
For important safety information, always refer to the User and safety guide of each device.
Welcome
Welcome to the world of home automation. We’re glad to have you on board! Your Shelly Smart Home Starter Kit includes four devices and endless possibilities - from controlling lights and appliances to detecting motion, measuring power consumption, and triggering actions with the press of a button. This guide will help you make the most of your Smart Home Starter Kit - from setting up your devices to using them together.
The Shelly Smart Home Starter Kit includes:
-
Shelly Plug M Gen3
-
Shelly BLU Motion ZB
-
Shelly Multicolor Bulb E27 Gen3
-
Shelly BLU Button Tough 1 (choose between colors Mocha and Ivory)
This Starter Kit combines devices that can detect motion, respond automatically, or let you take control manually from your phone or with a button. You can even create some automations to use your devices as a part of a home security alarm system. The motion sensor can detect you entering a room and then trigger an automation which turns on the bulb. The Button Tough can turn the bulb or Plug M on and off without opening the app. The Plug M can control an appliance and show how much power it uses.
The devices can operate standalone in a local Wi-Fi network or be connected to cloud services, and include an embedded web interface for setup, monitoring, and control. When connected directly to the device's access point, or at the device's IP address on the local Wi-Fi network you can access the Shelly® device's embedded Web Interface at http://192.168.33.1. The devices integrate flawlessly with Apple Home, Alexa, Google Home, SmartThings and Home Assistant.
In this guide, we focus on setting up and managing your devices with the Shelly Smart Control app. Shelly Smart Control is a home automation app for managing and controlling Shelly home automation devices. It provides a user-friendly interface that lets you control and organize all your Shelly devices in one place.
This guide will help you set up the devices in your Starter Kit and add them to the Shelly Smart Control app. You will learn how to control your lights and appliances remotely, monitor power consumption, and create schedules and automations.
Why start with this kit
-
Start with easy-to-use versatile devices
-
Control lights and plugged-in appliances from your phone
-
Detect motion and automatically trigger actions using scenes
-
Control devices with the press of a button
-
Monitor power usage and make more informed energy-saving decisions
How is this guide useful
-
Introduces key features of the devices included in the Starter Kit
-
Helps you create your first automation step by step using the Shelly Smart Control app
-
Offers ideas for additional use cases and automations
-
Provides useful links and resources to help you continue your home automation journey
What is included
This section provides short descriptions of the devices included in the Shelly Smart Home Starter Kit. For detailed information about the individual devices, see the Product documentation section.
Shelly Plug M Gen3
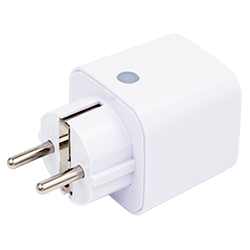
Shelly Plug M Gen3 is a smart plug with power measurement, overheating protection, and Wi-Fi and Bluetooth connectivity. It allows remote control and monitoring of appliances through a mobile phone, tablet, PC, or home automation system.
Shelly BLU Motion ZB
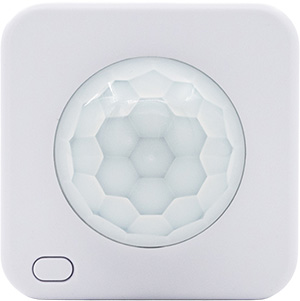
Shelly BLU Motion ZB is a compact, battery-powered motion sensor designed to bring smart automation to any space without wiring or drilling. It detects movement and ambient brightness, making it ideal for automating lights, scenes, and notifications based on real activity and actual room conditions.
Shelly Multicolor Bulb E27 Gen3
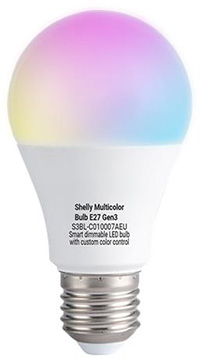
Shelly Multicolor Bulb E27 Gen3 is a smart Wi-Fi and Bluetooth dimmable LED bulb with custom color control. It supports two modes - Color and White. In Color mode, full color support is provided, while in White mode, color temperature can be adjusted from 2700 K (warm) to 6500 K (cool).
Shelly BLU Button Tough 1
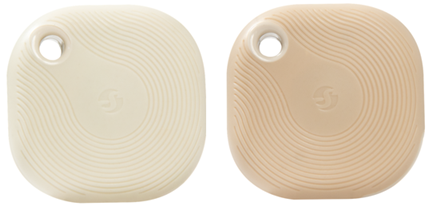
Shelly BLU Button Tough 1 is a smart shock, water, and dust-resistant Bluetooth button of a compact size. It features a long battery life, supports multi-click, and strong encryption.
How to use your Shelly devices
Shelly devices can work together to automate your home and simplify your day-to-day life. Below are simple diagrams showing how the devices in your Starter Kit can interact with one another.
Motion detection
BLU Motion ZB → detects movement → automation runs → Bulb turns on
Automatic response
Trigger → Shelly automation → Bulb / Plug M
Manual control
Button Tough → press → Bulb / Plug M / Scene
In the next sections, you’ll find step-by-step instructions for setting up your devices and using them together.
Getting started
For important safety information, always refer to the User and safety guide included with each device.
In this section, you will learn how to set up the Shelly Smart Control app and configure the devices included in the Starter Kit. You will get to know the main features and set up steps necessary to start automation your home.
Creating an account
-
Download the Shelly Smart Control app:
-
Open the app and create an account, or sign in if you already have one, by following the steps shown on your screen.
Set up your account
-
Customize your profile by choosing a name and profile picture.
-
Go to All Rooms and create your first room. This is where you’ll organize and add your devices.
-
Tap the

Set up your devices using the Shelly app
After you power on your Shelly device, its access point and Bluetooth connectivity remain active for 15 minutes. You can connect your device to the Shelly Smart Control application during this time frame. To reactivate the access point after the time frame, follow the instructions in the The key features you need to know before using the device section.
Shelly Plug M Gen3
The key features you need to know before using the device:
-
One push button
-
Single press: Toggle the output On/Off.
-
Press and hold for 3 s: Show device status (Possible only when the output is Off).
-
Press and hold for 5 s: Enable Wi-Fi AP and Bluetooth (within 60 s after power-up).
-
Press and hold for 10 s: Perform factory reset (within 60 s after power-up).
-
-
LED indication
-
Device status:
-
Blue light flashing: AP mode active.
-
Red light flashing slowly: Reconnecting to Wi-Fi.
-
Constant red light: Failed to reconnect to Wi-Fi.
-
Red light flashing rapidly: Firmware update (OTA) in progress.
-
-
When output is on:
-
Green-Yellow-Red transition: By default indicates power consumption (0%-50%-100% of limit).
-
-
When output is off:
-
LED Off: Default state.
-
-
Set up your device and connect it in the Shelly app using the following steps:
-
Open the device’s box. Inside, you’ll find the Shelly Plug M Gen3 device, its User and safety guide, and a QR code for the Shelly Facebook Support group.
-
Read the User and safety guide before installing and using the device.
-
Remove the protective cap and plug the Plug M Gen3 device into a compatible power socket.
-
Open the Shelly Smart Control app.
-
Tap the
-
Select your inclusion method.
-
Select Plug M Gen3 when it appears.
-
Enter your Wi-Fi credentials when prompted.
-
Give the device a name and choose an icon.
-
Assign it to the room you created earlier.
-
Once the device has been added successfully, continue with the next device in your Starter Kit.
Shelly BLU Motion ZB
The key features you need to know before using the device:
-
One push button
-
Press 4 times quickly: Put Shelly BLU Motion ZB into pairing mode. The LED starts flashing in blue for one minute.
-
Press 5 times quickly: Activate Zigbee pairing. The LED starts flashing purple for one minute.
-
Press and hold for 30 s: Perform a factory reset. The LED will flash in red for two seconds and the device will restart.
-
-
The device will broadcast every motion detection, indicating it by a red flash. This LED flash can be turned off from the Shelly app.
To use Shelly BLU Motion ZB with the Shelly Smart Control app, you need a permanently powered Shelly Wi-Fi and Bluetooth device (Gen2 or newer) to act as a Bluetooth gateway. In this Starter Kit, Shelly Plug M Gen3 can act as the gateway. Make sure you have already added your Plug M Gen3 to the app before continuing.
Setup your device and connect it in the Shelly app using the following steps:
-
Open the device’s box. Inside, you’ll find the Shelly BLU Motion ZB, its User and safety guide, double-coated adhesive tape, and a QR code for the Shelly Facebook Support group.
-
Read the User and safety guide before installing and using the device.
-
Pull out the protective battery tab to power on the device.
-
Open the Shelly Smart Control app.
-
Tap the
-
Choose the option to add a device via Bluetooth.
-
Select Shelly BLU Motion ZB when it appears.
-
When prompted, select a device to act as the Bluetooth gateway. For this Starter Kit, select your Plug M Gen3.
-
Give the device a name and choose an icon.
-
Assign it to the room you created earlier.
-
Once the device has been added successfully, place it in the area where you want to detect motion, and continue with the next device in your Starter Kit.
Shelly Multicolor Bulb E27 Gen3
The key features you need to know before using the device:
-
AP and Bluetooth activation - temporarily enable the bulb’s Wi-Fi Access Point and Bluetooth so you can connect to it.
-
Turn the light off if it is currently on.
-
Turn the light on and off 2 times, allowing 3 seconds between toggles.
-
Turn on the light.
In 3 seconds, the AP and the Bluetooth should be enabled.
AP and Bluetooth stay enabled for 15 min.
-
-
Factory reset
-
Turn the light off if it is currently on.
-
Turn the light on and off 4 times, allowing 3 seconds between toggles.
-
Turn on the light.
The bulb should light up with neutral white (4500 K) at 50% brightness to confirm it has been reset to factory defaults.
-
Set up your device and connect it in the Shelly app using the following steps:
-
Open the device’s box. Inside, you’ll find the Shelly Multicolor Bulb E27 Gen3 and its User and safety guide.
-
Read the User and safety guide before installing and using the device.
-
Open the Shelly Smart Control app.
-
Tap the
-
Select your inclusion method.
-
Select Shelly Multicolor Bulb E27 Gen3 when it appears.
-
Enter your Wi-Fi credentials when prompted.
-
Give the device a name and choose an icon.
-
Assign it to the room you created earlier.
-
Once the device has been added successfully, continue with the next device in your Starter Kit.
Shelly BLU Button Tough 1
The key features you need to know before using the device:
-
One push button
-
Press and hold for 10 s to pair Shelly BLU Button Tough 1 with another Bluetooth device.
-
Press and hold for 30 s to factory reset (possible only shortly after inserting the battery).
-
To use Shelly BLU Button Tough 1 with the Shelly Smart Control app, you need a permanently powered Shelly Wi-Fi and Bluetooth device (Gen2 or newer) to act as a Bluetooth gateway. In this Starter Kit, Shelly Plug M Gen3 can act as the gateway. Make sure you have already added your Plug M Gen3 to the app before continuing.
Set up your device and connect it in the Shelly app using the following steps:
-
Open the device’s box. Inside, you’ll find the Shelly BLU Button Tough 1, its User and safety guide, an opening tool, and a QR code for the Shelly Facebook Support group.
-
Read the User and safety guide before installing and using the device.
-
Pull out the protective battery tab to power on the device.
-
Press the button 4 times quickly to enable Bluetooth pairing mode.
-
Open the Shelly Smart Control app.
-
Tap the
-
Select your inclusion method.
-
Select Shelly BLU Button Tough 1 when it appears.
-
When prompted, select a device to act as the Bluetooth gateway. For this Starter Kit, select your Plug M Gen3.
-
Give the button a name and choose an icon.
-
Assign it to the room you created earlier.
-
Once the device has been added successfully, you’re ready to create your first automation.
Create your first automation
What are scenes
Shelly Smart Control allows you to create scenes for automatic control of devices at predefined hours or based on other parameters like temperature, humidity or light (with available sensors in Shelly Smart Control). A Scene consists of a When condition, a Do action, and an Active time. To learn more in-depth information about scenes, go to More about scenes.
Step-by-step scene
Turn your smart bulb on with a push of a button
-
Open the App. In the My home menu you should see the 4 devices from the Starter Kit in the room you created while setting up your app.
-
If you don’t see your devices, check the All devices tap.
-
-
Go to the All scenes tab and tap the
-
Tap the Add condition button and configure the following settings to set the Button Tough device as trigger for your scene.
-
Add condition → Create condition → Device based → Select device Button → Button Push → Choose your preferred push button variation → Select Trigger → Save
-
-
Tap Next and tap Do to choose what the Multicolor Bulb should do:
-
Add action → Create action → Device action → Select device Bulb → Change state → Turn on Shelly device → Set desired brightness and color → Click Next → Save
-
-
Tap Next to configure Active time. For this example, leave the scene active at all times so the button can turn on the bulb whenever you press it.
-
Tap Next twice skipping the More options tab.
-
Select the room where your devices are.
-
Name and upload a picture to personalize the scene preview and save it.
-
Press the play button to test the automation. The bulb must light up when the condition is met.
Try creating a second Scene to turn the bulb off with another button press. This way, you can turn the light on when you start reading, switch it off when you’re ready to sleep, and turn it back on in the morning—all without getting out of bed.
More about Scenes
When
-
Add condition: Choose between create condition or import condition if you have already created one. Choose from the following conditions:
-
Device based: Select a room and a device from the dropdown menus, and select a device property from the dropdown menu. Once the device property has been selected, choose the condition for when the Shelly Device is on/off. Select the option to watch the property as a Condition or a Trigger. If chosen as a condition, the desired device state is checked, but the scene is not activated. If chosen as a trigger, the desired device state is checked, and the scene is activated. Click the Save button to save this condition.
-
Time based: Once selected, you must choose the Time-Based Condition from the dropdown menu:
-
timer: Create a timer for a scene to be executed every set number of minutes.
-
daily / weekly schedule: Create a daily or weekly schedule. Select the active day(s) and the start time. Type in, or use the up/down buttons, to set this time.
-
once: Select the date and start time.
-
Click the
Savebutton to save this condition.
-
-
When automation runs: Select automation of a Scene / Alarm Zone from the dropdown menu. Select a room from the dropdown menu, and then select a scene (which you can set as a condition when the scene is completed). Click the
Savebutton to save this condition. -
Manual execution: when you select this option, you need to play and pause the scene manually from the All scenes tab.
-
Weather based: (Premium setting) Select the prediction period for the weather prediction from the dropdown menu. Then choose the weather condition from the dropdown menu. Click the
Savebutton to save this condition. -
Sunrise/Sunset: (Premium setting) Select the option for Sunset / Sunrise. Specify the time Before/After Sunrise/Sunset. Select the time in hours and minutes from the dropdown menus.
-
You can have multiple conditions set per scene. There are two options when adding conditions: “And” and “OR”. Once you create a condition, you can add another condition by clicking Add condition located below “And”. In this case all of the added conditions must be met in order for the scene action(s) to be executed. However, if you click the Add condition button below “OR”, then the scene action(s) will be executed if any of the conditions are met. You can add as many conditions as you want to suit your needs. Due to Shelly Devices having different functionalities, there are a variety of settings you can choose from to set up your condition.
Do
Add actions to your scene to be executed when the set conditions are met. Select an action from the following options:
-
Device action: Select the room and device, and then configure action to device specific settings.
-
Notification: Select the notification type from the dropdown menu. Choose from the following options: Phone notification / Email notification / Add to event log / Notify Alexa.
-
Play automation: Select the group. scene, or alarm to be executed.
You can add many actions to be executed at the same time by clicking the Add action button. Due to Shelly Devices having different functionalities, there are a variety of settings you can choose from to set up your actions.
Active time
-
Choose weekday: Select the day(s) of the week by clicking the corresponding checkbox.
-
Choose time interval: Click up/down button, or type in a number, to set a time in hours and minutes.
Discover more possibilities
Additional use cases
-
Prevent forgotten appliances from wasting energy: Monitor and control all plugged-in appliances easily with just a few clicks on your phone. With the built-in countdown timer and locally stored schedules, Shelly Plug M Gen3 can automatically switch off appliances after a user defined period even without internet.
Example: night lamps, fans, irons, portable ovens, electric heaters. -
Automatic laundry / appliance cycle notification: Shelly Plug M Gen3 detects when an appliance’s power consumption drops, allowing you to receive a notification when a washing machine, dishwasher, or dryer finishes its cycle.
-
Add motion awareness near entryways: Place BLU Motion ZB near an entryway and create a Scene that triggers a notification or turns on a light when unexpected motion is detected.
-
Sync your lights with sunrise and sunset times: Set smart schedules - use dimming/brightening functionalities to mimic the sunrise to gently wake you up with light, following your body's circadian rhythm.
-
Control a connected heater more conveniently: Use the app to control it from your phone, or create a Scene and trigger it with Button Tough.
-
Light a hallway only when needed: Install BLU Motion ZB in a hallway to automatically switch on lights only when someone passes by and the lux sensor reports low ambient light. This reduces energy usage by avoiding unnecessary lighting during the day while ensuring safe, hands-free navigation at night.
-
Lighting control: Assign a button to control specific lighting scenes or individual smart lights. For example, a single press could turn on/off the lights, while a long-term press could dim or brighten them.
Need further instructions about scenes? Check those step-by-step instructions.
Control a connected heater more conveniently
Automate your heater using Scenes. For this automation you’ll need Shelly Plug M Gen3 and Shelly BLU Button Tough 1 ZB.
Before connecting a portable heater, make sure its rated load does not exceed the Plug M Gen3 limits and that the heater manufacturer allows this type of external control. Always follow the safety instructions for both devices. Check the User and safety guide for further information.
-
Plug in your portable heater into the Plug M.
-
Open the App.
-
Go to the All scenes tab and tap the
-
Tap the Add condition button and configure the following settings to set the Button Tough device as trigger for your scene.
-
Add condition → Create condition → Device based → Select device Button → Button Push → Choose your preferred push button variation → Select Trigger → Save
-
-
Tap Next and tap Do to choose what the Plug M should do:
-
Add action → Create action → Device action → Select device Plug → Change state → Turn on Shelly device → Click Next → Save
-
-
Tap Next to configure Active time. For this example, leave the Scene active at all times so the button can turn on the heater whenever you press it.
-
Tap Next twice skipping the More options tab.
-
Select the room where your devices are.
-
Name and upload a picture to personalize the scene preview and save it.
Try creating a second Scene to turn the heater off with another button press. This way, you can turn the heater off when you’re ready to sleep and turn it on in the morning—all without getting out of bed.
Light a hallway only when needed
-
Open the App.
-
Go to the All scenes tab and press the
-
Tap the Add condition button and configure the following settings to set the Motion sensor as trigger for your scene.
-
Add condition → Create condition → Device based → Select device Motion sensor → Property Motion → Detected motion → Select Trigger → Save
-
-
Tap Next and tap Do to choose what the Multicolor Bulb should do:
-
Add action → Create action → Device action → Select device Bulb → Change state → Turn on Shelly device → Set desired brightness and color → Click Next → Save
-
-
Tap Next to configure Active time.
-
Tap Next twice skipping the More options tab.
-
Select the room where your devices are.
-
Name and upload a picture to personalize the scene preview and save it.
Try creating a second Scene to turn the bulb off when there is no motion detected.
Expand your smart home
As your smart home grows, you can add more Shelly devices to the same Shelly Smart Control account and organize them in your existing rooms, Groups, schedules, and Scenes.
-
More smart bulbs and lights — extend automated lighting to other rooms.
-
Smart plugs and relays — control more appliances and electrical circuits.
-
Door and window sensors — trigger actions when a door or window is opened.
-
Temperature and humidity sensors — create automations based on room conditions.
-
Additional buttons and sensors — add convenient controls and more automation triggers.
Looking for more ideas? Explore additional Shelly use cases.
Personalize your setup
You can personalize both the Shelly Smart Control app and your devices to suit your preferences. In the app, you can create different rooms and device groups to organize your smart home in a way that works best for you. Depending on the device, you can also adjust its settings to fit best in your home. In this section, you can take a closer look at some of the available personalization options.
App personalization
My Home Page
The Home page allows you to navigate between, configure, and create new Rooms, Groups, Scenes, Devices, and Alarms. Click on the tabs across the top of the page to navigate to the desired page. Let’s explore your options and how to personalize them to your likings.
Name and organize your devices
Naming your devices is especially useful as you add more devices to your smart home. A simple approach is to name them by location and function, for example Bedside Bulb or Coffee Machine Plug. Assign each device to the room where it is used. You can rename devices or move them to another room later.
All Rooms
The Rooms page will show all the rooms you create. In the toolbar located above your rooms list observe three buttons: add, edit, and info.
Add room
Set a room name, and select a room image or upload your own. You will then be taken to the page of your room, and given the option to add a device. Your newly added room will appear on the Rooms page of your app. Once on the specific room page, click the Add Device button to add a Shelly Device to the room.
Edit
Edit the Rooms page. Click the move icon of the item you wish to change the position of, and drag it to the desired position. Click the edit icon of the item you wish to change. Click the trash icon of the item you wish to delete from this page. If you wish to exit Edit Mode, click the Exit Edit Mode button.
All Groups
The Group page will show all the groups you create. In the toolbar Groups observe a dropdown menu to filter what groups are displayed on the page from specific rooms, and three buttons: add, edit and info.
Shelly Devices can be grouped with other devices in the application in order to control them together. Turn on/off all your devices at once by pressing the green/red power button ⏻ of the group.
Groups allow you to control compatible devices together. This can be useful as you expand your smart home and add more Shelly devices.
Schedules
Set your devices to perform actions automatically at specific times. Open a device in the Shelly Smart Control app and select the Schedules tab. Choose when the desired time window, then select the action you want the device to perform. For example, you can lower the bulb’s brightness after 6:00 PM or schedule the Plug M to turn off a connected appliance during certain hours.
Scenes
You can also personalize when your scenes run. Use Active time to limit a Scene to certain days or hours, and add conditions to make an automation more specific. For example, you can set a motion-based Scene to turn on the bulb only during the evening.
Device personalization
Shelly BLU Motion ZB
Open Shelly Smart Control App. Select the room where the device is located and open Device settings. Adjust the Sensitivity to change how easily motion is detected. You can also adjust the Blind time, which controls how soon the sensor can report another motion event after a detection. Try different settings to find what works best for your space and routine.
Shelly Multicolor Bulb E27 Gen3
Open the Shelly Smart Control app and adjust the bulb’s brightness, color, and white temperature to suit your room and activity. Try warm white for relaxing or reading, cooler white for daytime, or choose a color to match your mood.
Shelly BLU Button Tough 1
The Button Tough supports different button-press actions. Assign a Scene to each supported press type and control more than one device. For example, you could use short press to turn on the bulb and long press to turn on the Plug M.
Shelly Plug M Gen3
Open the Shelly Smart Control app and change the LED indication color mode and brightness. You can change the room the device is in, its picture and preview in the app.
Product documentation
You can find detailed information about each device in the Shelly Knowledge Base and in the User and safety guide per each product. These resources provide information about key features, technical specifications, compatibility, installation, and safe use.
For more information about the devices in the context of the Shelly Cloud Control app, go to https://kb.shelly.cloud/knowledge-base/shelly-smart-control-guide .
Shelly Plug M Gen3
-
Knowledge Base - https://kb.shelly.cloud/knowledge-base/shelly-plug-m-gen3
-
Printed User and safety guide
Shelly BLU Motion ZB
-
Knowledge Base - https://kb.shelly.cloud/knowledge-base/shelly-blu-motion-zb
-
Printed User and safety guide
Shelly Multicolor Bulb E27 Gen3
-
Knowledge Base - https://kb.shelly.cloud/knowledge-base/shelly-multicolor-bulb-e27-gen3
-
Printed User and safety guide
Shelly BLU Button Tough 1
-
Knowledge Base - https://kb.shelly.cloud/knowledge-base/shelly-blu-button-tough-1
-
Printed User and safety guide
Help and support
This section covers common issues you may encounter when setting up your Starter Kit. You’ll also find answers to frequently asked questions. At the end of the section, you’ll find useful links in case you need further assistance.
Having trouble setting up a device?
Device does not appear in the app
-
Make sure the device is powered on.
-
Make sure Bluetooth is enabled on your phone.
-
Put the device into Bluetooth pairing mode.
-
Keep your phone close to the device during setup.
-
Restart your phone or device if needed.
BLU Motion ZB or BLU Button Tough does not connect
-
Make sure your Plug M Gen3 is powered on and online.
-
Make sure the Plug M Gen3 has already been added to Shelly Smart Control.
-
Use the Plug M Gen3 as the Bluetooth gateway when prompted.
Wi-Fi device does not connect
-
Check that you entered the correct Wi-Fi credentials.
-
Make sure the device is within range of your Wi-Fi network.
-
Put the device into pairing mode again and retry the setup.
Frequently asked questions
Useful links
-
Facebook community support group - https://www.facebook.com/groups/ShellyIoTCommunitySupport/
-
Community forum - https://community.shelly.cloud/
-
Shelly Support - https://support.shelly.cloud/en/support/home
-
Knowledge Base - https://kb.shelly.cloud/knowledge-base