
Read before use
This document contains important technical and safety information about the device, its safety use and installation.
⚠ ATTENTION! Before beginning the installation, please read carefully and entirely this guide and any other documents accompanying the device. Failure to follow the installation procedures could lead to malfunction, danger to your health and life, violation of the law or refusal of legal and/or commercial guarantee (if any). Shelly Europe Ltd is not responsible for any loss or damage in case of incorrect installation or improper operation of this device due to failure of following the user and safety instructions in this guide.
Introduction to Shelly®
Shelly® is a line of innovative microprocessor-managed devices, which allow remote control of electric circuits through a mobile phone, tablet, PC, or home automation system. Shelly® devices can work standalone in a local Wi-Fi network, or they can be operated through cloud home automation services. Shelly Cloud is a service that can be accessed using either the Android or iOS mobile application, or with any internet browser at https://home.shelly.cloud/.
Shelly® devices can be accessed, controlled and monitored remotely from any place where the User has internet connectivity, as long as the devices are connected to a Wi-Fi router and the Internet.
When connected directly to the device's access point, or at the device's IP address on the local Wi-Fi network, the User can access the Shelly® device's embedded Web Interface at http://192.168.33.1. The embedded Web Interface can be used to monitor and control the device, as well as adjust its settings.
Shelly® devices can communicate directly with other Wi-Fi devices through HTTP protocol. An API is provided by Shelly Europe Ltd. For more information, please visit: https://shelly-api-docs.shelly.cloud/#shelly-family-overview.
Shelly® devices are delivered with factory-installed firmware. If firmware updates are necessary to keep the devices in conformity, including security updates, Shelly Europe Ltd will provide the updates free of charge through the device embedded Web Interface or Shelly Mobile Application, where the information about the current firmware version is available. The choice to install or not the Device firmware updates is the User’s sole responsibility. Shelly Europe Ltd shall not be liable for any lack of conformity of the Device caused by failure of the User to install the provided updates in a timely manner.
Shelly® Pro devices are DIN mountable inside the breaker box, and highly suitable for new building construction. All Shelly® Pro devices can be controlled and monitored through Wi-Fi and LAN connections. Bluetooth connection can be used for the inclusion process.
Control your home with your voice
Shelly® devices are compatible with Amazon Alexa and Google Home supported functionalities. Please see our step-by-step guide on: https://shelly.cloud/support/compatibility/.
Use case
This use case explains how using Shelly Pro 1/1PM V1 (the Device) you can turn on/off lights in a room, hall or corridor from a mobile device and/or multiple physical switches in key locations.
Learn more about Shelly Pro 1 and Shelly Pro 1PM.
Installation
⚠WARNING! Danger of electrocution. Mounting/installation of the Device to the power grid has to be performed with caution, by a qualified electrician!
⚠WARNING! Danger of electrocution. Every change in the connections has to be done after ensuring there is no voltage present at the Device terminals!
⚠CAUTION! Use the Device only with a power grid and appliances which comply with all applicable regulations. A short circuit in the power grid or any appliance connected to the Device may damage the Device!
⚠CAUTION! Тhe Device may be connected to and may control electric circuits and appliances only if they comply with the respective standards and safety norms!
⚠CAUTION! Do not connect the Device to appliances exceeding the given max load!
⚠CAUTION! Connect the Device only in the way shown in these instructions. Any other method could cause damage and/or injury!
⚠CAUTION! Do not use the Device if it has been damaged!
⚠CAUTION! Do not attempt to service or repair the Device yourself!
Mounting
⚠CAUTION! Before mounting the Device, turn the circuit breakers off, and check that there is no voltage on their terminals. This can be done with a phase tester or multimeter. When you are sure that there is no voltage, you can proceed to mounting and wiring the Device.
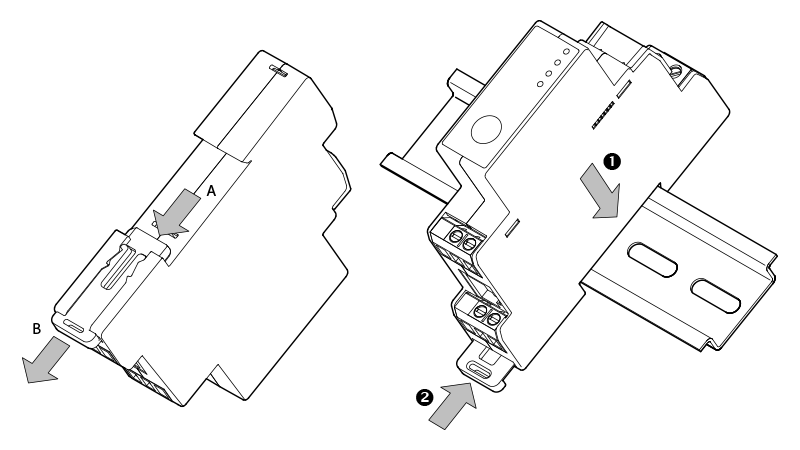
Open the mounting bracket by either pressing it from the inside (A) or pulling it out using a screw driver (B), as shown on the image above.
Place Shelly Pro 1/1PM on the DIN rail (1) and push the mounting bracket back to fix Shelly Pro 1/1PM to the DIN rail (2).
Wiring
Legend
|
Terminals |
|
Cables |
|
|---|---|---|---|
|
I |
Load circuit input terminal |
L |
Live (110-240 V) line |
|
O |
Load circuit output terminal |
N |
Neutral line |
|
SW1, SW2 |
Switch/button inputs |
|
|
|
L |
Live (110-240 V) terminal |
|
|
|
N |
Neutral terminal |
|
|
|
LAN |
Local Area Network RJ 45 connector |
|
|
Connections
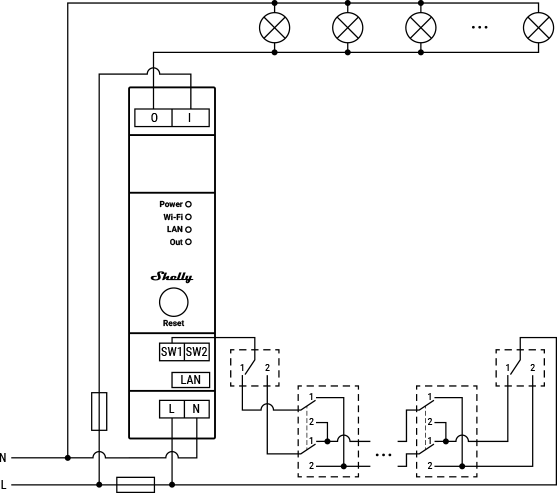
Create the lights circuit by connecting all the lights in parallel.
Connect the Neutral lights circuit cable to the Neutral line, and the Live light circuit cable to the Device O terminal in compliance with your local regulations.
Connect the Device N terminal to the Neutral line.
Mount a circuit breaker for the lights circuit. Choose the circuit breaker with a current rating corresponding to the connected lights power.
Connect the circuit breaker input terminal to the Live line and the Device I terminal to the circuit breaker output terminal.
Mount another circuit breaker for the Device power supply and the controlling circuit, and connect its input terminal to the Live line.
Connect the Device L terminal to the output terminal of the circuit breaker for the Device power supply.
Create the controlling circuit by connecting all the switches you want to use to turn on and off the lights as shown on the wiring diagram above.
Connect one of the controlling circuit cables to the output terminal of the circuit breaker for the Device power supply, and the other to the Device SW1 terminal.
Plug a LAN cable to the Device RJ 45 connector, if you want to control the Device over an Ethernet network.
⚠CAUTION! Plug in or unplug the LAN cable only when the Device is powered off! The LAN cable connector must not be metallic in the parts touched by the user to plug in or unplug the cable.
Make sure you have connected the devices properly and then turn on the circuit breakers.
Setup
The red Power LED will be on if the Device is powered, and the Wi-Fi multicolor LED will be on with a blue light indicating the Device access point (AP) is activated.
The green LAN LED will be on if the device is connected to an Ethernet network.
Controlling the Device using its embedded Web Interface
Connect to the Device AP (ShellyPro1-XXXXXXXXXXXX/ShellyPro1PM-XXXXXXXXXXXX). Type http://192.168.33.1 in your browser to access the embedded Web Interface.
Click on the Input (0) bar under Switches and attached inputs in the Home screen. Click on the Settings tab. Click on Input mode. Select Switch and click on the Save settings button.
Click on the displayed output (labelled as Output(0)) in the Home page under Switches and attached inputs to access the output settings. Next, in Action on power on select Match input.
Additionally, in the output settings you want to make sure that Switch mode is set to Follow.
Now you can continue with setting up the Device. Check Shelly Pro1 or Shelly Pro 1PM Web Interface Manuals.
Controlling the Device using applications or cloud services
If you choose to use the Device with the Shelly Cloud mobile application and Shelly Cloud service, instructions on how to connect the Device to the Cloud and control it through the Shelly App can be found in the Shelly Smart Control Guide.
The Shelly Mobile Application and Shelly Cloud service are not conditions for the Device to function properly. This Device can be used stand-alone or with various other home automation platforms and protocols.
Power measurement
If you use Shelly Pro 1PM you will be able to measure the momentary voltage and power levels.
Shelly Cloud service allows you to also store statistical data of the energy consumption of your lights within a year.