Read before use
This document contains important technical and safety information about the device, its safety use and installation.
⚠ ATTENTION! Before beginning the installation, please read carefully and entirely this guide and any other documents accompanying the device. Failure to follow the installation procedures could lead to malfunction, danger to your health and life, violation of the law or refusal of legal and/or commercial guarantee (if any). Shelly Europe Ltd is not responsible for any loss or damage in case of incorrect installation or improper operation of this device due to failure of following the user and safety instructions in this guide.
Introduction to Shelly®
Shelly® is a line of innovative microprocessor-managed devices, which allow remote control of electric circuits through a mobile phone, tablet, PC, or home automation system. Shelly® devices can work standalone in a local Wi-Fi network, or they can be operated through cloud home automation services. Shelly Cloud is a service that can be accessed using either the Android or iOS mobile application, or with any internet browser at https://home.shelly.cloud/.
Shelly® devices can be accessed, controlled and monitored remotely from any place where the User has internet connectivity, as long as the devices are connected to a Wi-Fi router and the Internet.
When connected directly to the device's access point, or at the device's IP address on the local Wi-Fi network, the User can access the Shelly® device's embedded Web Interface at http://192.168.33.1. The embedded Web Interface can be used to monitor and control the device, as well as adjust its settings.
Shelly® devices can communicate directly with other Wi-Fi devices through HTTP protocol. An API is provided by Shelly Europe Ltd. For more information, please visit: https://shelly-api-docs.shelly.cloud/#shelly-family-overview.
Shelly® devices are delivered with factory-installed firmware. If firmware updates are necessary to keep the devices in conformity, including security updates, Shelly Europe Ltd will provide the updates free of charge through the device embedded Web Interface or Shelly Mobile Application, where the information about the current firmware version is available. The choice to install or not the Device firmware updates is the User’s sole responsibility. Shelly Europe Ltd shall not be liable for any lack of conformity of the Device caused by failure of the User to install the provided updates in a timely manner.
Control your home with your voice
Shelly® devices are compatible with Amazon Alexa and Google Home supported functionalities. Please see our step-by-step guide on: https://shelly.cloud/support/compatibility/.
Short description
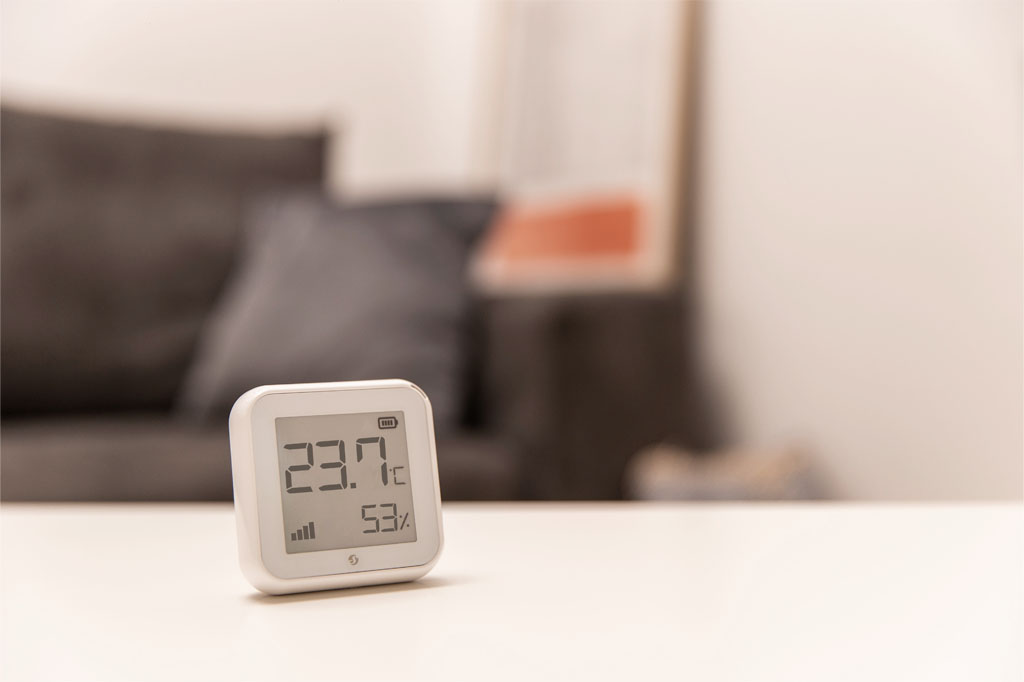
Shelly Plus H&T (the Device) is a Wi-Fi smart humidity and temperature sensor, featuring a large e-paper graphic display.
Learn more about Shelly Plus H&T and its specifications.
Installation
⚠CAUTION! Do not use the Device if it has been damaged!
⚠CAUTION! Do not attempt to service or repair the Device yourself!
1. Power supply
Shelly Plus H&T can be powered by 4 AA (LR6) 1.5 V batteries or a USB Type-C power supply adapter.
⚠CAUTION! Use the Device only with batteries or USB Type-C power supply adapter that comply with all applicable regulations. Inappropriate batteries or power supply adapters may damage the Device and cause fire.
A. Batteries
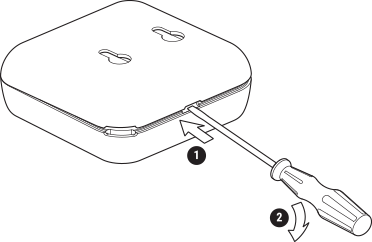
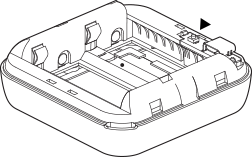
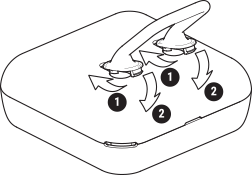
Remove the Device back cover using a flat screwdriver as shown above, insert the bottom row batteries and then the top row batteries as shown below.
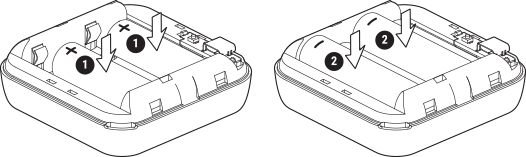
⚠CAUTION! Make sure the batteries + and - signs correspond to marking on the Device battery compartment.
B. USB Type-C power supply adapter
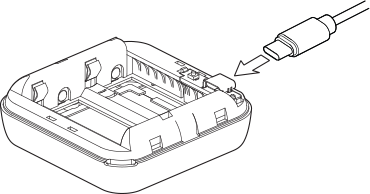
Insert the USB Type-C power supply adapter cable into the Device USB Type-C port.
⚠CAUTION! Do not connect the adapter to the Device if the adapter or the cable are damaged.
⚠CAUTION! Unplug the USB cable before removing or placing the back cover.
⚠IMPORTANT: The Device cannot be used to charge rechargeable batteries.
2. Starting
When initially powered the Device will be put in Setup mode and the display will show SEt instead of the temperature. By default the Device access point is enabled, which is indicated by AP in the bottom right corner of the display. If it is not enabled, press and hold the Reset button for 5 seconds to enable it.
⚠IMPORTANT: To save the batteries the Device stays in Setup mode for 3 minutes and then goes to Sleep mode and the display will show the measured temperature. Press briefly the Reset button to bring it back to Setup mode. Pressing briefly the Reset button while the Device is in Setup mode will put the Device to Sleep mode.
3. Inclusion to Shelly Cloud
If you choose to use the Device with the Shelly Cloud mobile application and Shelly Cloud service, instructions on how to connect the Device to the Cloud and control it through the Shelly App can be found in the Shelly Smart Control Guide.
The Shelly Mobile Application and Shelly Cloud service are not conditions for the Device to function properly. This Device can be used stand-alone or with various other home automation platforms and protocols.
⚠CAUTION! Do not allow children to play with the buttons/switches connected to the Device. Keep the devices for remote control of Shelly (mobile phones, tablets, PCs) away from children!
4. Connecting manually to a local Wi-Fi network
Shelly Plus H&T can be managed and controlled through its embedded web interface. Make sure the Device is in Setup mode, its access point (ShellyPlusHT-XXXXXXXXXXXX) is enabled and you are connected to it using a Wi-Fi enabled device. From a web browser open the Device Web Interface by navigating to http://192.168.33.1. Click the Networks button and then expand the Wifi section.
Enable the Wifi1 and/or Wifi2 (backup network) by toggling the corresponding Enable switch. Enter the Wi-Fi network name(s) (SSID) or select it(them) by clicking on the gray Click here to select network link(s). Enter the Wi-Fi network password(s) and click APPLY.
The Device URL will appear in blue color at the top of the Wifi section, when the device is successfully connected to the Wi-Fi network.
Read the complete Shelly Plus H&T web interface guide.
⚠RECOMMENDATION: For security reasons we recommend disabling or password protecting the Device AP (Networks / Access Point), after the Device successful connection to the local Wi-Fi network.
When ready including the Device to Shelly Cloud or another service, place the back cover.
⚠CAUTION! Unplug the USB cable before removing or placing the back cover.
5. Attaching the stand
If you want to place the Device on your desk, on a shelf or any other horizontal surface, attach the stand as shown above.
6. Wall mounting
If you want to mount the Device on a wall or any other vertical surface use the back cover to mark the wall where you want to mount the Device.
⚠CAUTION! Do not drill through the back cover.
Use screws with head diameter between 5 and 7 mm and max 3 mm thread diameter to fix the Device to a wall or another vertical surface.
Another option to mount the Device is using a double sided foam sticker.
⚠CAUTION! The Device is intended for indoor use only!
⚠CAUTION! Protect the Device from dirt and moisture!
⚠CAUTION! Do not use the Device in a damp environment and avoid water splashing.
Reset button actions
Press briefly:
-
If the Device is in Sleep mode, puts it in Setup mode.
-
If the Device is in Setup mode, puts it in Sleep mode.
Press and hold for 5 sec: If the Device is in Setup mode, enables its access point.
Press and hold for 10 sec: If the Device is in Setup mode, factory resets the Device.
Display

|
|
The Device is in Setup mode. |
|
|
The Device access point is enabled. |
|
|
Humidity readings |
|
|
The Device is receiving over-the-air update. Shows the progress as a percentage instead of the humidity. |
|
|
The Device has reported current readings to the Cloud. If missing, the current readings on the display are not yet reported. In this case, the readings on the display may differ from the ones in the Cloud. |
|
|
Wi-Fi signal strength indicator |
|
|
Indicates battery level. Shows an empty battery when only USB powered. |
|
|
Bluetooth connectivity is enabled. |
|
|
Error while updating the Device firmware. |