
Read before use
This document contains important technical and safety information about the device, its safety use and installation.
⚠ ATTENTION! Before beginning the installation, please read carefully and entirely this guide and any other documents accompanying the device. Failure to follow the installation procedures could lead to malfunction, danger to your health and life, violation of the law or refusal of legal and/or commercial guarantee (if any). Shelly Europe Ltd is not responsible for any loss or damage in case of incorrect installation or improper operation of this device due to failure of following the user and safety instructions in this guide.
Introduction to Shelly®
Shelly® is a line of innovative microprocessor-managed devices, which allow remote control of electric circuits through a mobile phone, tablet, PC, or home automation system. Shelly® devices can work standalone in a local Wi-Fi network, or they can be operated through cloud home automation services. Shelly Cloud is a service that can be accessed using either the Android or iOS mobile application, or with any internet browser at https://home.shelly.cloud/.
Shelly® devices can be accessed, controlled and monitored remotely from any place where the User has internet connectivity, as long as the devices are connected to a Wi-Fi router and the Internet.
When connected directly to the device's access point, or at the device's IP address on the local Wi-Fi network, the User can access the Shelly® device's embedded Web Interface at http://192.168.33.1. The embedded Web Interface can be used to monitor and control the device, as well as adjust its settings.
Shelly® devices can communicate directly with other Wi-Fi devices through HTTP protocol. An API is provided by Shelly Europe Ltd. For more information, please visit: https://shelly-api-docs.shelly.cloud/#shelly-family-overview.
Shelly® devices are delivered with factory-installed firmware. If firmware updates are necessary to keep the devices in conformity, including security updates, Shelly Europe Ltd will provide the updates free of charge through the device embedded Web Interface or Shelly Mobile Application, where the information about the current firmware version is available. The choice to install or not the Device firmware updates is the User’s sole responsibility. Shelly Europe Ltd shall not be liable for any lack of conformity of the Device caused by failure of the User to install the provided updates in a timely manner.
Use case
This guide describes how to monitor and control the level of the liquid in a container using Shelly Plus Add-on (the Device) and XKC-Y25-V capacitive non-contact liquid level detection sensor.
Learn more about Shelly Plus Add-on and its specifications.
Installation
⚠WARNING! Danger of electrocution. Mounting/installation of the Device to the power grid has to be performed with caution, by a qualified electrician!
⚠WARNING! Danger of electrocution. Every change in the connections has to be done after ensuring there is no voltage present at the Device terminals!
⚠CAUTION! Use the Device only with a power grid and appliances which comply with all applicable regulations. A short circuit in the power grid or any appliance connected to the Device may damage the Device!
⚠CAUTION! Тhe Device may be connected to and may control electric circuits and appliances only if they comply with the respective standards and safety norms!
⚠CAUTION! Do not connect the Device to appliances exceeding the given max load!
⚠CAUTION! Connect the Device only in the way shown in these instructions. Any other method could cause damage and/or injury!
⚠CAUTION! Do not install the device where it can get wet!
⚠CAUTION! Do not use the Device if it has been damaged!
⚠CAUTION! Do not attempt to service or repair the Device yourself!
Mounting
Shelly Plus Addon is intended to be attached to a Shelly Plus device (currently Shelly Plus 1, Shelly Plus 1PM, Shelly Plus 2PM, Shelly i4 and Shelly i4DC).
⚠CAUTION! If you are installing the Shelly Plus Add-on to a Shelly Plus device that is already connected to the power grid, check that the breakers are turned off and there is no voltage on the terminals of the Shelly Plus device you are attaching the Shelly Plus Add-on to. This can be done with a phase tester or multimeter. When you are sure that there is no voltage, you can proceed to installing the Shelly Plus Add-on.
Attach the Shelly Plus Add-on to the Shelly Plus device as shown below.
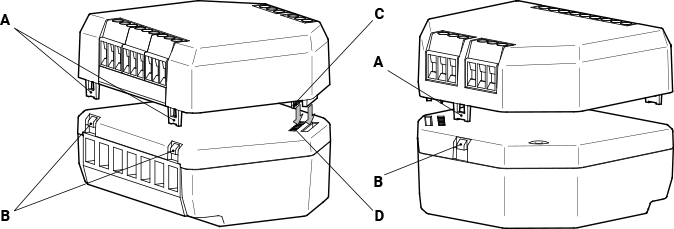
⚠CAUTION! Be very careful not to bend the Device header pins (C) when inserting them to the Shelly Plus device header connector (D).
Make sure the brackets (A) lock on the Shelly Plus device hooks (B) and then proceed to the Device wiring.
Wiring
Connect the two XKC-Y25-V sensors to Shelly Plus Add-on according to the schematic below.
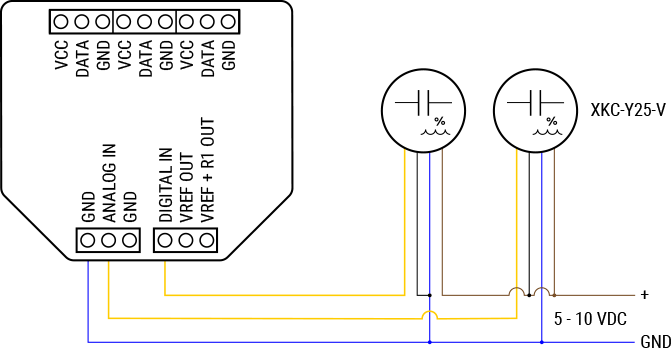
The Yellow wire from the sensor is its output. Connect the Yellow wires to the Device ANALOG IN and the DIGITAL IN inputs respectively.
The sensor output level is controlled by connecting the Black wire either to the ground wire of the sensors power supply for low level, or to the positive wire of the power supply for high level.
Since the DIGITAL IN input is triggered by low level signal, the Black wire or the sensor connected to that input has to be connected to the ground.
The Black wire of the sensor connected to the ANALOG IN input of the Device can be connected to any of the two (connected to the positive wire in this case).
Connect the Brown wires to the positive wire of the power supply and the Blue ones to the ground.
If you need to use a single sensor, we recommend using the DIGITAL IN input.
Adding the Shelly Plus Add-on peripherals to the Shelly Plus device
Connect to the Shelly Plus device to which the Shelly Plus Addon is attached to and type http://192.168.33.1 in your browser to access its embedded Web Interface.
Press the Add-on button in the Main menu. Press the Enable Add-on button. To complete the process you have to reboot the Shelly Plus device. Press Reboot now.
Now you have to add the Device inputs. Press the Add Peripherals button.
Select Digital Input and press Save settings. Reboot the Shelly Plus device.
Press Add Peripherals button.
Select Analog Input and press Save settings. Reboot the Shelly Plus device.
If you are using a single sensor skip adding the Analog Input.
Now you have to create Actions for each input.
Press the Input (100) bar (This is the Digital input. You can change the name, for example, to Upper level in the settings).
Press Actions tab. Create an action by pressing the New Action button. For more information on how the actions for the Add-on work for the different peripherals see Shelly Plus Add-on web interface guide.
Create the same way action for the Input (101) (The Analog input) if you are using two sensors.
Use the actions to toggle the relay(s) of the Shelly Plus device to which the Device is connected and/or control other Shelly devices in the same network.
You can keep the liquid level in a tank between the positions of the two sensors, by opening or closing, for example, a solenoid valve thus filling or emptying the tank.

⚠ATTENTION! You can use the XKC-Y25-V capacitive non-contact liquid level detection sensor only on non-metallic tanks.
⚠CAUTION! Make sure the sensors are secured on the tank wall. The detached sensor will not be able to detect the liquid, which may cause overflowing and flooding or other undesirable events.
⚠RECOMMENDATION! To prevent unexpected events in case of sensor malfunction or loss of connection to a device, we suggest that you set a Flip value after time for a local action, or enable Auto OFF time on the Shelly device(s) to automatically turn off the controlled appliance(s) after a certain period of time.
Using Shelly Cloud mobile application and Shelly Cloud service
If you choose to use the Device with the Shelly Cloud mobile application and Shelly Cloud service, you also use scenes to control other smart devices or receive notifications on your mobile device.
Instructions on how to connect the Shelly Plus Device to the Cloud and control it through the Shelly App can be found in the Shelly Application Guide.
The Shelly Mobile Application and Shelly Cloud service are not conditions for the Device to function properly. This Device can be used stand-alone or with various other home automation platforms and protocols.
⚠CAUTION! Do not allow children to play with the buttons/switches connected to the Device. Keep the devices for remote control of Shelly (mobile phones, tablets, PCs) away from children!