Read before use
This document contains important technical and safety information about the device, its safety use and installation.
⚠ ATTENTION! Before beginning the installation, please read carefully and entirely this guide and any other documents accompanying the device. Failure to follow the installation procedures could lead to malfunction, danger to your health and life, violation of the law or refusal of legal and/or commercial guarantee (if any). Shelly Europe Ltd is not responsible for any loss or damage in case of incorrect installation or improper operation of this device due to failure of following the user and safety instructions in this guide.
Introduction to Shelly®
Shelly® is a line of innovative microprocessor-managed devices, which allow remote control of electric circuits through a mobile phone, tablet, PC, or home automation system. Shelly® devices can work standalone in a local Wi-Fi network, or they can be operated through cloud home automation services. Shelly Cloud is a service that can be accessed using either the Android or iOS mobile application, or with any internet browser at https://home.shelly.cloud/.
Shelly® devices can be accessed, controlled and monitored remotely from any place where the User has internet connectivity, as long as the devices are connected to a Wi-Fi router and the Internet.
When connected directly to the device's access point, or at the device's IP address on the local Wi-Fi network, the User can access the Shelly® device's embedded Web Interface at http://192.168.33.1. The embedded Web Interface can be used to monitor and control the device, as well as adjust its settings.
Shelly® devices can communicate directly with other Wi-Fi devices through HTTP protocol. An API is provided by Shelly Europe Ltd. For more information, please visit: https://shelly-api-docs.shelly.cloud/#shelly-family-overview.
Shelly® devices are delivered with factory-installed firmware. If firmware updates are necessary to keep the devices in conformity, including security updates, Shelly Europe Ltd will provide the updates free of charge through the device embedded Web Interface or Shelly Mobile Application, where the information about the current firmware version is available. The choice to install or not the Device firmware updates is the User’s sole responsibility. Shelly Europe Ltd shall not be liable for any lack of conformity of the Device caused by failure of the User to install the provided updates in a timely manner.
Control your home with your voice
Shelly® devices are compatible with Amazon Alexa and Google Home supported functionalities. Please see our step-by-step guide on: https://shelly.cloud/support/compatibility/.
Short description
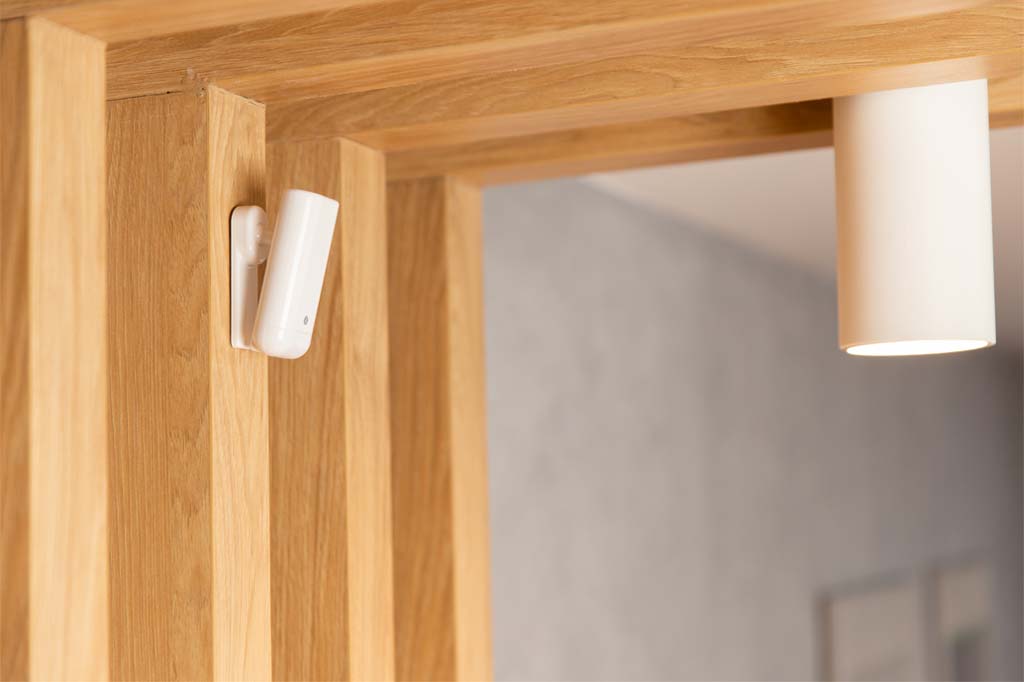
Shelly Motion 2 (the Device) is a high-sensitivity, ultra-low power consumption Wi-Fi motion sensor, which also features light and temperature metering. The built-in light and temperature sensors provide additional opportunities for home or office automation. Shelly Motion 2 also has an integrated accelerometer for tamper protection and features vibration detection. The built-in 6500 mAh rechargeable Li-ion battery allows the Device to stay connected to the Internet in standby mode for up to 3 years, and in active transmission (approx. 6 hours/day motion detection) estimated between 12 and 18 months without recharging.
Learn more about Shelly Motion 2 and its specifications
Installation
⚠CAUTION! Do not use the Device if it has been damaged!
⚠CAUTION! Do not attempt to service or repair the Device yourself!
1. Charging
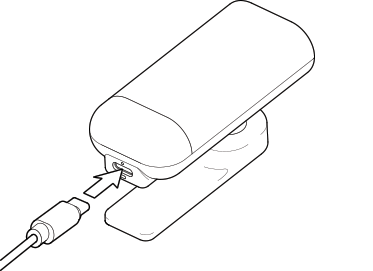
Prior to using the Shelly Motion 2, please fully charge its battery by plugging the USB Type-C charging adapter cable into the Device charging port.
⚠CAUTION! Use only charging adapters that comply with USB-C standard. Do not charge the Device if the charging adapter or the charging cable are damaged.
The red charging indicator above to the charging port will be on while the Device is charging. The indicator will go off when the battery is fully charged.
⚠IMPORTANT: The device heats up during charging, which prevents it from measuring the room temperature correctly.
2. Starting
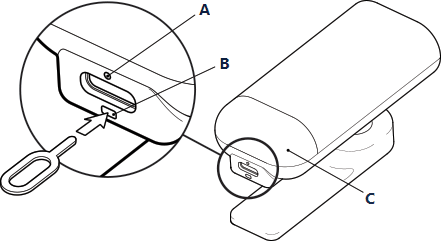
Press briefly the Reset button (B) using the pin in the packaging to turn on the Device.
⚠CAUTION! Be careful not to insert the pin into the round hole of the charging indicator (A). The reset button has an oblong shape (B).
The LED indicator behind the motion sensor lens (C) will start flashing in red, green and blue sequentially for a while and then turn steady blue. The Device is now in AP (access point mode).
⚠IMPORTANT: If the motion sensor detects movement while the Device is in AP mode the LED indication will briefly change to cyan.
⚠IMPORTANT: If the Device has not been added into your Wi-Fi network in 3 minutes, it will switch off. Press briefly the Reset button to start it again. Pressing the Reset button while the Device is in AP mode will turn off the Device.
3. Inclusion to Shelly Cloud
If you choose to use the Device with the Shelly Cloud mobile application and Shelly Cloud service, instructions on how to connect the Device to the Cloud and control it through the Shelly App can be found in the Shelly Smart Control Guide.
The Shelly Mobile Application and Shelly Cloud service are not conditions for the Device to function properly. This Device can be used stand-alone or with various other home automation platforms and protocols.
⚠CAUTION! Do not allow children to play with the buttons/switches connected to the Device. Keep the devices for remote control of Shelly (mobile phones, tablets, PCs) away from children!
4. Connecting manually to a local Wi-Fi network
The Device can be managed and controlled through its embedded web interface too. Make sure Shelly Motion 2 is in AP mode. Open the Device Web interface at http://192.168.33.1 when connected directly to the Device access point.
Click the Internet & Security button and then select WIFI MODE - CLIENT.
Check the Connect the Shelly device to an existing WiFi Network, enter the Wi-Fi network name and password, and click SAVE. Find your Device IP address in the Wi-Fi network. You can use a simple tool to find Shelly devices in the local network: https://shelly.cloud/documents/device_finders/ShellyFinderWindows.zip (Windows) and https://shelly.cloud/documents/device_finders/ShellyFinderOSX.zip (Mac OSX).
⚠IMPORTANT: Enabling the Client mode will disable the AP mode. In case you need the AP mode again, press and hold the Reset button for 5 seconds. Press and hold the Reset button for 10 seconds to factory reset the Device.
Read the complete Shelly Motion 2 Web Interface User Guide.
5. Attaching the stand
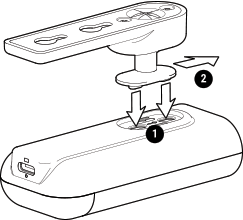
Insert the two L-shaped protrusions of the stand swivelling arm into the Device body’s oblong openings and then slide the stand in a direction opposite the charging port as shown above.
6. Wall mounting
Use the stencil printed at the end of the User and Safety Guide booklet (included in the packaging box) to mark the wall where you want to mount the Device.
Use screws with a head diameter between 5 and 8 mm.
⚠CAUTION! The Device is intended for indoor use only!
⚠CAUTION! Protect the Device from dirt and moisture!
⚠CAUTION! Do not use the Device in a damp environment and avoid water splashing.
Detection Diagram
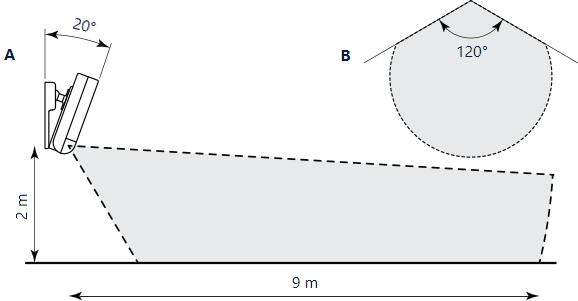
Shelly Motion 2 detection area is shown above - A: Side and B: top view (not to scale).
⚠IMPORTANT! Shelly Motion cannot detect movement through transparent objects.
⚠IMPORTANT! Direct sun light or close heating sources can trigger false motion detection.
LED Indication Signals
Blue: AP mode
Blue brief flash: Settings changed
Blue flashing: Firmware update
Red brief flash: Motion detected and reported
Red long flash: Error while performing firmware update.
Green brief flash: Unreported motion detection (the Device is not connected, or motion detection is disabled).
Red, green and blue flashing sequentially: Tamper detection or Device started
Cyan brief flash: Motion detection while in AP mode.
⚠IMPORTANT! LED indication can be disabled.
Reset button actions
Press briefly:
-
While turned off, starts the Device.
-
While in AP mode, turns off the device.
-
While in Client mode, exits energy saving mode for 3 minutes and sends mDNS info.
Press for 5 sec: Sets the Device in AP mode.
Press for 10 sec: Factory resets the Device.