In your Smart Control application, tap on Shelly Presence Gen4 to open its control panel. You can use the different tabs to manage the behavior of the device.
What are zones, blind spots, and boundaries
-
Zones - specific areas in the room that you can customize, for example Dining area.
-
Blind spots - areas of the room where presence detection is intentionally disabled but is still within the defined room.
-
Room boundaries - boundaries that define the size of the room which you are monitoring.
Main controls
You can use the Main controls tab to view the primary information about your Shelly device.
The information includes:
-
Real-time data reported by the device:
-
Number of populated zones
-
Illuminance level in the room
-
Number of detected objects in the room
-
-
A visual representation of the room where your device is mounted. View the device coverage and the static and moving objects in the room.
-
Data tiles with the number of objects detected per zone
-
List with the last 5 events reported by the device. The types of events are:
-
Presence Room/Zone - there is an object in the room or the zone
-
Cleared Room/Zone - there is no object in the room or the zone
-
In the Main controls tab, you can also manage zones and areas, as well as editing sensor configurations.
Adding zones
-
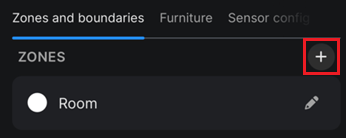
In the Main controls tab, tap the Edit zones button.
-
In the Zones and boundaries panel, tap on the plus icon:
-
In the Create zone panel, specify the following information:
-
Zone name
-
Zone enabled - switch the toggle to enable zone for automations. For more information about how to create automations, see Schedule and Actions tabs.
-
Choose the Draw option to add tiles to your zone. Tap the Erase option if you want to remove already added zone tiles.
-
Color - select a specific color for the zone.
-
Select the tiles on the map that represent your zone.
-
Tap the Save button.
Adding blind spots and boundaries
-
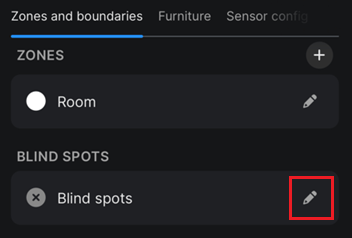
In the Main controls tab, tap the Edit zones button.
-
In the Zones and boundaries panel, tap edit (pencil icon) next to the Blind spots or Boundaries panel:
-
In the new screen, select Draw or Erase if you want to add or remove areas on the map.
-
Select the tiles of the blind spots or boundaries on the map.
-
Tap the Save button.
Adding furniture
Add furniture to the map to make it easier to understand your room space at a glance. The furniture icons are visual only and have no effect on detection.
-
In the Main controls tab, tap the Edit zones button.
-
In the Furniture panel, go to the Add tab.
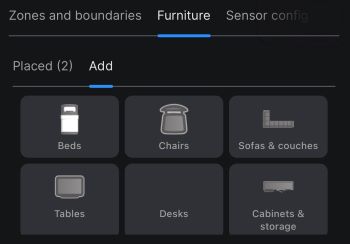
-
Choose an item and tap on it to add it on the map. Position the item on the map to match your real room.
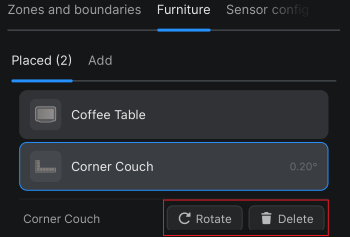
Editing furniture
-
In the Main controls tab, tap the Edit zones button.
-
In the Furniture panel, go to the Placed tab.
-
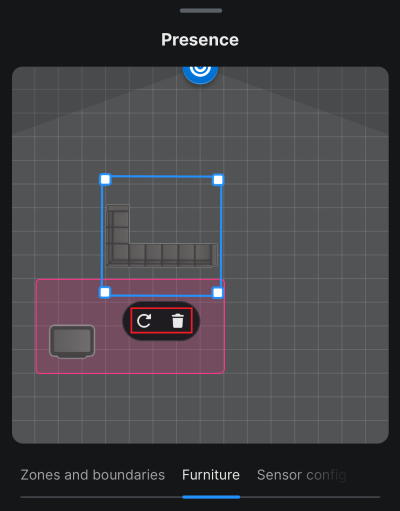
Tap on a specific furniture to enable editing mode.
-
On the map, you can perform the following actions:
-
Move - drag the furniture icon to a new location on the map
-
Rotate clockwise - tap the

-
Rotate manually - drag the
-
Remove - tap the

-
Resize - hold one corner point of the rectangular bounding box while dragging another corner point to resize the icon
-
Optional: You can use the Rotate or Delete buttons in the Placed tab.
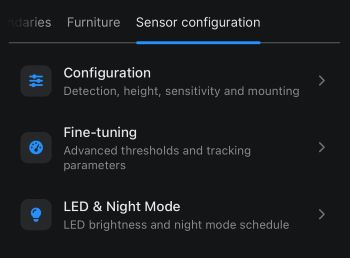
Editing sensor configurations
-
In the Main controls tab, tap the Edit zones button.
-
Tap on the Sensor configuration tab and choose one of the following menus:
-
Configuration - use this menu to edit the default presence sensor configurations
-
Fine-tuning - use this menu of advanced options to fine-tune the settings of your device
-
LED & Night mode - use this menu to adjust the brightness of the LED indicator and to enable night mode for a specific period.
-
Tap Save settings to apply your changes.
Sensor configuration parameters
A list of the sensor configuration parameters and their short description:
For more information and examples about how to configure your presence device, go to the Shelly Presence Gen4 web interface guide.
|
Parameter |
Description |
|---|---|
|
Configuration |
|
|
Detection |
If you enable this option, the sensor will display detected presence in the room |
|
Flipped mounting |
Enable if the device is mounted upside down (rotated 180°) |
|
Imperial units |
If you enable the option, both metric and imperial units will be displayed in the presence configuration |
|
Min detection height
|
The height above the floor at which presence can be detected.
|
|
Sensor mounting height |
The height at which the device is mounted.
|
|
Sensor tilt |
The sensor tilt angle is auto-calibrated. Tap Calibrate to make the sensor apply the current tilt angle relative to the floor. |
|
Transmission power |
The transmission power controls the detection distance |
|
Detection sensitivity |
The high sensitivity improves detection of stationary objects; low sensitivity reduces false triggers |
|
Fine-tuning |
|
|
SNR threshold |
Minimum signal strength compared to the background noise that is required to detect motion.
|
|
Object recognition threshold |
Minimum number of detected points required to recognize an object.
|
|
Velocity threshold |
Minimum speed required to detect an object.
|
|
Max velocity difference |
Maximum difference in velocity that two points can have while still being considered as one object.
|
|
Motion activation threshold (det_act_thr) |
Number of consecutive frames that must be detected to mark an object as active.
|
|
Motion release threshold (det_free_thr) |
Number of consecutive frames required to confirm the object is no longer detected on the map (free).
|
|
Tracking loss threshold (act_free_thr) |
Number of consecutive frames required to transition an object from active to no longer detected on the map (free).
|
|
Stillness tracking threshold (stat_free_thr) |
Number of consecutive frames required to confirm a stationary object as presence.
|
|
Stillness timeout threshold (sleep_free_thr) |
Maximum time to hold a detection when no motion is sensed. Valid range: 1 - 65535 frames |
Notifications
You can use the Notifications tab to view the notifications that you received on your Shelly device.
Activity log
You can use the Activity log tab to view the history of the detected events on your Shelly device.
Tap on a specific record to view the following data per event:
-
Date and time in the
yymmddformat -
Detected motion:
-
An eye icon and Presence label indicating that presence was detected
-
A visibility off icon and No_presence label indicating that motion was not detected.
-
Schedule
You can use the Schedule tab to create schedules for your Shelly device.
Adding schedules
-
Tap the Add schedule button.
-
In the Week days subtab, select one of the following options:
-
Simple - choose the weekday when the schedule should be executed.
-
Advanced:
-
Choose the weekday when the schedule should be executed.
-
Select specific days of the month and Select specific months - switch any of the toggles and define the following settings:
-
Select Even/Odd - choose this option if you want the schedule to be executed only on even/odd days/months.
-
From - To - enter the start and end of the schedule period and tap Select to confirm it.
-
-
-
In the Time subtab, select one of the following options:
-
Simple - from the drop-down, choose between:
-
Time - tap on the up or down arrows or enter a number to set the time of the schedule in hours and minutes.
-
Sunrise/Sunset - select from the drop-down the hours and minutes Before or After Sunrise or Sunset when the schedule should be executed.
-
-
Advanced:
-
Hours, Minutes, and Seconds - tap the toggle switch and define the following settings:
-
Select Even or Odd - choose this option if you want the schedule to be executed only on even/odd hours/minutes/seconds.
-
From - To - enter the schedule period and tap Select to confirm it.
-
-
-
In the Action subtab, tap + Add local action.
-
Specify the following information:
-
Select local action - Control Zone
-
Select target component - the room or a specific zone in the room
-
Enable - define the On or Off state of the area at the scheduled time
-
In the Preview subtab, review the summary of the action that appears and tap Save to create the schedule.
Example:
Schedule: 5:23 pm on Monday, Local action: Control Output, Target component: Dining area, State: Off.
At 5:23 pm on Monday, the device will not show any presence in the Dining area zone.
Actions
You can use the Actions tab to create an action that is automatically executed on a device after a specific set of conditions is fulfilled.
Creating actions
-
Tap the Add action button and then choose a component.
-
Enter the name of the action, for example: Switch off.
-
If you want the action to occur during a specific time period, switch the Set active time toggle, and specify the Start time and End time of the period.
-
Select the condition event that must happen to trigger the action, for example: When enter zone.
-
Optional: Specify an additional condition that must be fulfilled to trigger the action.
-
Enter the minimum time interval before the action can repeat. Any condition that is met during the time interval will be ignored.
Example
When: Object enters the zone, Repeat when: 60 seconds.
The action will repeat if an object enters the zone again after the next 60 seconds.
-
Choose the destination device or area, and the type of the action that must be performed:
-
URL Actions - use this option to add actions by entering URL link to the destination device
-
Add action from another device - use this option to select a device from your account
-
Local Actions - use this option if you want the action to be executed in the room or zone area. Specify the following information:
-
Select local action - Control Zone
-
Select target component - the room or a specific zone in the room
-
Enable - define the On or Off state of the area at the scheduled time
-
Example:
When: Object enters the zone, Action: Control Output, Dining area Off
If an object enters the Dining area zone, hide the detected presence events for this zone.
-
Tap Save to create the action.
Specific action conditions
An action can be triggered when one of the following conditions is met:
-
Zone presence - change the state of zone occupation: when a zone transitions to occupied (at least one object present in the zone) or to not-occupied (no objects in the zone) states
-
Presence counter - change the number of objects in the zone: triggers when a specified number of objects is detected in the zone
-
When enter zone – when an object crosses the border of a specific zone from the outside
-
When leave zone – when an object crosses the border of a specific zone from the inside
Networks
You can use the Networks tab to specify the settings for different network connections.
Tip: In each subtab, remember to tap the Save button to apply your changes.
Wi-Fi 1 and Wi-Fi 2
You can enable Wi-Fi 1, Wi-Fi 2, or both networks at the same time. When enabled, the device connects automatically to the network. If your Shelly device disconnects from one of the networks, it will automatically connect to the other network. In the subtab, you can perform the following actions:
-
View the current network status on your Shelly device: connected or disconnected
-
Mark the Enable checkbox and connect your device to up to two different Wi-Fi networks. Enter the Wi-Fi manually or scan for the available Wi-Fi networks. The Open network checkbox is marked automatically if the network that you have selected is open.
-
Mark the Static IP address by marking the checkbox and fill in the required information.
Access point
In the Access Point subtab, you can perform the following actions:
-
Mark the Enable checkbox to access the Wi-Fi Access Point (AP) of your Shelly device.
-
Set a password to protect the AP from unauthorized access. Mark the checkbox if you want the AP to be an open network.
Tap Save to save and apply your changes.
Outbound websocket
In the Outbound WebSocket subtab, you can perform the following actions:
-
View the current SSL connection status on your Shelly device: connected or disconnected
-
Mark the Enable checkbox to enable SSL connectivity. Select the type of SSL connectivity from the dropdown menu and enter the server address.
RPC over UDP
In the RPC over UDP subtab, you can enable RPC over UDP communication.
Enter the destination address and port. Then, enter the listening port.
Cloud
In the Cloud subtab, you can perform the following actions:
-
View the current cloud connection status on your Shelly device: connected or disconnected.
-
Switch the Enable toggle to connect the device to its cloud. By adding the device to the cloud, you can control the device remotely and receive notifications and updates.
-
To disable the cloud connection, turn off the toggle. In the confirmation message, tap Disable to confirm the action.
Matter
In the Matter subtab, you can enable Matter by selecting the Enable checkbox.
MQTT
In the MQTT subtab, you can perform the following actions:
-
View the current MQTT connection status of the Shelly device: connected or disconnected.
-
Mark the Enable checkbox to enable MQTT. Configure the device to execute actions via MQTT.
-
Choose the connection type from the following options:
-
RPC status notifications over MQTT
-
Generic status update over MQTT
-
SSL connectivity
-
-
Enter the MQTT prefix, the desired server, and client ID.
-
Enter the username and password.
Bluetooth
You can use the Bluetooth tab to configure the Bluetooth connectivity on your Shelly device.
Bluetooth settings
In the Bluetooth Settings subtab, you can perform the following actions:
-
Mark the Enable checkbox to enable Bluetooth connection
-
Switch the Enable RPC toggle to enable RPC communication
-
Switch the Enable Bluetooth gateway toggle to enable a Bluetooth gateway on the Shelly device
Assigned Bluetooth devices
In the Assigned Bluetooth devices subtab, you can see the BLE devices to which your device is gateway. You can also add BLE devices to which your Shelly device is gateway.
Application settings
You can use the Application Settings tab to specify the main application settings on your Shelly device, such as appliance type, pin lock, or other.
Tip: In each subtab, remember to tap the Save button to apply your changes.
Offline notifications (Premium plan)
In the Offline Notifications subtab, you can control the offline notifications on your Shelly device:
-
Enable or disable offline email notifications
-
Enable or disable offline push notifications
Device Card customization
In the Device card customization subtab, you can customize the big and small parameter slots on the preview card of your Shelly device. After customization, the changes apply everywhere that you see the device in the app.
Customizing card preview
-
Tap the Customize device card button. There are 2 types of slots that you can configure:
-
Big Parameter slot: Choose between:
-
None
-
Action - if you select this option, the On/Off state of the device will be visible
-
Parameter - from the Parameter type drop-down select the information that you want to view in the big slot: Power, Voltage, Frequency, or other.
-
-
Small Parameter Slot: Here you can remove or add parameters that will be displayed in the small parameter slot.
-
Check the Preview of the device card.
Exclude from activity log
Important: If you exclude the device from the activity log, the tab will not show any detected presence events.
In the Exclude from activity log tab, switch the toggle to exclude your Shelly device from the global activity log.
Device note
In the Device note subtab, you can leave a short note about your Shelly device.
Device usage details
In the Device Usage Details subtab, you can view in which room, channel, or dashboard the device is in use.
Share
You can use the Share tab to share limited access to your device with another user of the Shelly Smart Control application. Enter the user email address in the field and tap the Share button.
View the list of users that already have limited control to your device. You can remove a user by tapping the delete button to the right of the email account.
Device settings
You can use the Settings tab to view and change the main settings of your Shelly device, such as name, geolocation, and time zone.
Tip: In each subtab, remember to tap the Save button to apply your changes.
Device name
In the Device name subtab, you can change the current name of the device.
To synchronize the modified name with the web interface of the device, switch the Sync device name toggle.
Firmware version
In the Firmware versions subtab, you can perform the following actions:
-
Schedule an automatic update
-
View the current firmware version
-
Initiate an update
-
Check for update
Geolocation and time zone
In the Geolocation and time zone subtab, you can set your location by one of the following methods:
-
Enable Automatically detect time-zone and Geolocation. As a result, the location data is auto-populated in the fields.
-
Tap the Time zone field and select your time zone from the list
-
Chose if the Daylight saving mode should be on, off, or automatically enabled
-
Enter your Latitude and Longitude
Factory Reset
Important: Factory reset will disconnect the device from your Wi-Fi network. All associated users, including you, will be removed from the device account. All previously set data will be deleted.
Tap the Factory Reset button to reset your Shelly device to its factory settings.
Device reboot
In the Device reboot subtab, you can restart your Shelly device by tapping the Reboot button.
Device information
In the Device information subtab, you can view the Device ID, Device Model, Device IP, or other. You can choose between the following options:
-
Transfer - tap here if you want to transfer your device to another of your accounts. You are able to use this option only if, at the time of transferring the device, you are also logged in to the other account.
-
Delete - tap here if you want to remove the device from your account