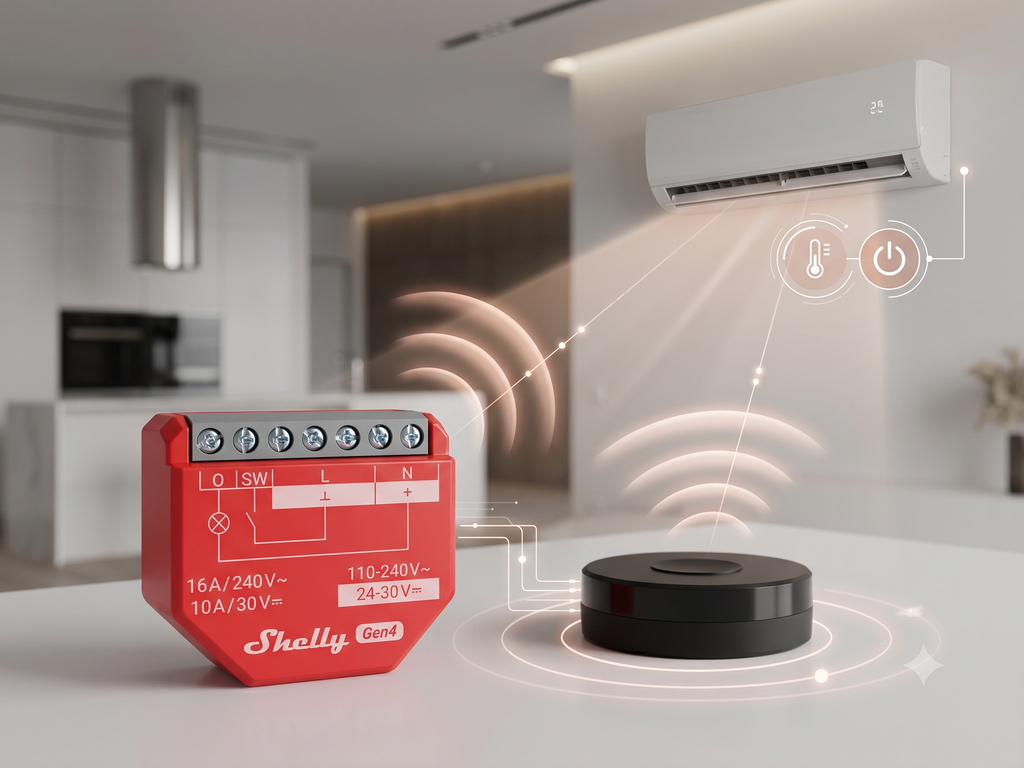
A Shelly 1PM Gen3 running a JavaScript script brings IR-controlled air conditioners into the Shelly ecosystem with no separate hub and no equipment replacement. Any room's A/C can then be managed alongside other connected devices from one app, fully locally.
Air conditioners are among the largest consumers of electricity in homes, hotels, and commercial premises — and most of them can only be operated through an infrared remote control. That remote works well for one person in one room, but it provides no automation, no scheduling, no integration with other devices, and no visibility from outside the room.
This use case demonstrates how a Shelly 1PM Gen3 running a published JavaScript bridges that gap. By combining Shelly's local scripting, Virtual Components, and a Tasmota-based infrared blaster, any IR-controlled A/C can be managed from the Shelly Smart Control app alongside other connected devices — without replacing the air conditioner, without a separate home-automation hub, and without depending on a vendor cloud service.
The solution is suitable for homes, hotel rooms, serviced apartments, offices, retail sites, and showrooms. Any space with an IR-controlled air conditioner and a local Wi-Fi network is a candidate.
How The Scenario Works
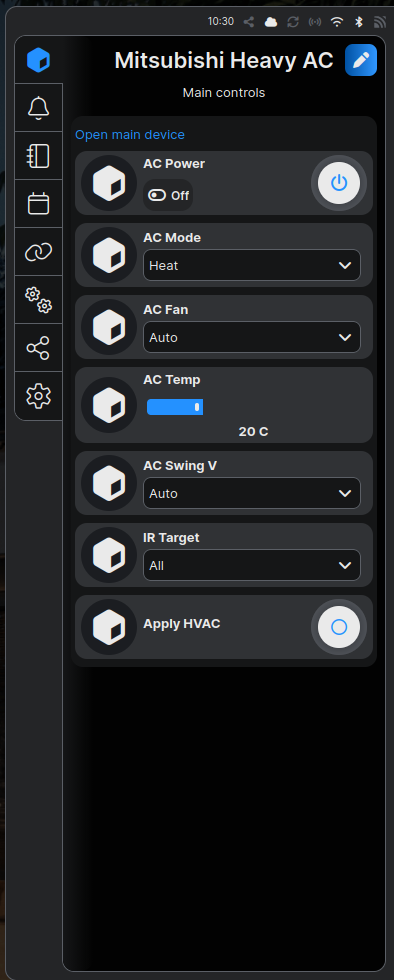
A user opens Shelly Smart Control and sees a device panel labelled Mitsubishi Heavy AC. The panel displays the current requested settings: power consumption, operating mode, fan speed, target temperature, vertical swing, and the infrared target zone. The user adjusts the settings and presses Apply HVAC. The Shelly 1PM Gen3 assembles a complete AC state command and sends it over the local network to the NEO Coolcam IR Blaster, which transmits the infrared signal to the air conditioner.
The full control chain runs in five steps:
|
Step |
Action |
|---|---|
|
1 |
User adjusts settings in Shelly Smart Control or on the optional Wall Display |
|
2 |
Shelly 1PM Gen3 JavaScript script assembles the HVAC state from Virtual Component values |
|
3 |
Shelly 1PM Gen3 sends an HTTP GET request with the IRHVAC payload to the NEO Coolcam IR Blaster |
|
4 |
NEO Coolcam (Tasmota firmware) transmits the infrared command to the A/C |
|
5 |
A/C receives the infrared signal and changes its operating state |
The entire chain runs on the local LAN. No internet connection and no additional automation server are required for daily operation.
The Tasmota firmware on the NEO Coolcam uses the built-in MITSUBISHI_HEAVY_88 IRHVAC manufacturer profile, so no manual code learning is required. The profile supports the following discrete control values:
|
Control |
Supported Values |
|---|---|
|
Power |
On, Off |
|
Mode |
Auto, Cool, Heat, Dry, Fan |
|
Fan speed |
Auto, Min, Low, Med, High, Max |
|
Temperature |
16–31 °C in 1 °C steps |
|
Vertical swing |
Off, Auto, Min, Low, Mid, High, Max |
|
IR target |
Zone 1, Zone 2, All |
Each transmission sends a complete HVAC state, not a toggle. The current setting for every control parameter is included in every Apply HVAC command.
The IR target selector allows one Shelly 1PM Gen3 to address multiple independent NEO Coolcam IR Blasters. Each blaster serves one A/C unit or zone. Selecting All sends the same command to every configured zone simultaneously. The zone map is defined in the script and updated by the installer when the system is commissioned or expanded.
Physical And Logical Architecture
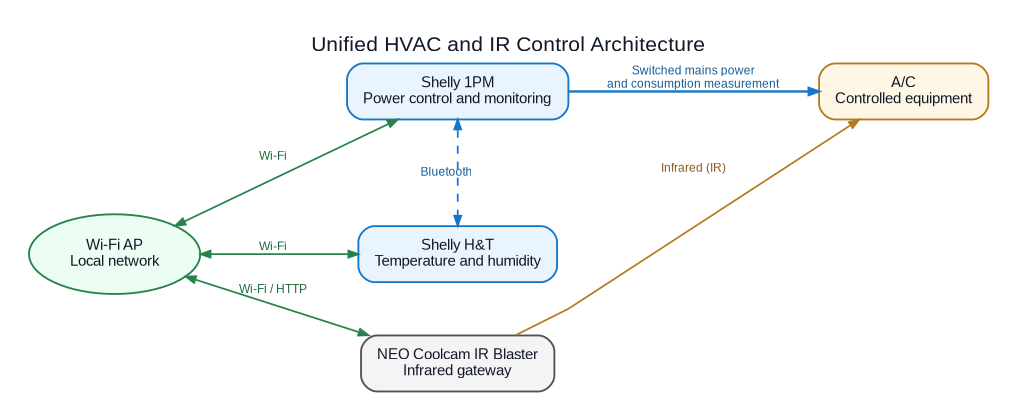
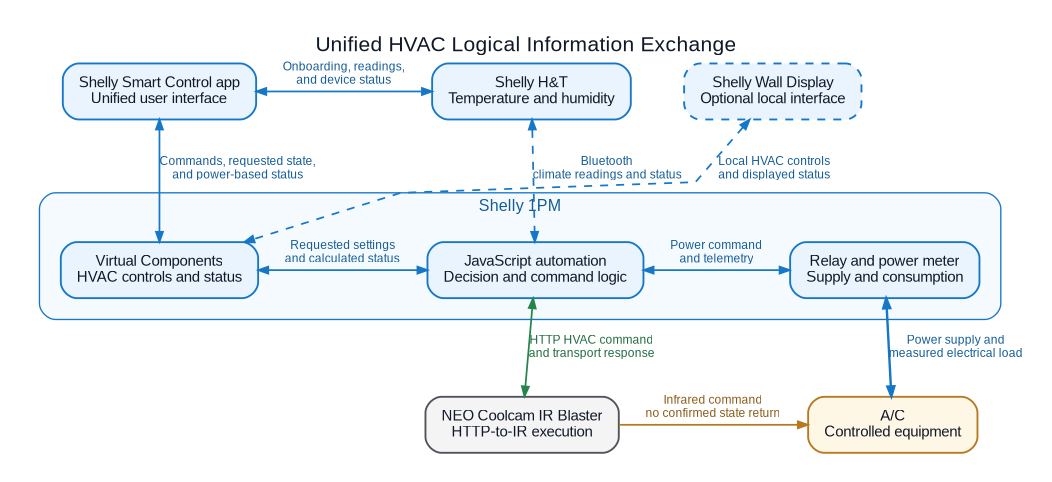
The Shelly 1PM Gen3 fills three roles in a single device: the JavaScript automation logic, the Virtual Components control panel that the app and Wall Display expose to users, and the built-in relay and power meter. The relay switches mains power to the A/C. The power meter observes the A/C electrical load, which makes consumption data available in Shelly Smart Control without any additional metering device.
Shelly H&T provides independent room temperature and humidity readings over Bluetooth. These readings are separate from the A/C unit's own internal sensor and are available in the app for monitoring and as inputs to future condition-based automation — for example, enabling the A/C when the measured room temperature exceeds a set threshold.
The Shelly Wall Display is an optional addition. When connected, it exposes the same HVAC Virtual Components on a wall-mounted touchscreen, giving occupants local control without opening a phone app.
Tasmota And The IR Blaster
Tasmota is an open-source firmware for ESP8266 and ESP32 devices. It replaces the factory firmware with a locally controlled, cloud-independent alternative that supports MQTT, HTTP, and a built-in web interface. In this use case, Tasmota turns a commodity Wi-Fi IR blaster into an HTTP-controlled infrared transmitter that the Shelly 1PM Gen3 can reach directly over the local network.
Hardware: NEO Coolcam NAS-IR03W
The infrared blaster used in this implementation is the NEO Coolcam NAS-IR03W, an ESP8266-based Wi-Fi IR controller. The Tasmota template assigns GPIO14 as the IR transmitter and GPIO05 as the IR receiver, with a status LED on GPIO12 and a button on GPIO13. The Tasmota community template for this device is: {"NAME":"Neo Coolcam IR","GPIO":[255,148,255,149,158,51,0,0,56,17,8,0,0],"FLAG":0,"BASE":62}
Before purchasing or flashing the device, refer to the Blakadder template page for current hardware compatibility and community guidance.
Flashing Tasmota On The IR Blaster
The IR blaster must be flashed with tasmota-ir.bin, the full IR firmware variant that includes support for the IRHVAC command and all manufacturer protocols including MITSUBISHI_HEAVY_88. Standard tasmota.bin does not include IRHVAC support.
Option A — Tasmota Web Installer (easiest, requires serial adapter)
-
Open tasmota.github.io/install in Google Chrome or Microsoft Edge.
-
Open the device case and connect a 3.3 V USB-to-serial adapter to the board pads:
TX → RX,RX → TX,3V3 → 3V3,GND → GND. -
Bridge
GPIO0toGNDwhile applying power to put the chip into programming mode. -
Click Install, select the serial port, choose tasmota-ir as the firmware variant, and confirm the flash.
-
After flashing, remove the
GPIO0bridge and restart the device.
Option B — Tuya-Convert (no serial adapter, OTA)
-
Install Tuya-Convert on a Linux machine or Raspberry Pi according to the Tuya-Convert instructions.
-
Put the NEO Coolcam into pairing mode (hold the button for five seconds until the LED flashes rapidly).
-
Run Tuya-Convert and select
tasmota-ir.binwhen prompted for the firmware file. -
Confirm the flash and wait for the device to reboot.
Important: Never flash while the device is connected to mains power. Use 3.3 V only on the serial adapter — 5 V will damage the ESP chip.
Configuring Tasmota After Flashing
Once flashed, the device creates a Wi-Fi access point named tasmota-XXXXXX.
-
Connect to that access point and navigate to
192.168.4.1in a browser. -
Enter the local Wi-Fi credentials and save. The device will join the network and obtain a DHCP address.
-
Open the Tasmota web interface at the assigned IP address.
-
Go to Configuration → Configure Other and paste the NEO Coolcam template JSON, then enable it and save.
-
Go to Configuration → Configure Module and confirm that GPIO14 is set to
IRsend (8). -
Assign the device a static IP address or a reserved DHCP lease in the router so the address does not change between restarts.
Verifying IR Output
Open the Tasmota console and send a test command. To verify that the MITSUBISHI_HEAVY_88 profile is available, run: IRHVAC {"Vendor":"xx"}
Tasmota responds with the full list of supported vendor protocols. Confirm that MITSUBISHI_HEAVY_88 appears in the list. To test a real command:
IRHVAC {"Vendor":"MITSUBISHI_HEAVY_88","Power":"On","Mode":"Cool","FanSpeed":"Auto","Temp":22,"SwingV":"Auto"}
Point the IR blaster at the A/C, run the command, and confirm the appliance responds. Repeat for each control value (power off, heat mode, each fan speed, temperature steps, each swing position) to complete the acceptance test before handing the system over to the end user.
Installer Script
The script is maintained in the official Shelly Script Examples repository:
Mitsubishi Heavy AC via Tasmota - shelly-script-examples
-
mitsubishi_heavy_ac_vc.shelly.js - creates the Virtual Components, persists the HVAC settings across restarts, and sends the IRHVAC HTTP command to the configured Tasmota endpoints when the user presses Apply HVAC.
Before uploading the script, the installer must edit the target IP address map to match the local network addresses of the NEO Coolcam devices:
var IR_TARGET_IPS = {
'Zone 1': '192.168.1.10',
'Zone 2': '192.168.1.11',
};
Each NEO Coolcam must be configured with the MITSUBISHI_HEAVY_88 IRHVAC profile and must be reachable from the Shelly 1PM Gen3 on the same local network.
Stable IP addresses or local DNS hostnames are required for reliable operation. Adding or replacing a zone requires only a script update.
Why It Matters
For a homeowner or building occupant, the value is the elimination of a separate remote control for every room. The A/C responds to the same app, the same automations, and the same wall-mounted display as lighting, sensors, and other Shelly devices. Routine operation can be autonomous: sensors detect conditions and the script sends the appropriate command without requiring daily manual input.
For the installer, the value is a hub-free architecture. The JavaScript logic runs on the Shelly 1PM Gen3. The NEO Coolcam IR Blaster is a commodity device flashed with open-source Tasmota firmware. There is no third-party automation server to license, maintain, or support. The same design can be replicated across multiple rooms or properties by copying the script and updating the IP map.
For a property owner or investor, existing IR-controlled air conditioners do not need to be replaced. The integration adds connectivity, automation, and energy visibility without touching the A/C itself, preserving the original equipment investment.
Important Limitations
State display: All values shown in the app represent the last settings sent to the air conditioner, not a confirmed operating state. The A/C does not transmit its current state back to Shelly over infrared. If the original infrared remote is used, the values displayed in the app may no longer match the actual appliance state.
IR delivery: An HTTP 200 response from the Tasmota bridge confirms that the bridge received the command. It does not confirm that the infrared signal reached the air conditioner or that the appliance acted on it.
No automatic retry: The script applies a 10-second HTTP timeout. If a request fails, the failure is reported. No automatic retry is performed. A missed command requires the user to press Apply HVAC again.
Network dependency: If the local network or the NEO Coolcam IR Blaster is unreachable, the command fails and no infrared signal is sent. Internet loss does not affect local operation provided the LAN remains functional.
Installer requirement: The NEO Coolcam IR Blaster must be flashed with Tasmota firmware before use. This requires a technically capable installer. Flashing third-party firmware may affect the device's warranty or vendor support. Hardware compatibility must be confirmed before purchase.
Compatibility scope: The published script and verified compatibility are limited to the Tasmota
MITSUBISHI_HEAVY_88IRHVAC profile and Mitsubishi Heavy A/C units. Other brands — including Bosch, Panasonic, Midea, and LG - have communicated successfully in preliminary tests, but exact models, profiles, and command sets must be documented and verified before any compatibility claim is made for those brands.
Core Materials
Shelly Devices
|
Device |
What It Does In The Use Case |
|---|---|
|
Shelly 1PM Gen3 and newer |
Runs the JavaScript automation script, creates the HVAC Virtual Component control panel, switches mains power to the A/C, and measures electrical consumption. All three functions use the same single device. |
|
Shelly H&T |
Measures room temperature and humidity independently of the A/C and communicates the readings to the Shelly 1PM Gen3 over Bluetooth. |
|
Shelly Wall Display (optional) |
Provides a local room interface for the HVAC Virtual Components without requiring the Shelly Smart Control mobile app. |
Gateway And Installation Materials
|
Material |
Why It Is Needed |
|---|---|
|
NEO Coolcam IR Blaster with Tasmota firmware |
Acts as the HTTP-to-infrared bridge. Receives the IRHVAC command from the Shelly 1PM Gen3 over Wi-Fi and transmits the infrared signal to the air conditioner. One device per A/C unit or zone. |
|
Wi-Fi access point |
Provides the local network that connects the Shelly 1PM Gen3 and the NEO Coolcam IR Blaster. All devices must be reachable on the same LAN. |
|
Mains wiring and terminals |
Connects the A/C mains supply through the Shelly 1PM Gen3 relay for switching and consumption measurement. |
|
IR blaster mounting bracket or tape |
Positions the NEO Coolcam with a clear line of sight to the A/C infrared receiver at the required range and angle. |
Sales Angle
The message for every audience is that existing air conditioners do not need to be replaced. Shelly adds control, automation, energy visibility, and integration without modifying the A/C itself.
Sales Points
-
No hub required: The JavaScript automation runs entirely on the Shelly 1PM Gen3. The full control chain operates over the local LAN without an additional automation server, license, or cloud subscription.
-
Works with existing equipment: Any IR-controlled A/C that has a compatible Tasmota IRHVAC profile can be integrated. The air conditioner needs no Wi-Fi module, vendor app, or firmware update.
-
One app for the whole property: The A/C appears alongside other Shelly devices in Shelly Smart Control. Automations can combine HVAC, lighting, sensing, and switching in a single workflow.
-
Scalable across rooms and zones: Each room uses its own Shelly 1PM Gen3 and NEO Coolcam. Multiple zones can be addressed individually or simultaneously using the IR target selector in the same control panel.
-
Local operation during internet loss: Commands travel over the LAN. Internet access is not required for the automation to run.
-
Energy visibility included: The Shelly 1PM Gen3 built-in power meter records the A/C electrical load. Consumption data is available in Shelly Smart Control without any additional metering device.
-
Optional wall interface: A Shelly Wall Display can expose the HVAC controls directly on the wall so occupants can adjust settings without reaching for a phone.
-
Investment protection: Existing IR-controlled air conditioners remain in service. The integration cost is one Shelly 1PM Gen3, one Shelly H&T, and one NEO Coolcam per room — not a full equipment replacement.