.png?cb=22e476b802d3f3cb070e66d80b7bcb7a)
Overview
This step by step solution guide gives detailed instructions how with Shelly smart devices you can achieve remote control and automations of electric windows, enhancing convenience, energy efficiency, and security for private residential or commercial spaces.
The end result is that conventional electric window can be controlled remotely. You can also add automating window operations, which can ensure optimal indoor air quality, reduce energy consumption, and maintain better security through remote access and scheduling.
Prerequisites
Before implementing this solution, ensure you have the following:
-
Shelly 2PM Gen3 Smart Relay Switch: This device allows for remote control and monitoring of electric windows.
-
Shelly BLU RC Button 4: A Bluetooth remote control for convenient operation.
-
Electric windows with compatible motorized mechanisms: Ensure your windows are equipped with motors that can be controlled electronically.
-
Wi-Fi Network: A stable Wi-Fi connection is essential for device communication and remote access.
-
Smartphone or Tablet: For initial setup and ongoing control via the Shelly mobile application. if required.
Step-by-Step Instructions
-
Install the Shelly 2PM Gen3
-
Power Off: Ensure the main power supply to the window's motor is turned off to prevent electrical hazards.
-
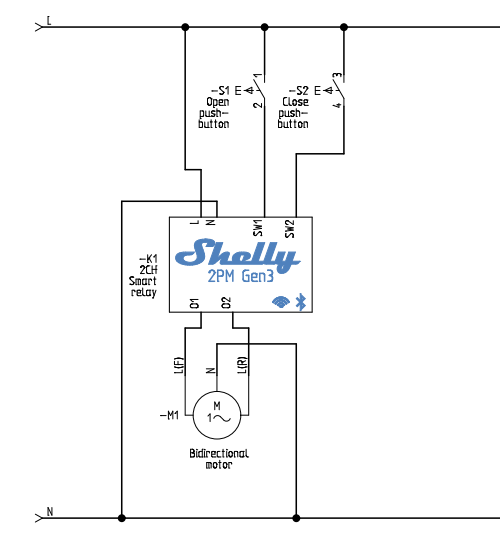
Wiring: Connect the Shelly 2PM Gen3 to the window's motor following the wiring diagram provided in the device's user manual. Typically, this involves connecting the neutral (N) and line (L) wires to the corresponding terminals on the Shelly device, and the motor's control wires to the output terminals (O1 and O2).
-
Mounting: Place the Shelly device in a suitable enclosure near the window motor, ensuring it's protected from environmental factors.
-
Power On: Restore the main power supply.
-
The wiring is shown in the diagram below:
Here are actual pictures of the wiring from several angles
.jpg?cb=15953987eadedcb0f7128dd4a85aadcd)
|
.jpg?cb=583ca4d0b5bbec73d111ad7bd9ff19de)
|
.jpg?cb=ef63f0d371d46daa3fa4a01e095a5ed8)
|
.jpg?cb=dfd3d6ff39d925a03b5ab2e67b6800bb)
|
.jpg?cb=0054c6159b835d2d77f3d10cbb00459e)
|
|---|
-
Configure the Shelly 2PM Gen3
-
Connect to device Wi-Fi: Using your smartphone or tablet, connect to the Shelly device's Wi-Fi network (e.g., "shelly2pm-xxxxxx").
-
Access Web Interface: Open a web browser and navigate to
http://192.168.33.1/. -
Network Settings: Enter your home or office Wi-Fi credentials to connect the Shelly device to your local network.
-
-
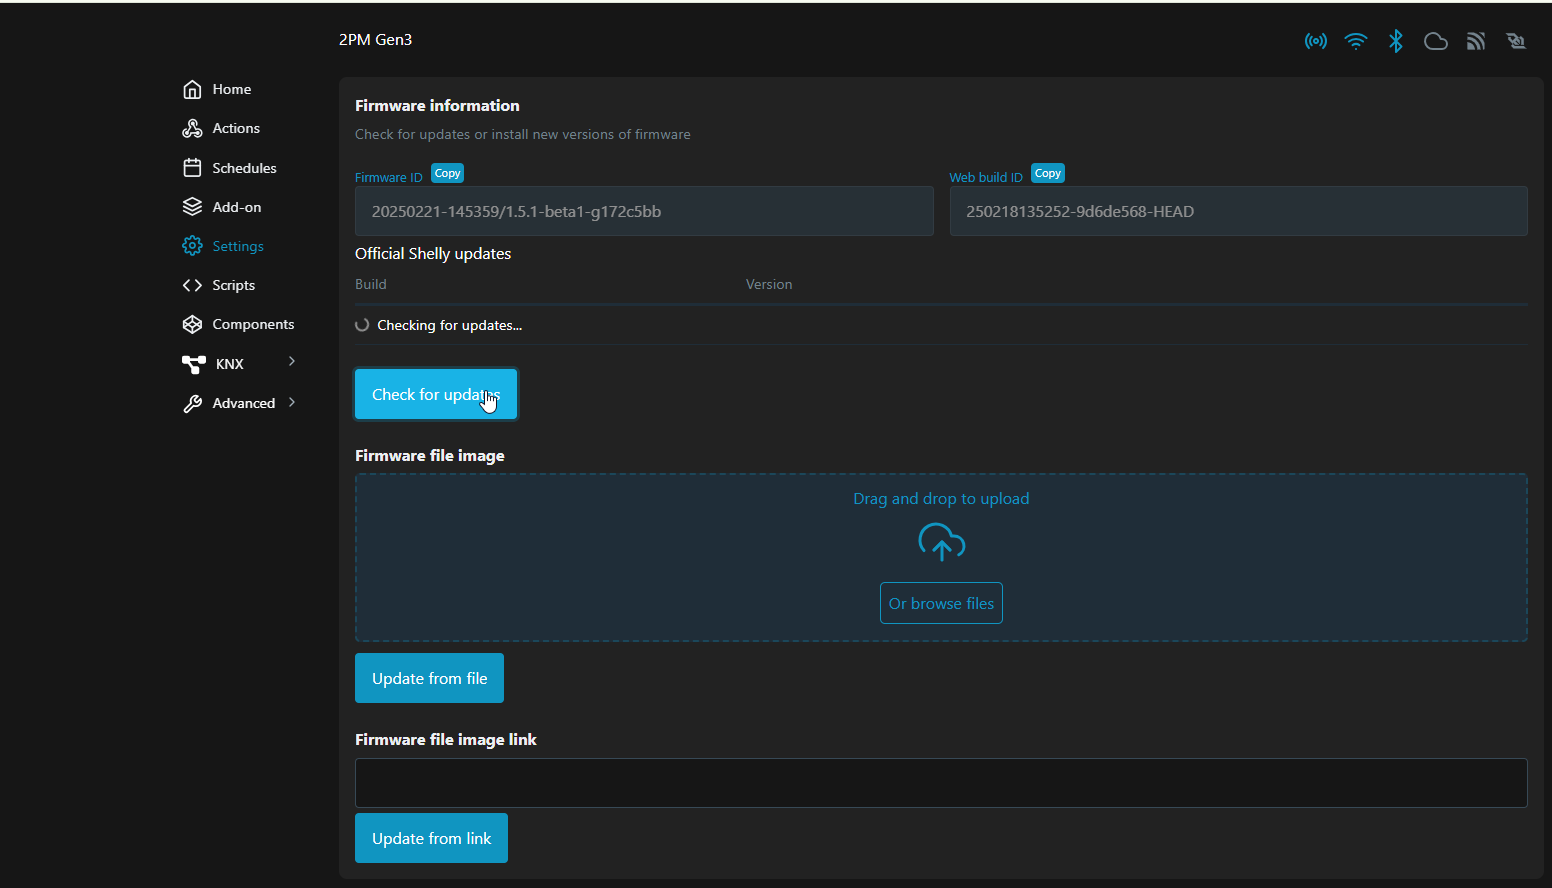
Device Firmware update
Once connected to the device local web make sure its updated to latest FW version available. Follow steps as on the screenshots below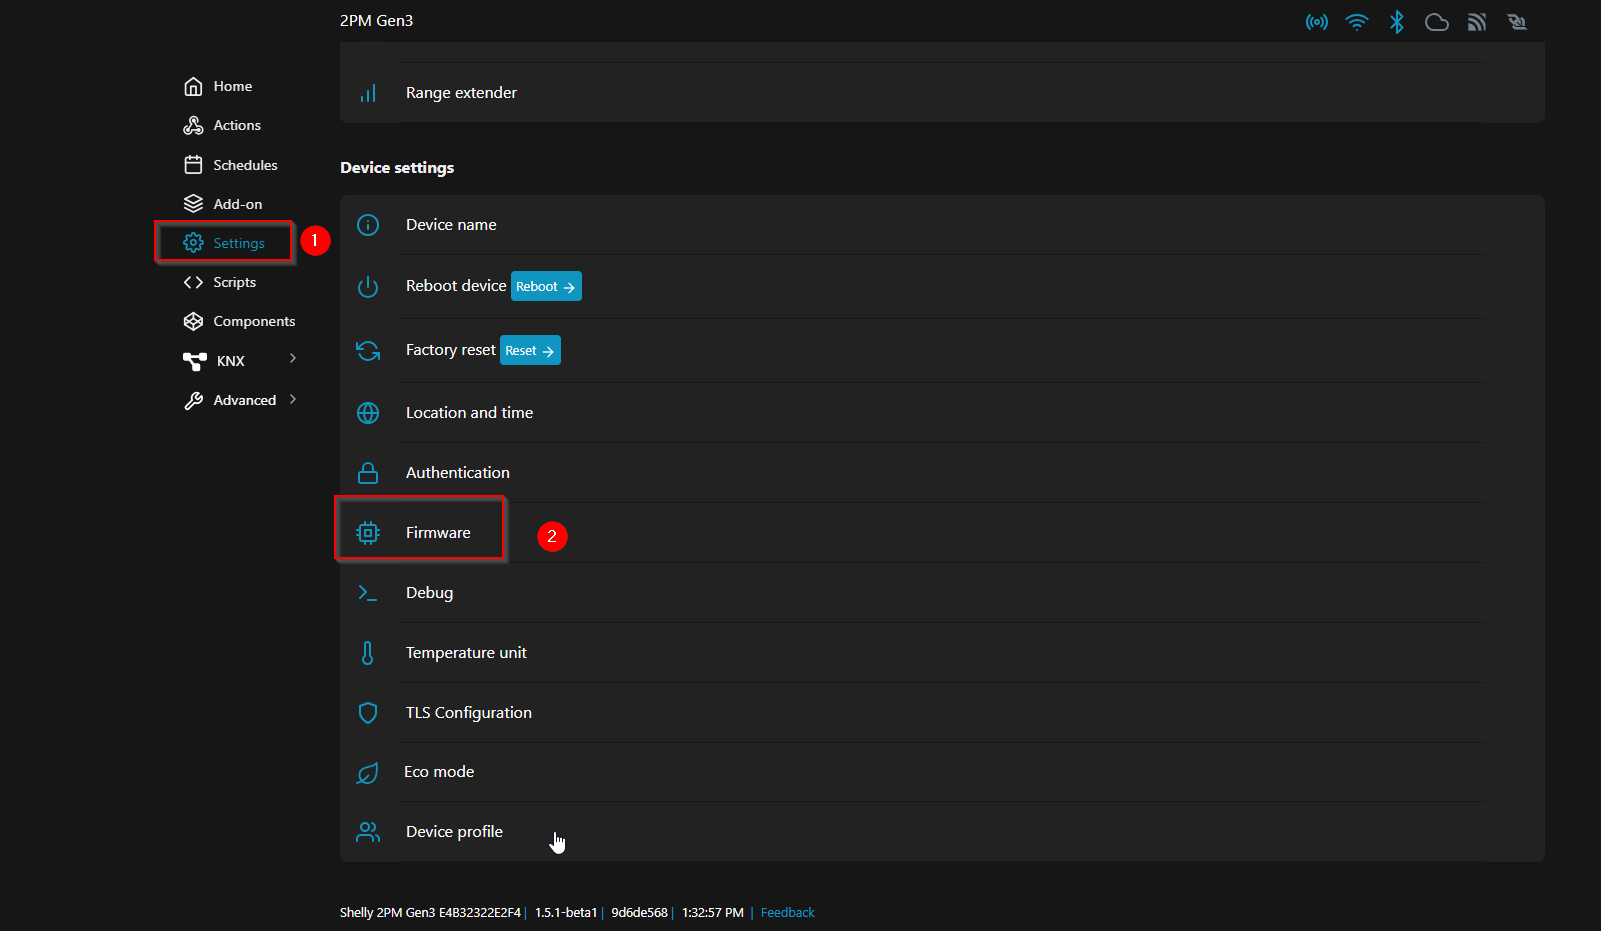
-
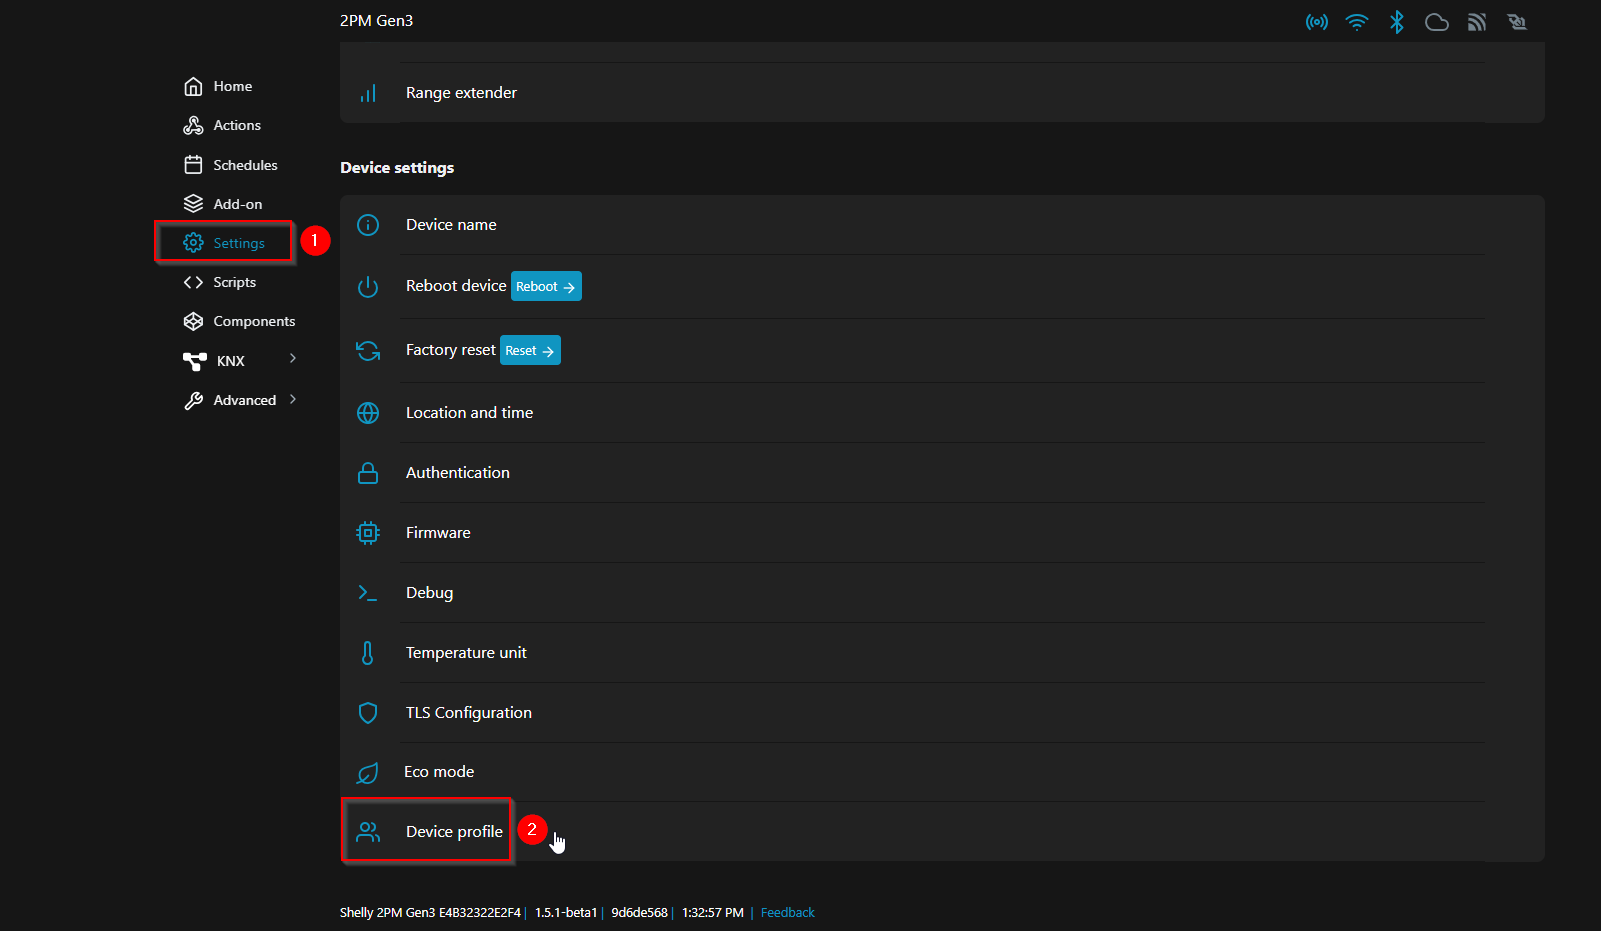
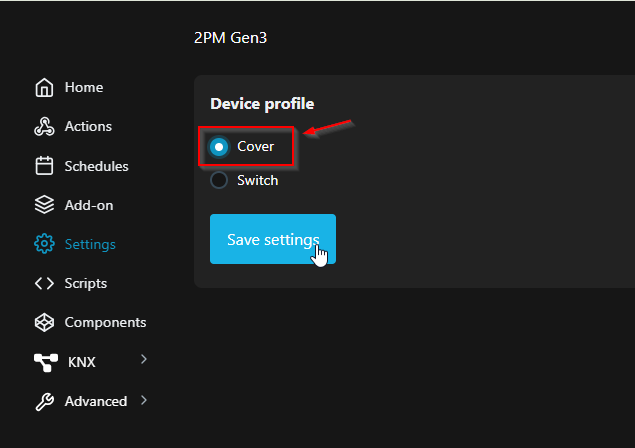
Change from switch to cover
Change device settings so it is set to control the electric windows for which you need to change the default setting from switch to cover. Follow steps as on the screenshots below.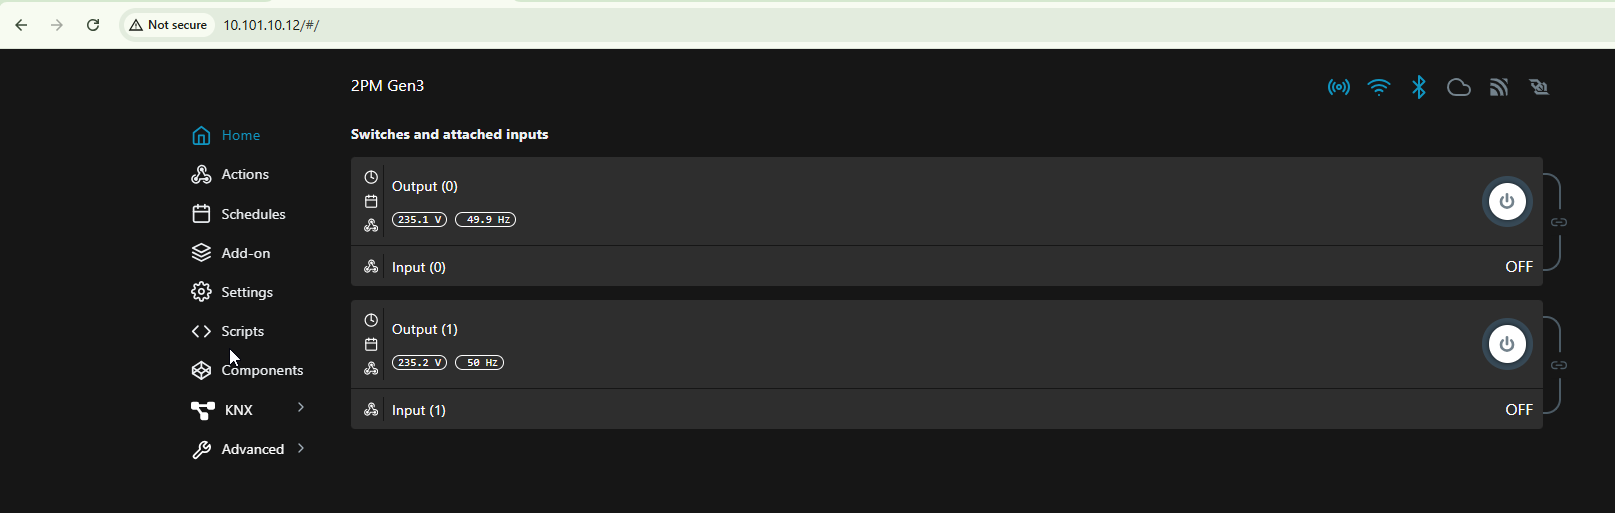


-
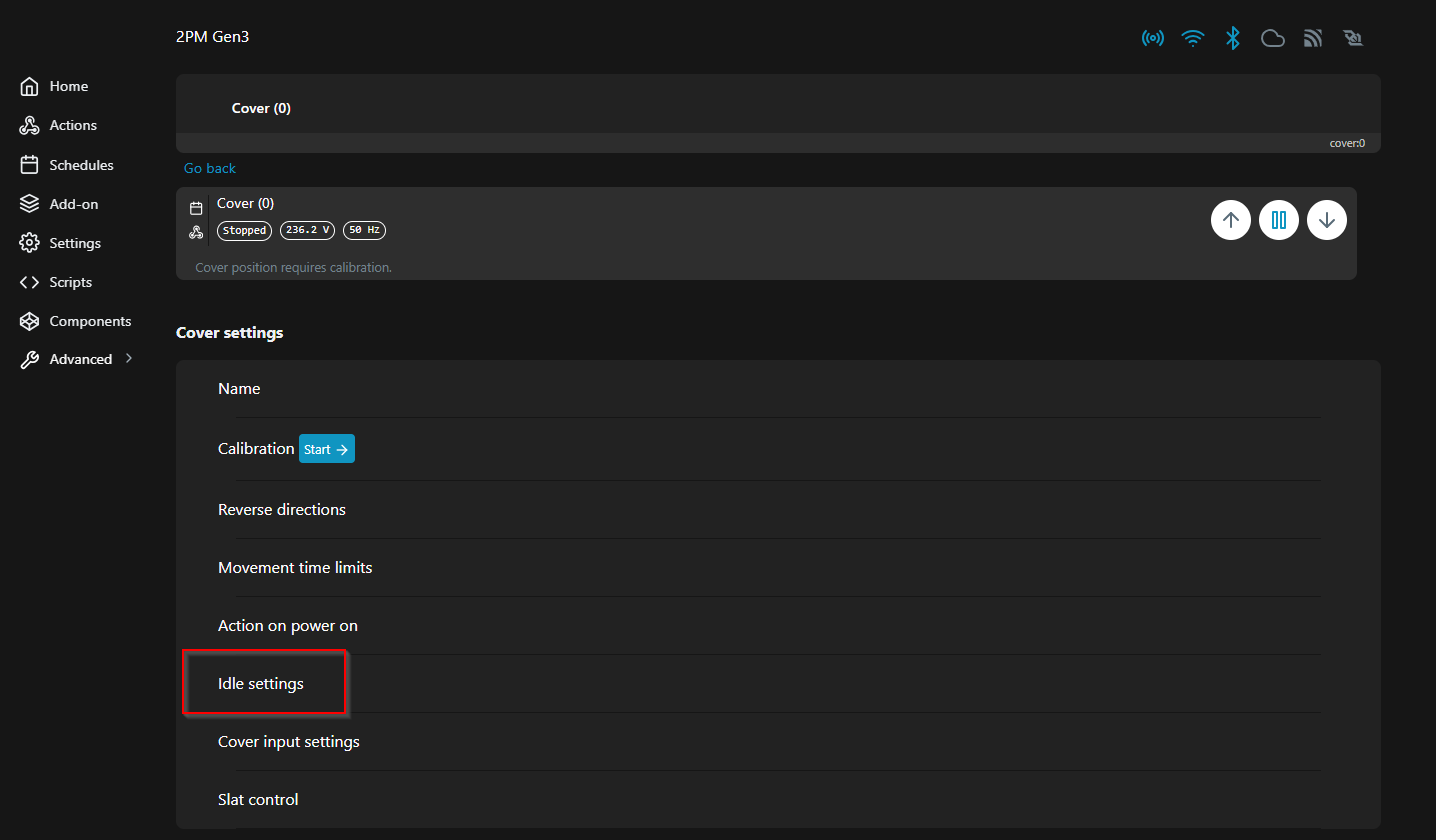
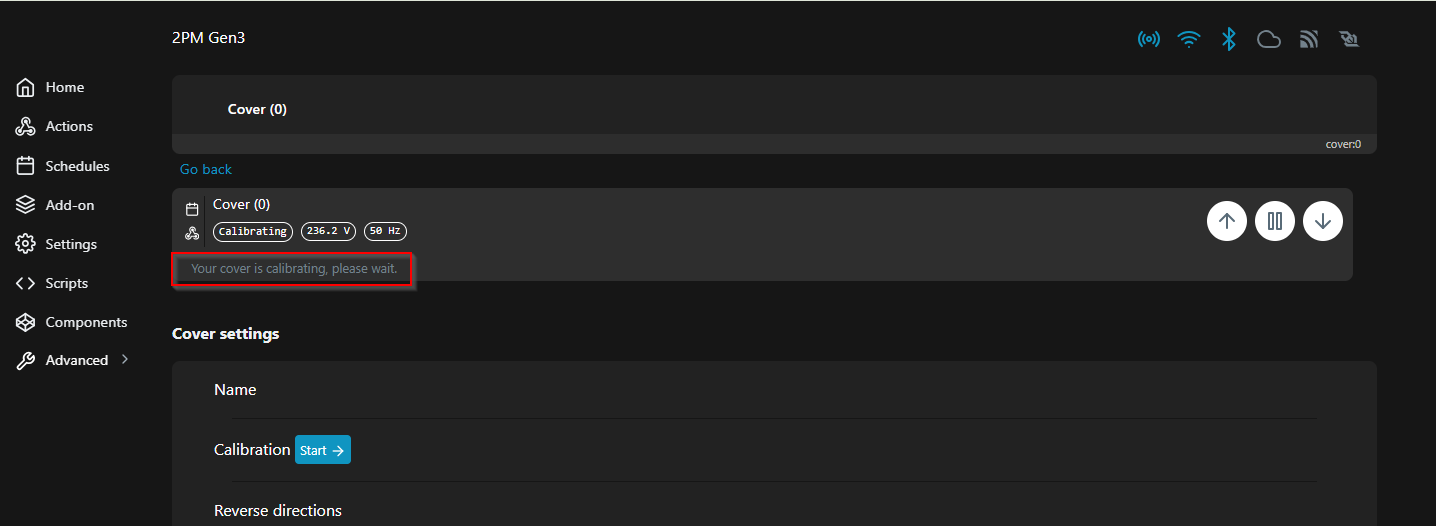
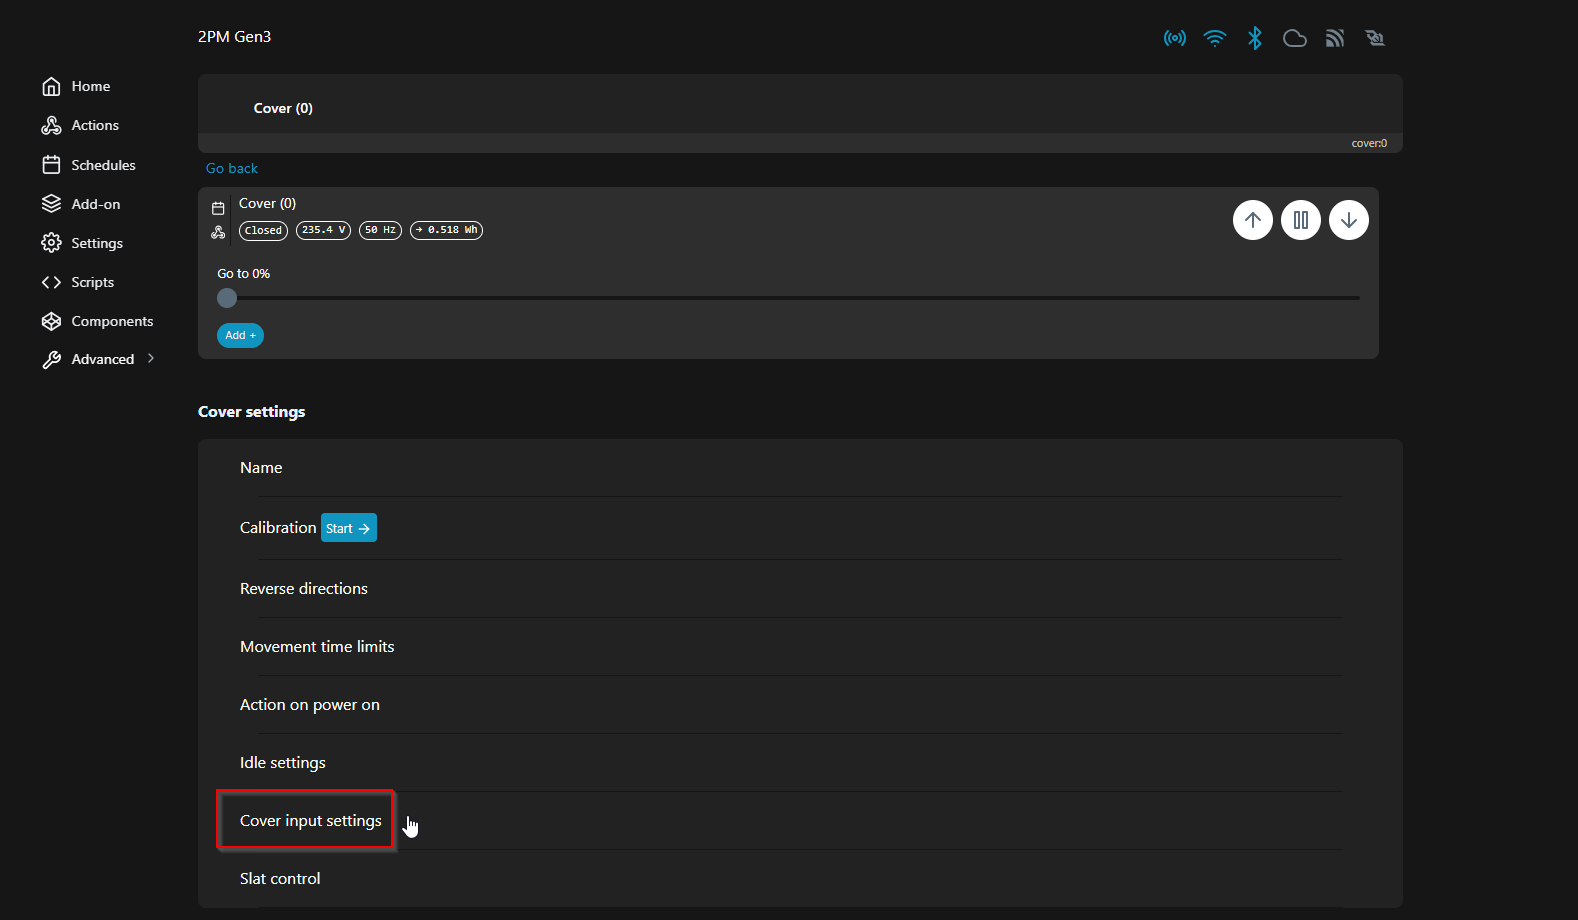
Device Calibration
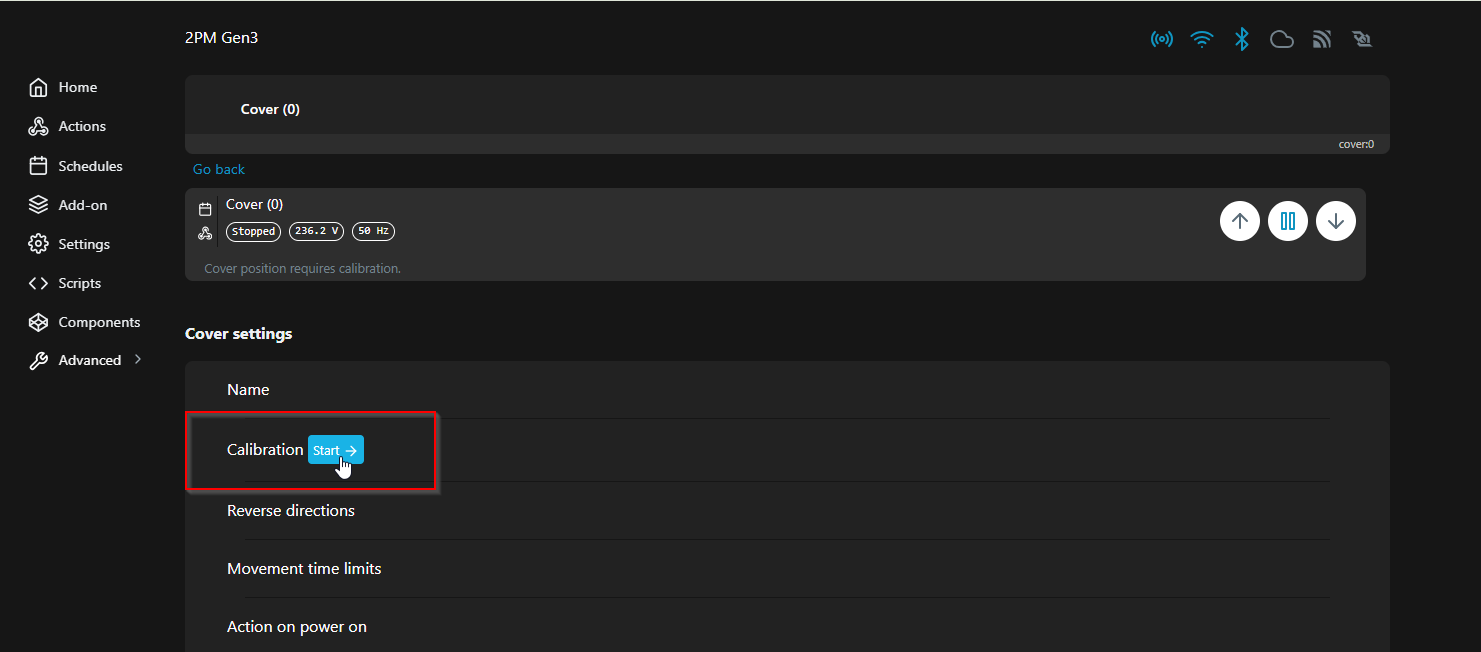
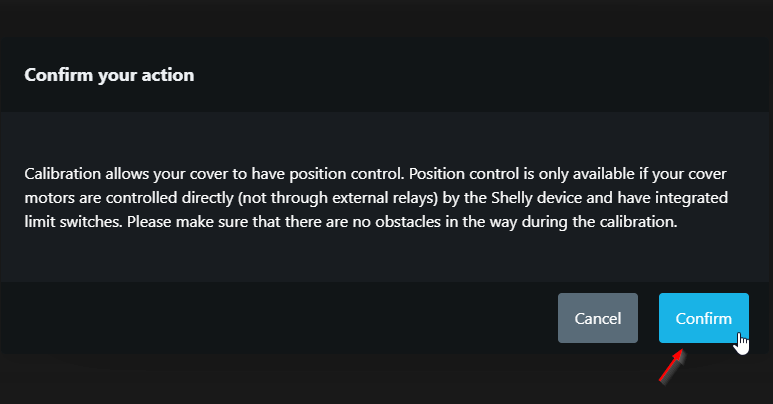
Calibrate the Shelly 2PM Gen3 to recognize the fully open and closed positions of your window. This ensures accurate control and positioning. Follow steps as on the screenshots below
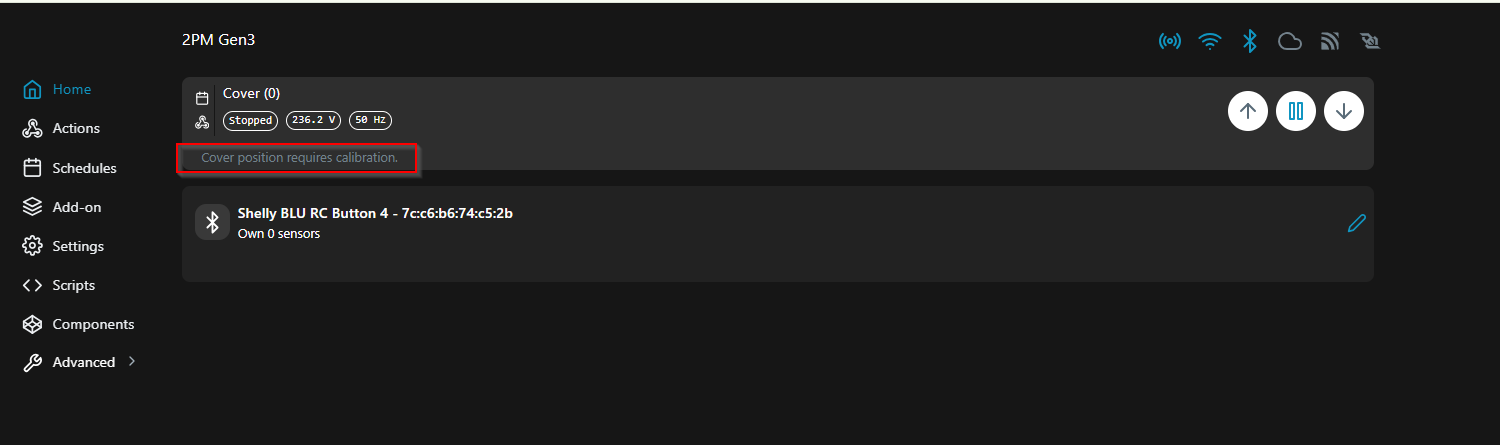
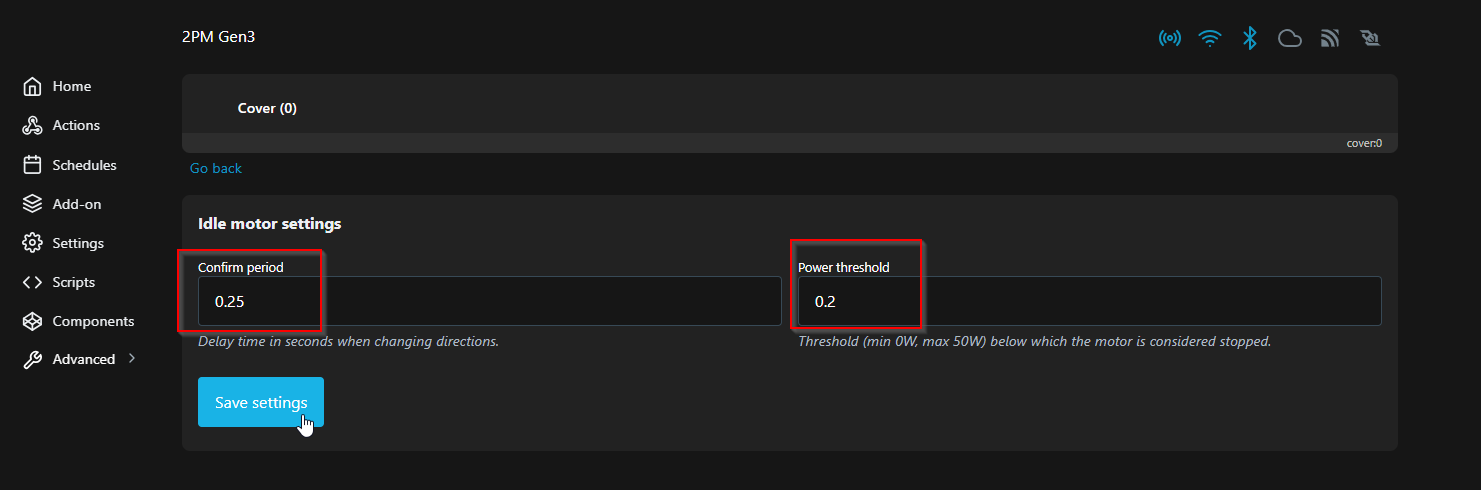
Prior to the actual calibration itself, set the Idle motor settings according to your conditions to assure proper calibration.
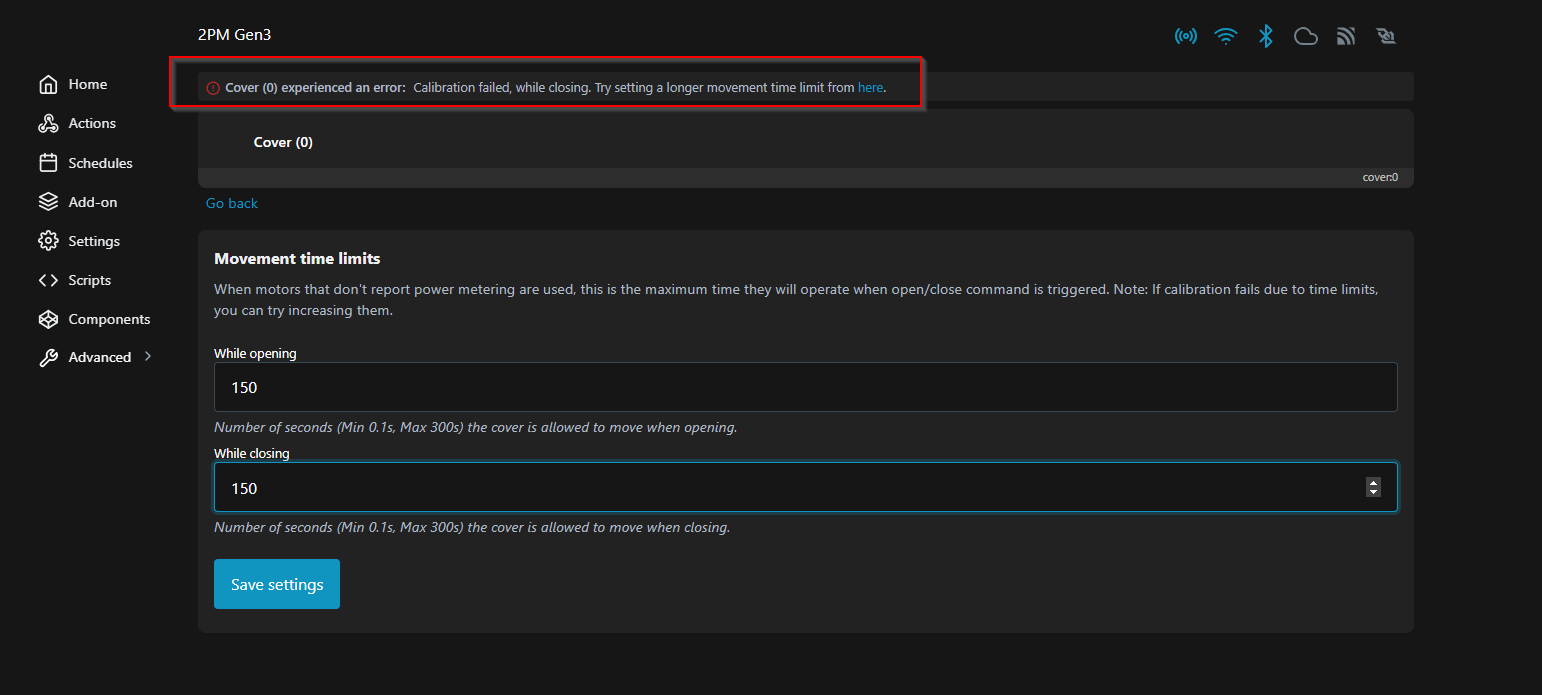
This screenshot below is informational and shows the error if the idle settings were left by default and the calibration is failing.
Start the actual calibration - keep in mind that this might take several minutes and the window might close and open several times during the process. Let it finish until you see its done.
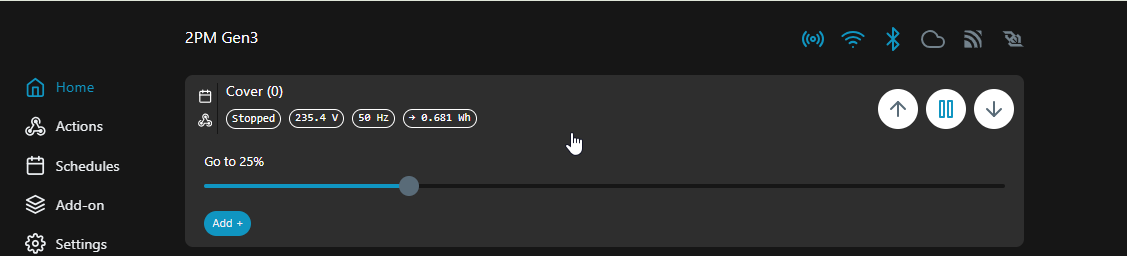
Once the calibration is complete, you will get the controls in the device web interface like on the screenshot below. Keep in mind that based on device used and FW, the looks might differ a bit.
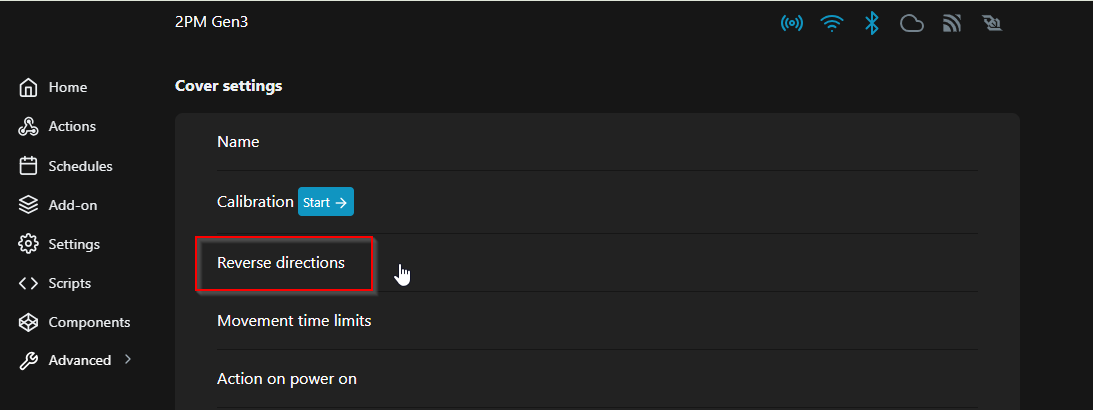
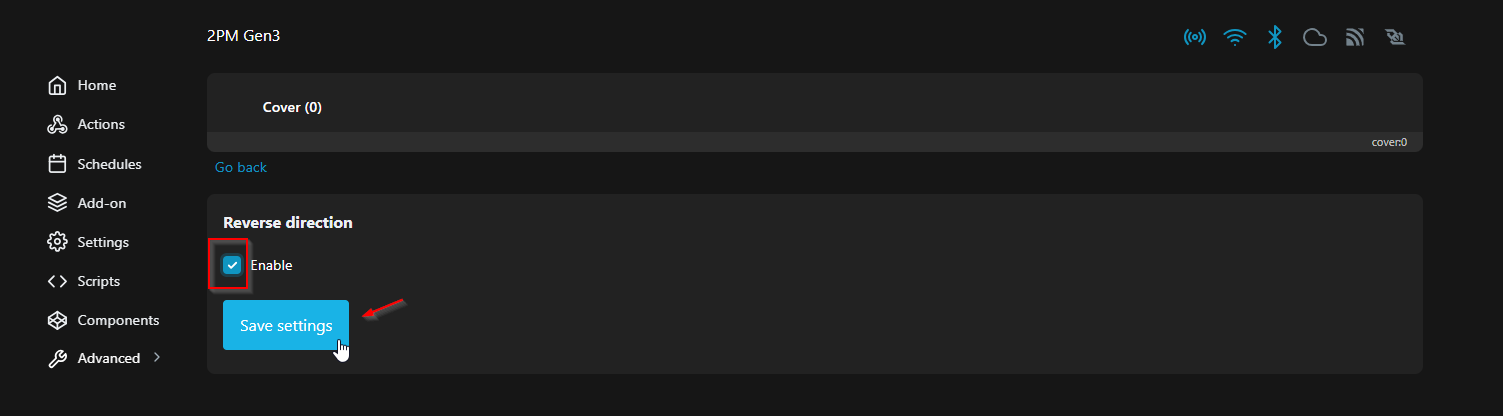
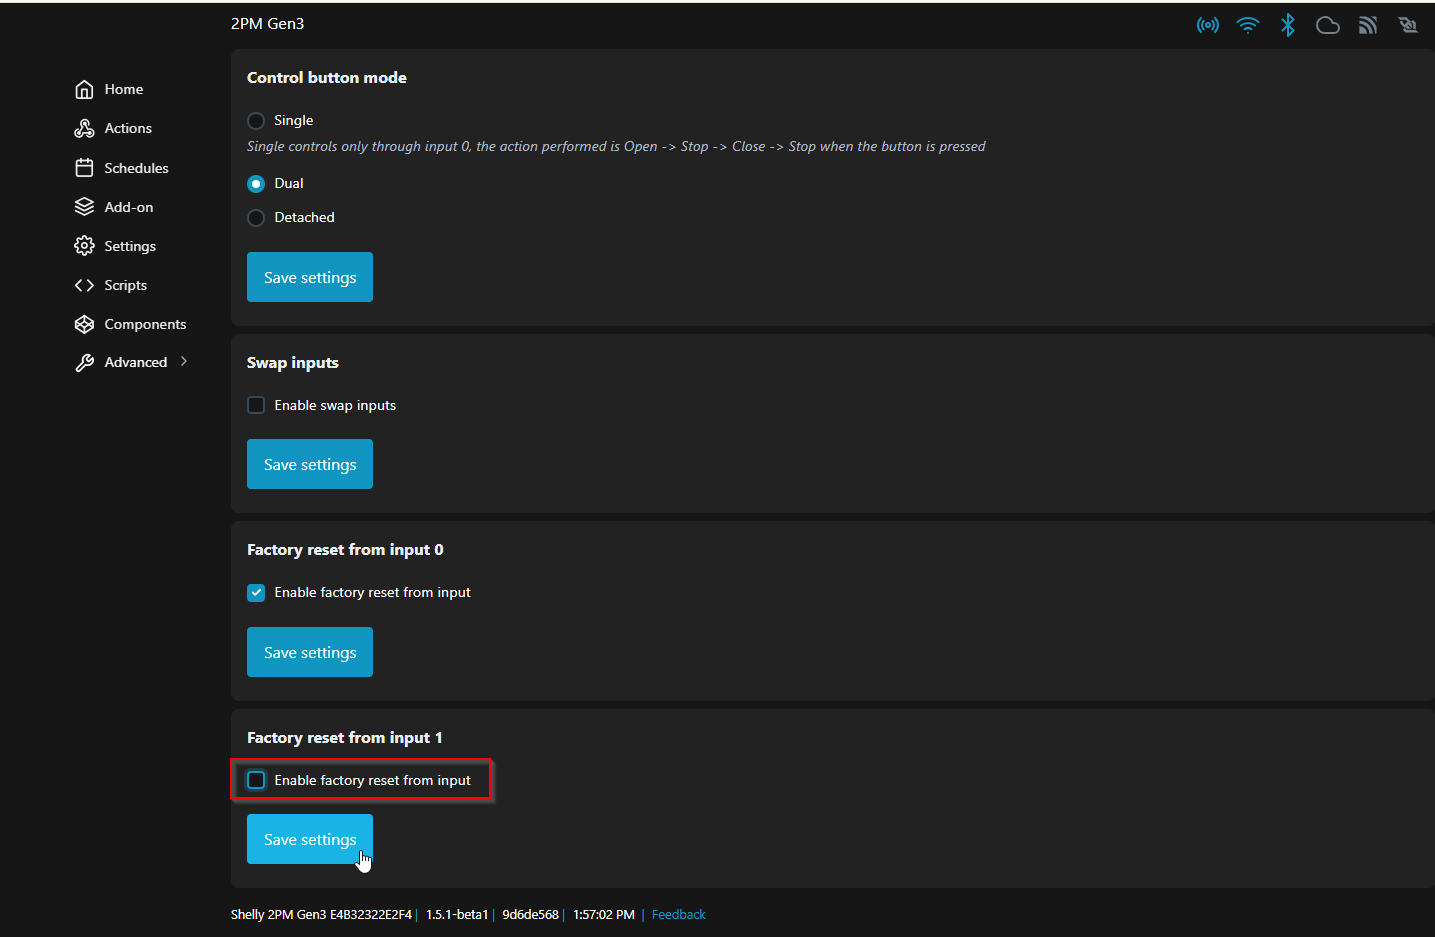
If required, reverse direction of the buttons to make sure the physical button pushed accommodate your preference for the directions.
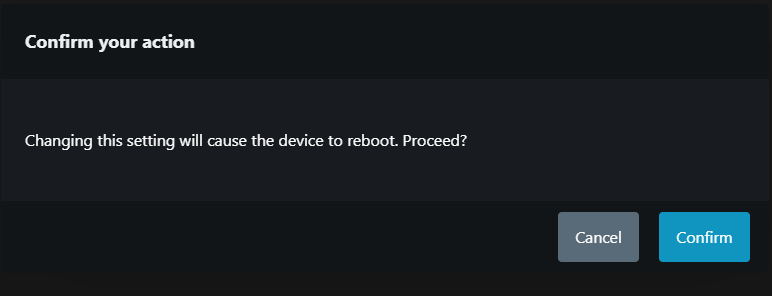
To avoid accidental device reset, disable the “Enable factory reset from input“ checkbox.
-
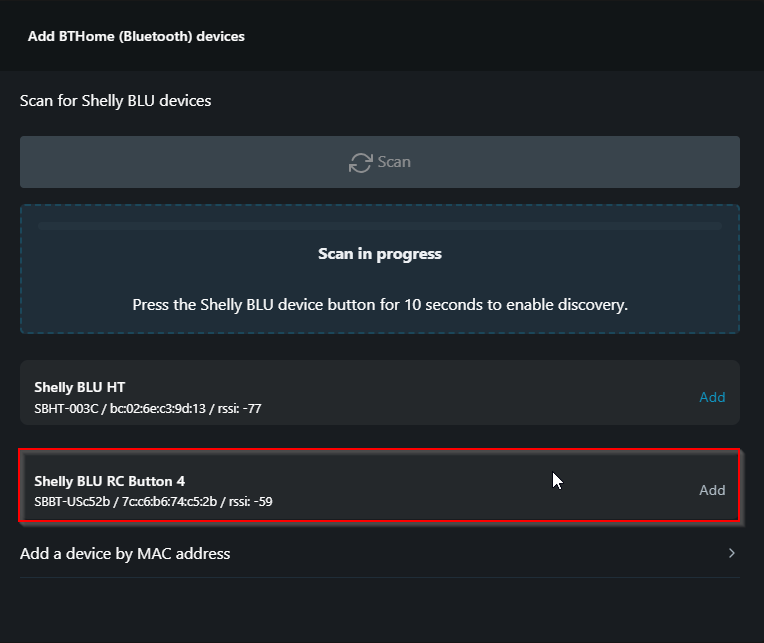
Add Shelly BLU RC Button 4 as a BT Home component
Make sure BT module is turned on, on the Shelly 2PM Gen3 to add Shelly BLU RC Button 4 remote to BT Home
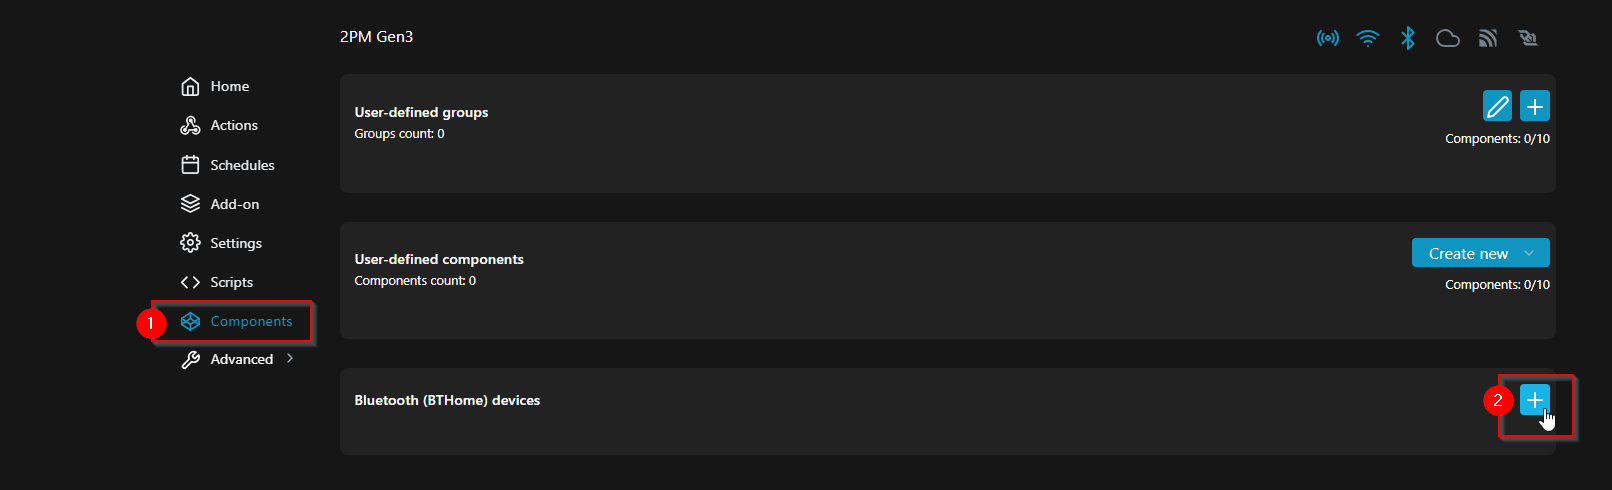
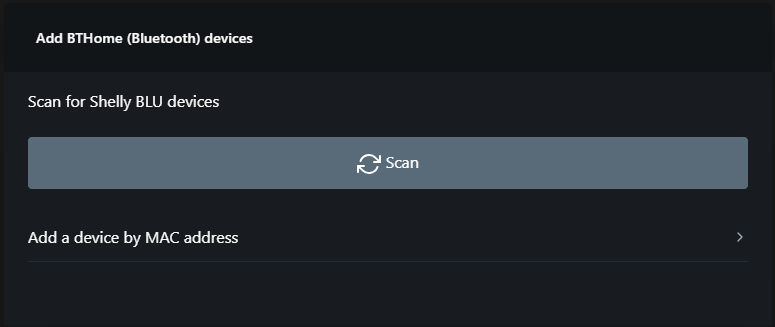
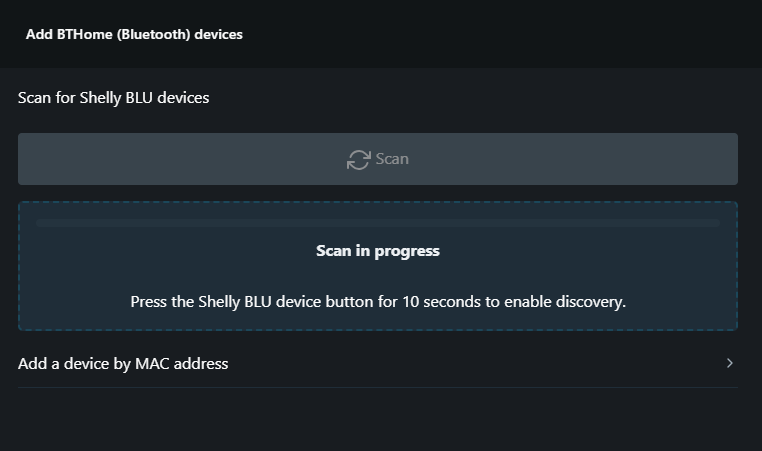
Press the pairing button on the Shelly BLU RC Button 4. The devices should appear in the list of discovered devices. Then click Add button.
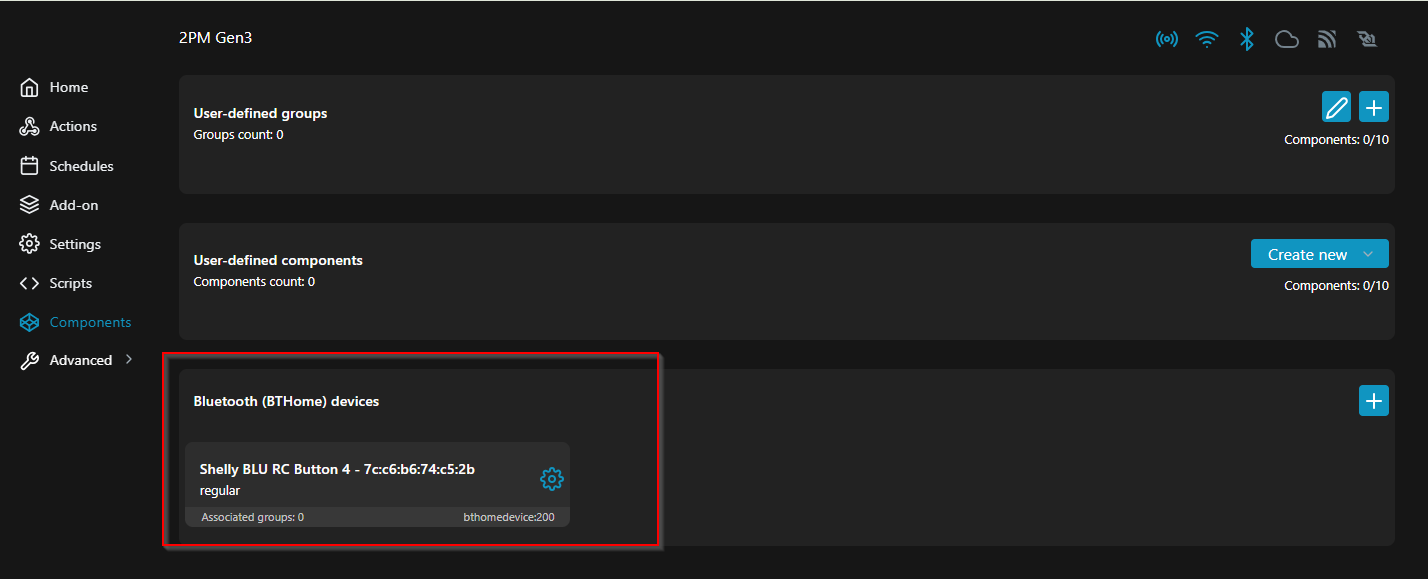
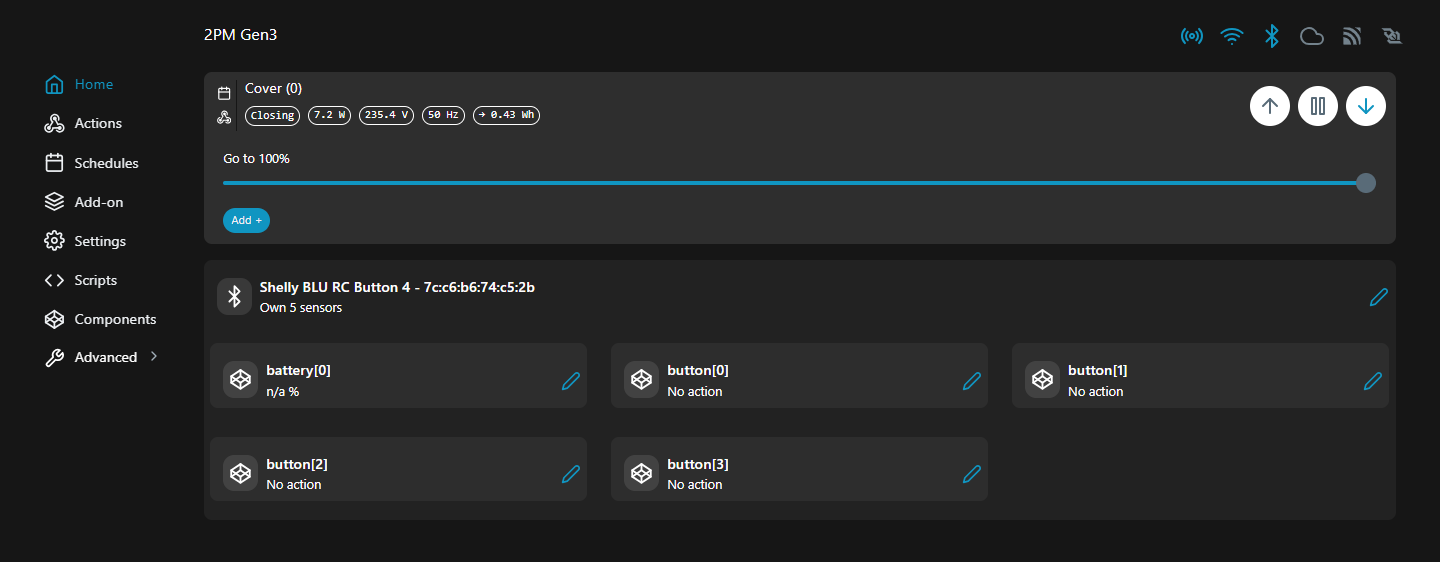
This is how the newly added device will look like in the web interface
And this is how it will appear on the Home section.
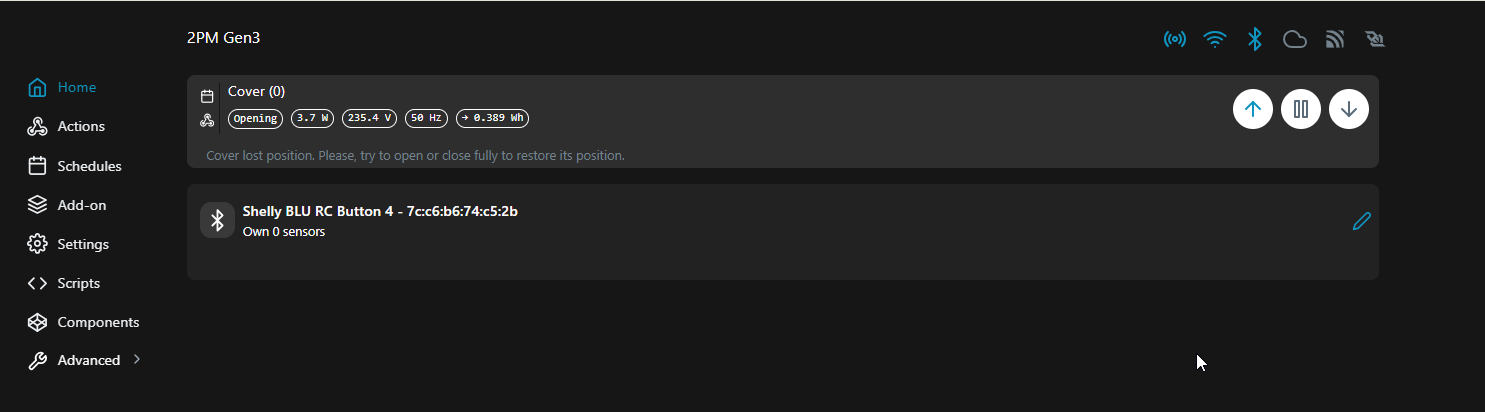
In order all device buttons/entities to appear, press any button of Shelly BLU RC Button 4 so the populate in the view.
-
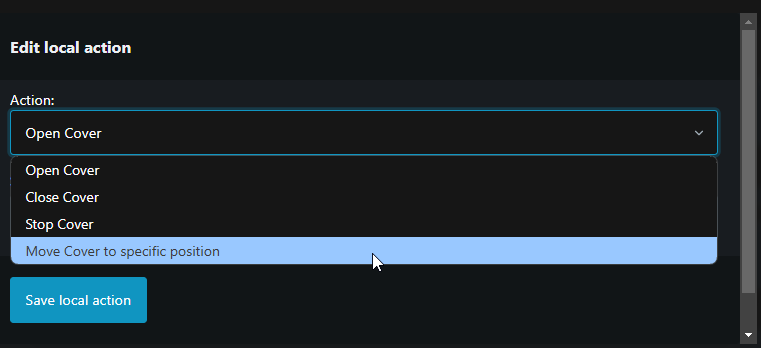
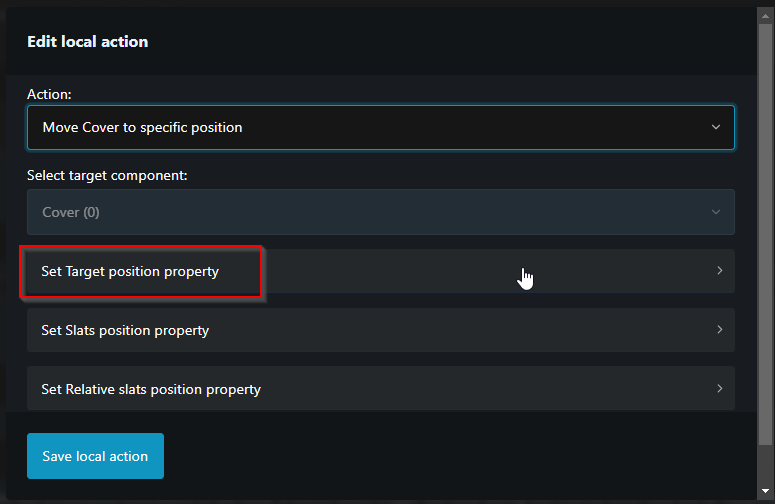
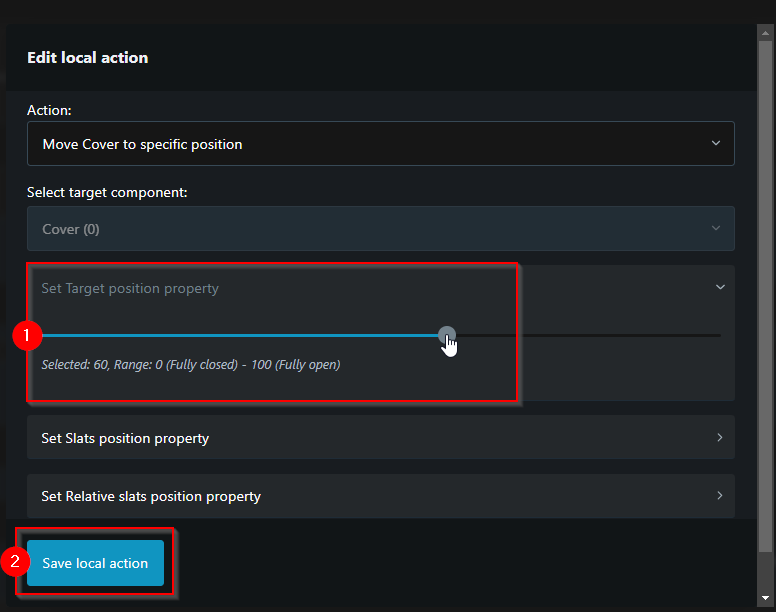
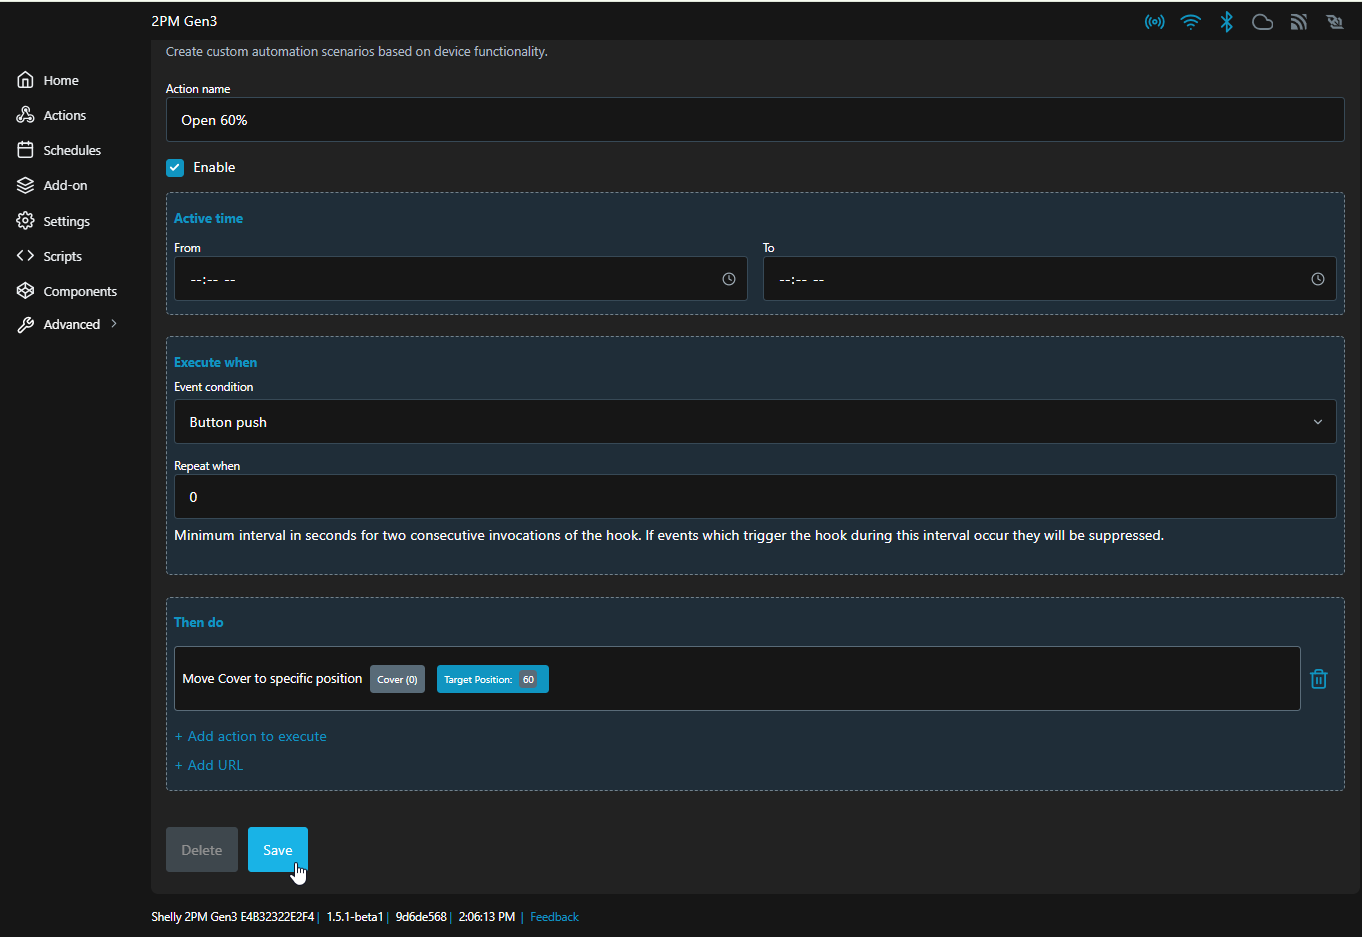
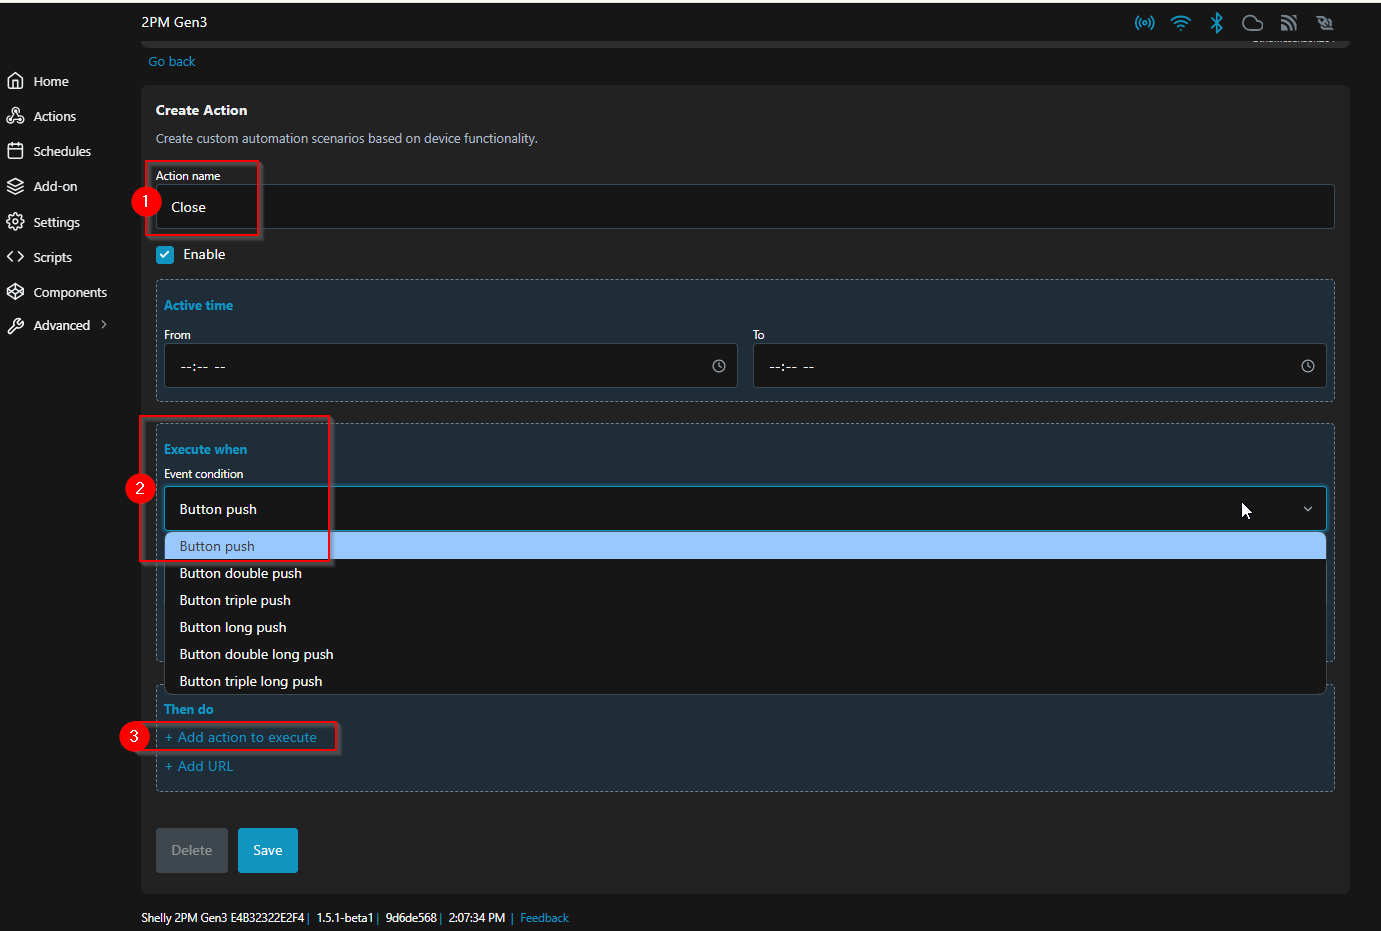
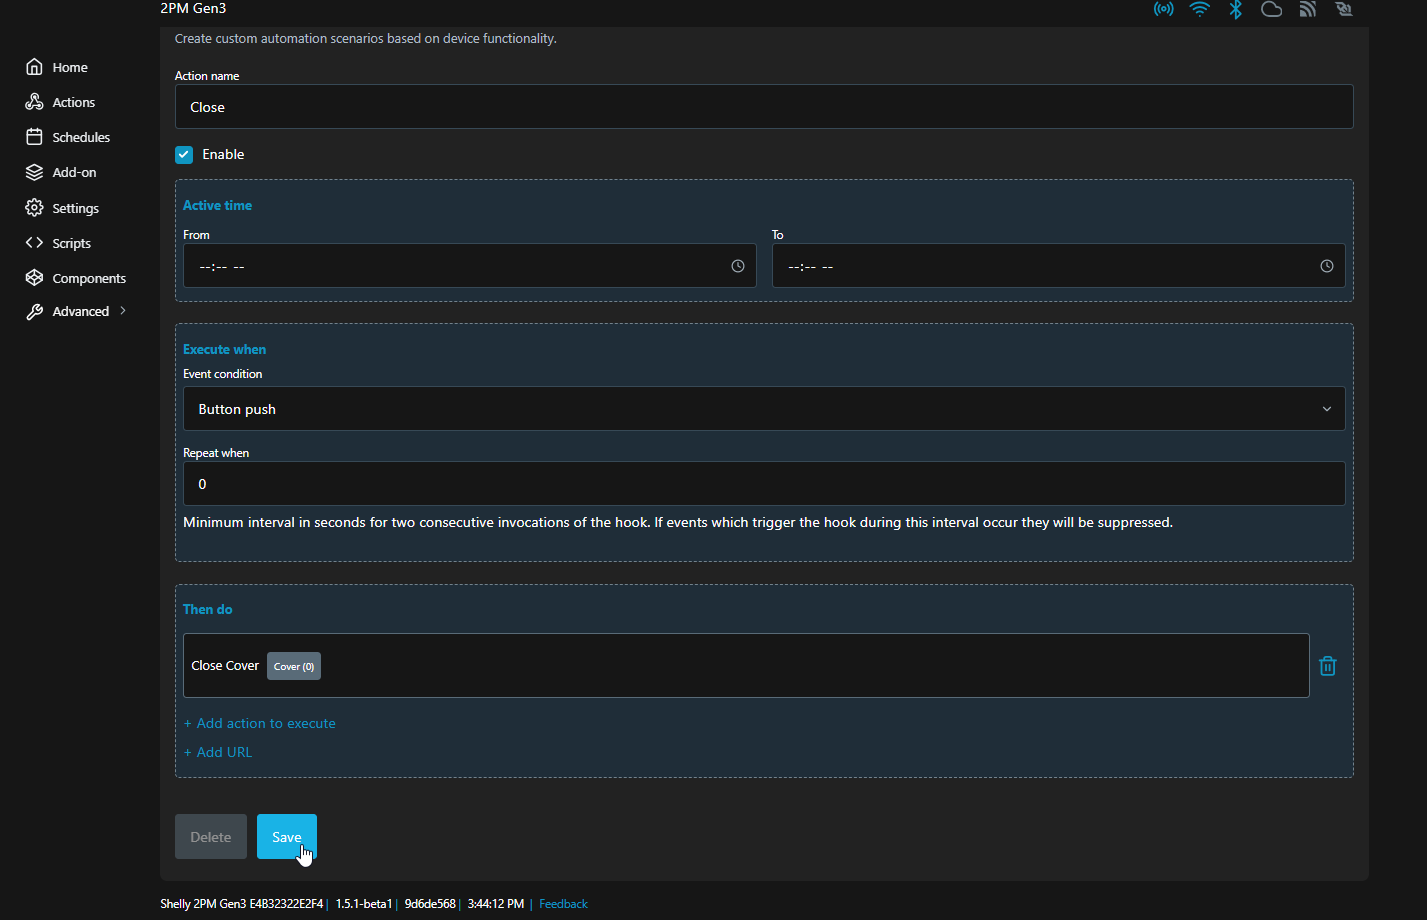
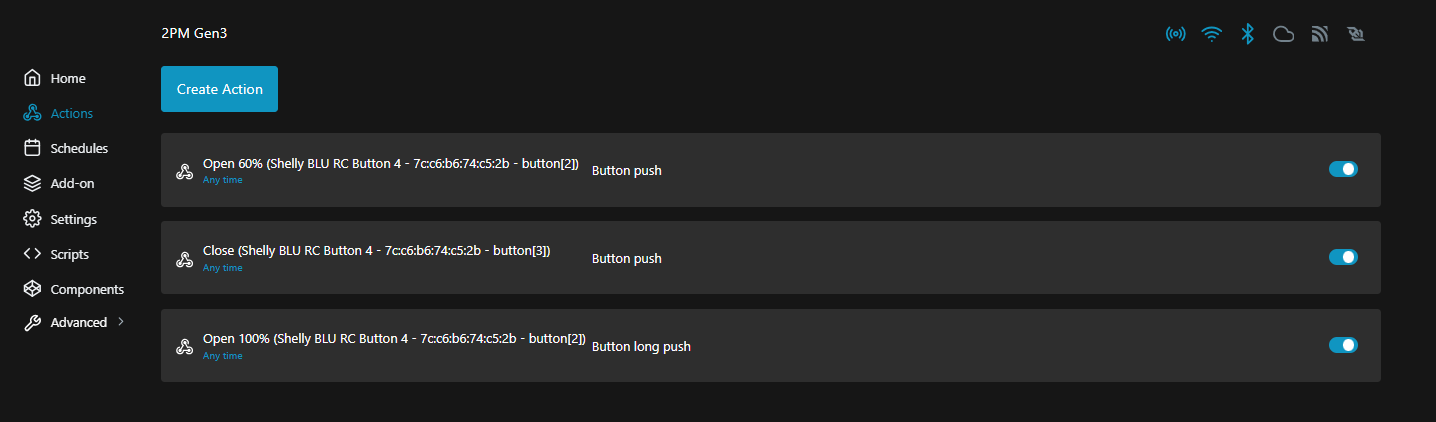
Set Up Automation and Schedules
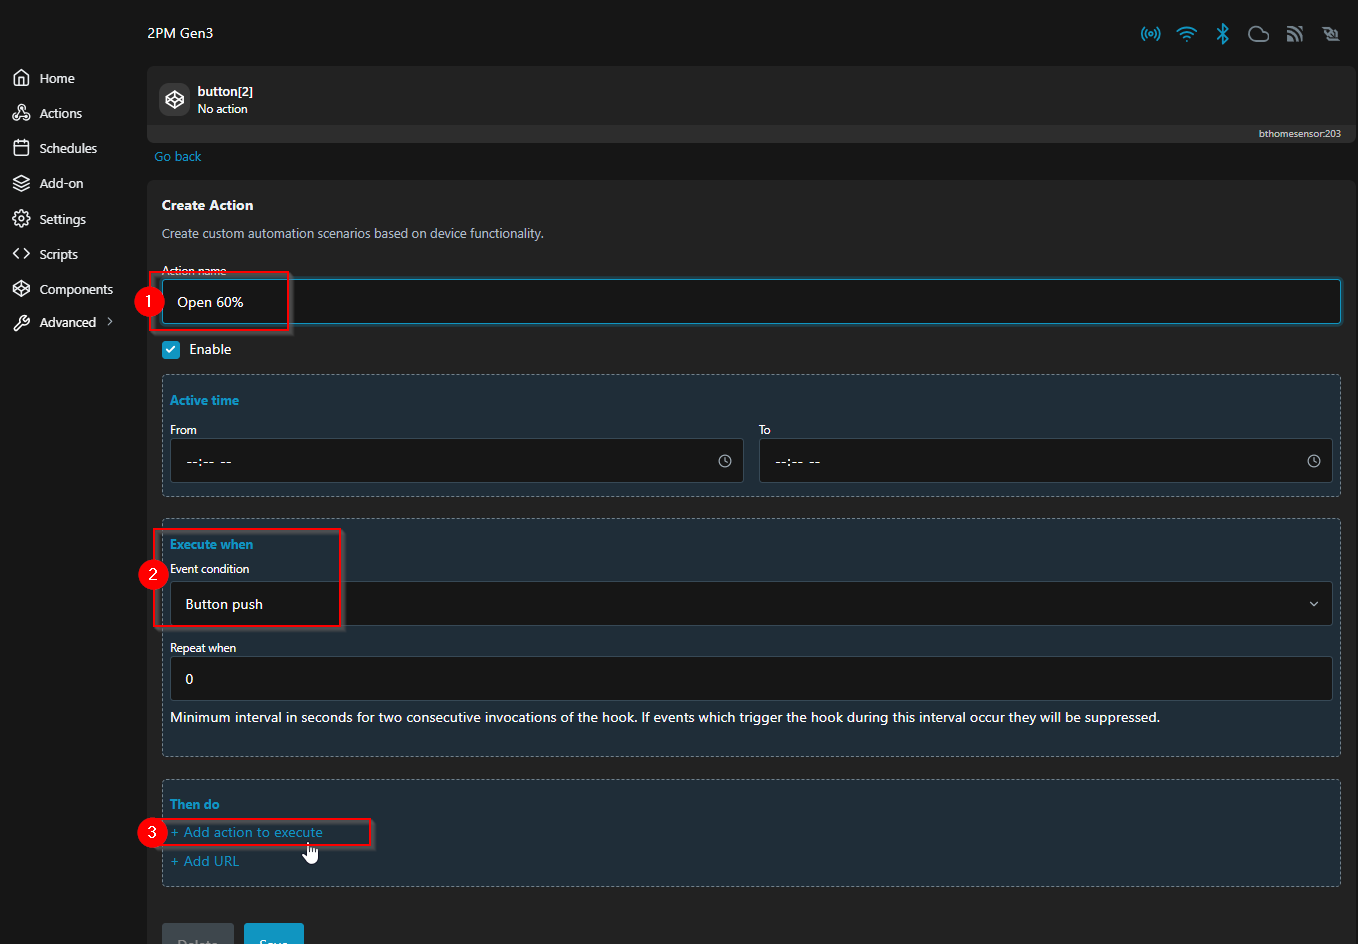
You can create local action to control and automate the electric window.
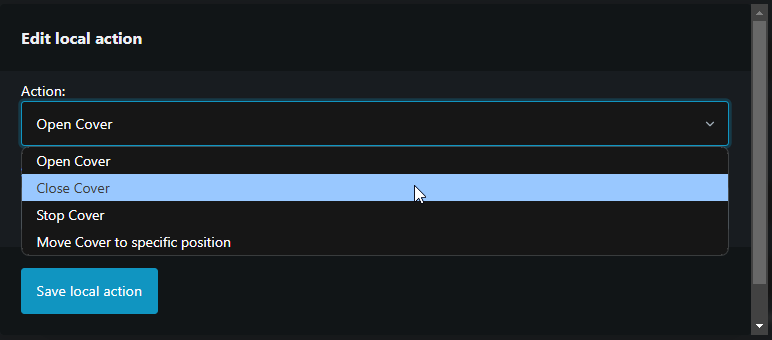
Create local action for window opening
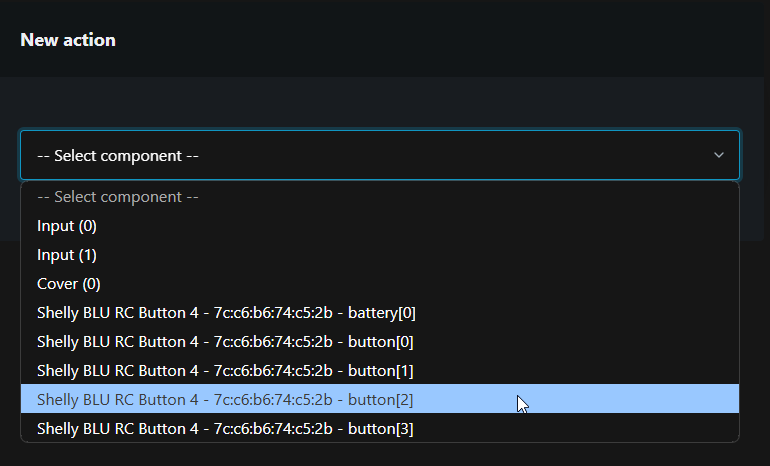
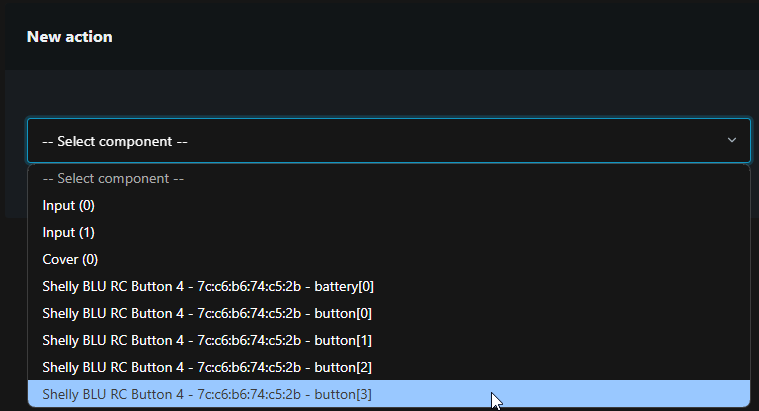
Note the actual button representation in the local web interface of the Shelly devices starts with 0 not with 1. So for example (and as shown on the screenshot) if you want to configure button 3 on the Shelly BLU RC Button 4, you have to select button 2 in the local web interface.

Create local action for window closing
Troubleshooting Tips
-
Device Not Responding: Ensure the Shelly device is properly wired and receiving power. Check your Wi-Fi network for connectivity issues.
-
Calibration Issues: If the window doesn't operate as expected, redo the calibration process to ensure accurate open and close positions.
-
Remote Pairing Failures: Ensure the Shelly BLU RC Button 4 is within the effective Bluetooth range and has functional batteries.
We Value Your Feedback!
Thank you for taking the time to read our article! Was it helpful or interesting?
Your insights can help us improve. We’d be grateful for any feedback. If you have a moment,
please share it with us at the following email:
Devices Used