
Device image
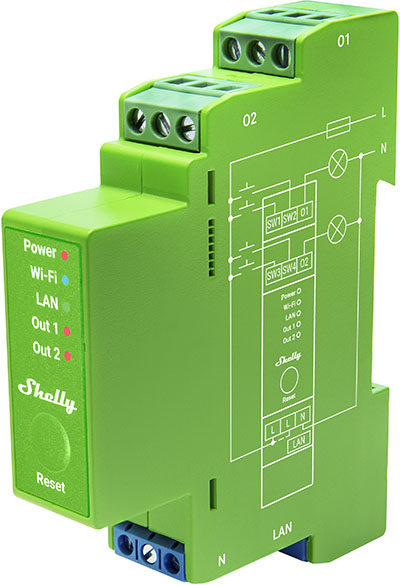
Device identification
-
Device name: Shelly Pro Dimmer 2PM
-
Device model: SPDM-002PE01EU
-
Device SSID: ShellyProDM2PM-XXXXXXXXXXXX
-
Device Bluetooth ID: 0x200E
Short description
Shelly Pro Dimmer 2PM (the Device) is a DIN-rail mountable, two-channel smart dimmer. It can work standalone in a local Wi-Fi network or it can also be operated through cloud home automation services. The Device can be accessed, controlled, and monitored remotely from any place where the User has internet connectivity, as long as it is connected to a Wi-Fi router and the Internet. Shelly Pro Dimmer 2PM has an embedded Web Interface which can be used to monitor and control the Device, as well as adjust its settings.
Main features
-
DIN rail mountable
-
Automatic dimming calibration: Provides smooth dimming throughout the entire range.
-
Switch/Button input mode: Allows flexible input control through switches or buttons.
-
One/dual button dimming control: Allows to use the full functionalities of the Device for dimming control with any wall switch configuration.
-
Night mode: Enables to set a specific brightness of input lights during nighttime.
-
Min/Max brightness: Reframes the range of the dimming signal to get more precise brightness control on the output.
-
Button fade rate: Controls how quickly the output brightness changes while holding the button(s).
-
Transition duration: Controls the time for dimming from 0 to 100 %.
-
Warm-up: Set brightness and time that will create an initial impulse for light bulbs that need more energy to wake up when the brightness is below 10%.
-
Gamma correction: adjusts the control signal so that each step in dimming appears evenly spaced in brightness to prevent lights from seeming too jumpy at low levels or too compressed at high levels. Range: 0.4 - 4.0. Default value (no correction): 1.0
-
Safety: Оver current/voltage/power protections
-
Weekly schedules: Supports daily schedules and routines, including setting of brightness, transition duration, and flip value of the dimming signal.
-
Auto on/off timers: Enables auto on/off timer setting.
-
Local actions: Allows creating automation scenarios within the local Wi-Fi network, including setting of brightness, transition duration, and flip value of the dimming signal.
-
Webhooks: Support automation through lightweight, event-driven communication with other devices.
-
BLE Gateway: Facilitates communication between BLE and Wi-Fi-enabled devices.
-
Wi-Fi Range Extender: Retransmits the Wi-Fi signal and extends its reach.
-
Scripting: Allows creating automation scenarios through scripts.
-
Compatibility: Highly compatible with 3rd Party home automation systems.
-
No need for hub: Ready for use locally or remotely via Shelly Smart Control or 3rd Party systems.
Use cases
-
Control brightness of dimmable lights within the 110-240 V range to set the perfect brightness.
-
Create smart schedules to have lights automatically adjust their brightness throughout the day.
-
Retrofit your existing lighting system with the Pro Dimmer and continue using your current switches.
-
Sync your lights with sunrise and sunset times easily using smart schedules.
-
Activate a night mode for reduced brightness during nighttime hours.
-
Integrate the Pro Dimmer with third-party systems like Home Assistant, Google Home, Alexa, and SmartThings for expanded control options.
-
Utilize the device to dim lights up or down with a single or double button press.
-
Monitor and measure power usage of connected lights for energy management.
-
Achieve precise and customized lighting control for professional installations on DIN rail.
Integrations
Amazon Alexa supported capabilities
Google Smart Home supported traits
Samsung SmartThings supported capabilities
Simplified internal schematics
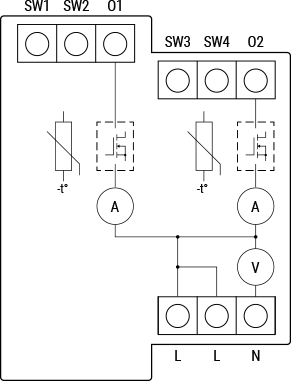
Device electrical interfaces
Inputs
-
4 switch/button inputs on screw terminals: SW1, SW2, SW3, and SW4
-
3 power supply inputs on screw terminals: 2 L and 1 N
Outputs
-
2 outputs: O1 and O2
Ethernet port
-
1 RJ45 connector
⚠CAUTION! Plug in or unplug the LAN cable only when the Device is powered off! The LAN cable connector must not be metallic in the parts touched by the user to plug in or unplug the cable.
Add-on interface
-
Shelly proprietary serial interface
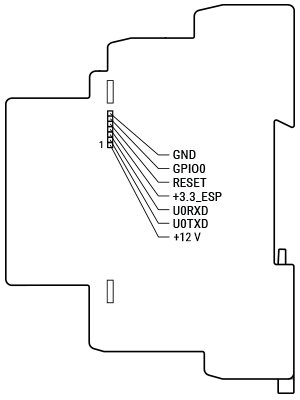
⚠CAUTION! High voltage on the add-on interface when the Device is powered!
Connectivity
-
Ethernet
-
Wi-Fi
-
Bluetooth
Safety function
-
Overheating protection
-
Overvoltage protection
-
Overcurrent protection
-
Overpower protection
Supported load types
-
Dimmable LED lamps:
-
220 V~: up to 200 W per channel
-
120 VAC: up to 100 W per channel
-
-
Incandescent bulbs:
-
220 V~: up to 200 W per channel
-
120 VAC: up to 100 W per channel
-
-
Halogen lamps:
-
220 V~: up to 200 W per channel
-
120 VAC: up to 100 W per channel
-
-
Iron-core transformer with low-voltage incandescent lamps:
-
220 V~: up to 200 VA per channel
-
120 VAC: up to 100 VA per channel
-
-
Dimmable electronic transformers:
-
220 V~: up to 200 W per channel
-
120 VAC: up to 100 W per channel
-
User interface
Inputs
-
One (Reset) button
-
Press and hold for 5 seconds to enable Device access point and Bluetooth connection.
-
Press and hold for 10 seconds to factory reset the Device.
-
Outputs
-
LED indication
-
Power (red): Red light indicator will be on if power supply is connected.
-
Wi-Fi (varies):
-
Blue light indicator will be on if in AP mode.
-
Red light indicator will be on if in STA mode and not connected to a Wi-Fi network.
-
Yellow light indicator will be on if in STA mode and connected to a Wi-Fi network. Not connected to Shelly Cloud or Shelly Cloud disabled.
-
Green light indicator will be on if in STA mode and connected to a Wi-Fi network and to the Shelly Cloud.
-
The light indicator will be flashing Red/Blue if OTA update is in progress.
-
-
LAN (green): Green light indicator will be on if LAN is connected.
-
Out 1 (red): Red light indicator will be on if the Output 1 is on.
-
Out 2 (red): Red light indicator will be on if the Output 2 is on.
-
Specifications
|
Quantity |
Value |
|---|---|
|
Physical |
|
|
Size (HxWxD): |
94x19x69 mm / 3.70x0.75x2.71 in |
|
Weight: |
75 g / 2.7 oz |
|
Screw terminals max torque: |
0.4 Nm / 3.54 lbin |
|
Conductor cross section: |
0.5 to 2.5 mm² / 20 to 14 AWG (green connectors)
|
|
Conductor stripped length: |
6 to 7 mm / 0.24 to 0.28 in (green connectors)
|
|
Mounting: |
DIN rail |
|
Shell material: |
Plastic |
|
Shell color: |
Lime |
|
Environmental |
|
|
Ambient working temperature: |
-20 °C to 40 °C / -5 °F to 105 °F |
|
Humidity: |
30 % to 70 % RH |
|
Max. altitude: |
2000 m / 6562 ft |
|
Electrical |
|
|
Power supply: |
110 - 240 V~ 50/60 Hz |
|
Power consumption: |
< 2 W |
|
External protection: |
10 A, tripping characteristic B or C,
|
|
Dimming type: |
Trailing edge |
|
Output circuits ratings |
|
|
Max. current |
0.9 A per channel |
|
Max. output power: |
200 W (at 220 V~) per channel 100 W (at 120 VAC) per channel |
|
Sensors, meters |
|
|
Voltmeter (AC): |
Yes |
|
Ammeter (AC): |
Yes |
|
Power and energy meters: |
Yes |
|
Internal-temperature sensor: |
Yes |
|
Radio |
|
|
Wi-Fi |
|
|
Protocol: |
802.11 b/g/n |
|
RF band: |
2401 - 2483 МHz |
|
Max. RF power: |
< 20 dBm |
|
Range: |
Up to 30 m / 100 ft indoors and 50 m / 160 ft outdoors
|
|
Bluetooth |
|
|
Protocol: |
4.2 |
|
RF band: |
2400 - 2483.5 MHz |
|
Max. RF power: |
< 4 dBm |
|
Range: |
Up to 10 m / 33 ft indoors and 30 m / 100 ft outdoors
|
|
Microcontroller unit |
|
|
CPU: |
ESP32-D0WDQ6 |
|
Flash: |
8 MB |
|
Firmware capabilities |
|
|
Schedules: |
20 |
|
Webhooks (URL actions): |
20 with 5 URLs per hook |
|
Scripting: |
Yes |
|
MQTT: |
Yes |
Basic wiring diagrams
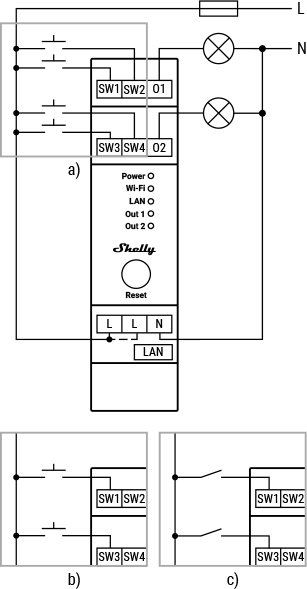
Legend
|
Terminals |
Wires |
||
|---|---|---|---|
|
SW1, SW2 |
Switch/button input terminals controlling O1 |
L |
Live (110-240 V) wire |
|
SW3, SW4 |
Switch/button input terminals controlling O2 |
N |
Neutral wire |
|
O1, O2 |
Load circuit output terminals |
|
|
|
L |
Live (110-240 V) terminals |
|
|
|
N |
Neutral terminal |
|
|
|
LAN |
Local Area Network RJ 45 connector |
|
|
Troubleshooting
-
Verify both the working voltage of the device and the supplied voltage of your power grid:
-
Installing the device with a non-recommended power supply may result in malfunction.
-
-
Ensure that the device is properly powered:
-
Check power cables, outlets, and any power indicators on the device.
-
-
Inspect Power Supply Quality:
-
Poor power quality, including voltage spikes or fluctuations, can affect device performance. Consider using a surge protector or voltage regulator if needed.
-
-
Inspect Connections:
-
Verify that all connections, including cables and wiring, are secure and properly seated. Loose connections can lead to functionality issues.
-
-
Inspect Physical Components:
-
Physically inspect the device for any signs of damage or overheating.
-
-
Monitor Environmental Factors:
-
Consider environmental factors such as temperature and humidity.
-
-
Check Load Compatibility
-
If applicable, check the load and ensure it complies with the list of supported loads.
-
-
Check Network Connection:
-
If the device is connected to a network, ensure that the network settings are correct. Test the network connection and consider restarting routers or switches if needed.
-
-
Check Compatibility:
-
Ensure that the device is compatible with other components in your system, including hardware and software. Incompatibility issues can lead to malfunctions.
-
-
Review Device Settings:
-
If applicable, check and review the device settings. Ensure that configurations are correct and match your intended use.
-
-
Restart or Reboot:
-
Sometimes, a simple restart can resolve temporary glitches. Turn off the device, wait a few seconds, and then power it back on.
-
-
Update Firmware/Software:
-
Check if there are any available firmware or software updates for the device. Keeping the device up-to-date can resolve known issues and improve performance.
-
*These are general troubleshooting steps, and the specific steps may vary based on the type of device or issue you are facing. If the issue persists and you are unable to resolve it, consider reaching out to our technical customer support.
Shelly Smart Control
Components and APIs
Compliance
-
Shelly Pro Dimmer 2PM multilingual EU declaration of conformity 2025-07-22.pdf
-
Shelly Pro Dimmer 2PM UK PSTI ACT Statement of compliance.pdf
-
Shelly Pro Dimmer 1PM&2PM AU NZ Certificate for Suitability.pdf