Shelly TRV User and Safety Guide
Read before use
This document contains important technical and safety information about the device, its safety use and installation.
⚠ ATTENTION! Before beginning the installation, please read carefully and entirely this guide and any other documents accompanying the device. Failure to follow the installation procedures could lead to malfunction, danger to your health and life, violation of the law or refusal of legal and/or commercial guarantee (if any). Shelly Europe Ltd is not responsible for any loss or damage in case of incorrect installation or improper operation of this device due to failure of following the user and safety instructions in this guide.
Introduction to Shelly®
Shelly® is a line of innovative microprocessor-managed devices, which allow remote control of electric circuits through a mobile phone, tablet, PC, or home automation system. Shelly® devices can work standalone in a local Wi-Fi network, or they can be operated through cloud home automation services. Shelly Cloud is a service that can be accessed using either the Android or iOS mobile application, or with any internet browser at https://home.shelly.cloud/.
Shelly® devices can be accessed, controlled and monitored remotely from any place where the User has internet connectivity, as long as the devices are connected to a Wi-Fi router and the Internet.
When connected directly to the device's access point, or at the device's IP address on the local Wi-Fi network, the User can access the Shelly® device's embedded Web Interface at http://192.168.33.1. The embedded Web Interface can be used to monitor and control the device, as well as adjust its settings.
Shelly® devices can communicate directly with other Wi-Fi devices through HTTP protocol. An API is provided by Shelly Europe Ltd. For more information, please visit: https://shelly-api-docs.shelly.cloud/#shelly-family-overview.
Shelly® devices are delivered with factory-installed firmware. If firmware updates are necessary to keep the devices in conformity, including security updates, Shelly Europe Ltd will provide the updates free of charge through the device embedded Web Interface or Shelly Mobile Application, where the information about the current firmware version is available. The choice to install or not the Device firmware updates is the User’s sole responsibility. Shelly Europe Ltd shall not be liable for any lack of conformity of the Device caused by failure of the User to install the provided updates in a timely manner.
Control your home with your voice
Shelly® devices are compatible with Amazon Alexa and Google Home supported functionalities. Please see our step-by-step guide on: https://shelly.cloud/support/compatibility/.
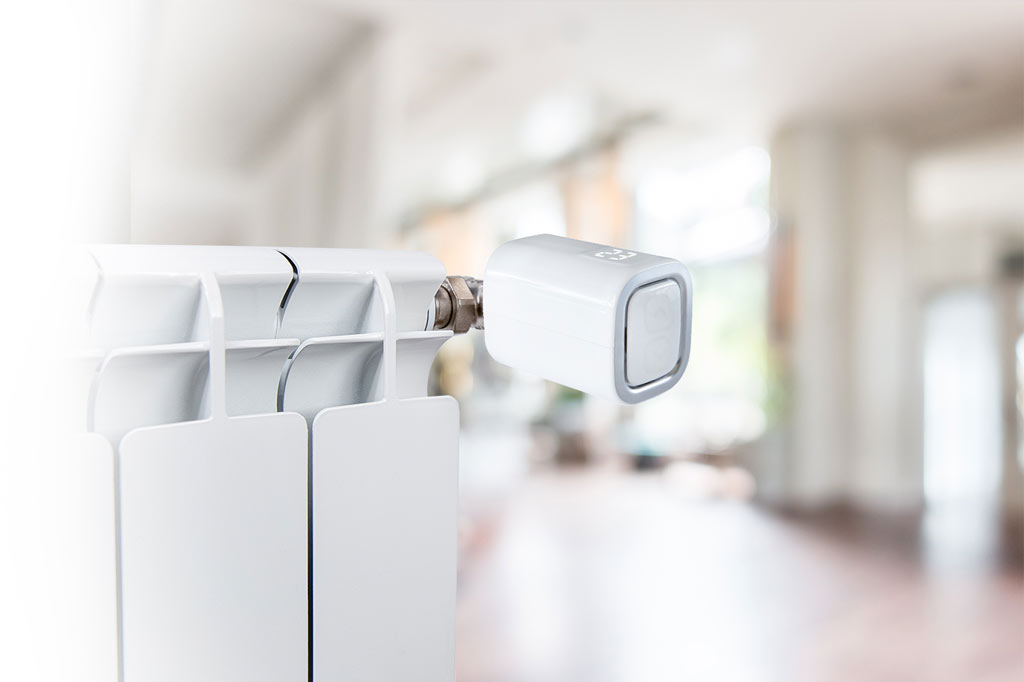
Short description
Shelly® TRV (the Device) is an intelligent Wi-Fi connected, self-regulating valve head fitted to a hot water heating system radiator valve. It controls the temperature of a room by changing the flow of the hot water through the radiator. Shelly® TRV can maintain the room temperature according to a set weekly schedule. If needed, the temperature can be changed at any time by pressing the buttons on the device, or through your mobile phone, tablet or PC. Shelly® TRV is powered by a built-in rechargeable battery. The battery can be recharged via a USB-C connector. Shelly® TRV is designed to work without recharging for 2 years, but this depends on the specific working conditions, such as how often it is necessary to adjust the hot water flow, Wi-Fi signal strength and wireless network quality.

Display
Up button
Down button
Temperature sensor opening
USB Type-C charging port
Reset button
Metal ring
Learn more about Shelly TRV and its specifications
Installation
⚠CAUTION! The Device is intended for indoor use only!
⚠CAUTION! Protect the Device from dirt and moisture!
⚠CAUTION! Do not use the Device in a damp environment and avoid water splashing.
⚠CAUTION! Ensure that the radiator is turned off and has cooled down before beginning the Device installation.
Compatible valves
If you already have thermostatic radiator valves, which typically have a dial on top with numbers from 1 to 5, your radiators are likely compatible with Shelly® TRV. Check the list of compatible radiator valves by brand and model here:
Shelly TRV-Valves compatibility list
Radiators with manual valves are not compatible with Shelly® TRV. Manual valves are typically small and discrete. They are standard when you have a separate thermostat in the room or a central thermostat.

If your radiator valves are not compatible you can use one of the adapters included in the box. See the image above.
Remove the existing thermostatic radiator valve
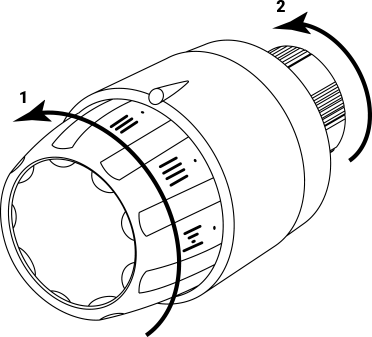
Turn the dial counter clockwise until the valve is fully open.
Unscrew the metal ring counter clockwise to remove the valve.
Install Shelly TRV
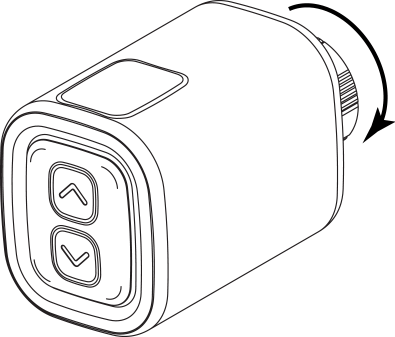
Check if you need an adapter, and if necessary, mount the suitable one before installing Shelly® TRV.
Fasten the Shelly® TRV to the radiator valve by turning the metal ring clockwise. Do not fully tighten the ring.
Place the Device display in the correct position and then fully tighten the metal ring.
⚠CAUTION! Do not try to rotate the Device if the metal ring is fully tightened. This can damage it.
Switch on the Device
Press briefly the Device Reset button. The screen will display the CL message and the motor inside will turn in both directions. This is the calibration process.
⚠CAUTION! Be careful not to insert the pin into the round hole of the temperature sensor. You may damage it. The reset button has an oblong shape.
If the calibration process is successful, the screen will display AP and the Device is ready to be connected to your Wi-Fi network.
If the calibration is not successful, then E1 message will be displayed. The reason is either the ring is not tightened enough or the Device is not properly mounted to the radiator.
Try tightening the ring or remove the Device and carefully mount It again. Press and hold for 3 seconds either the Up or Down button. Then press the Down button a couple of times. The Device will try to calibrate again.
⚠IMPORTANT! If the Device has not been added to your Wi-Fi network in 3 minutes, it will switch off. Press briefly the Reset button to start it again.
If needed, the Device can be switched off manually by pressing briefly the Reset button while the Device is in AP mode.
Charge the device
Fully charge the Device before its first use for about 7 hours. Battery status is displayed while charging. The line, which indicates the battery level, flashes while the device is charging. A dot is displayed next to the bottom line, when a charger is connected. If the battery level is not displayed, press briefly the Reset button. If battery level is very low bL is briefly shown before the display goes off.
 | <50% |
 | 50-75% |
 | 75% |
⚠IMPORTANT: The device heats up during charging, which prevents it from measuring the room temperature correctly.
⚠CAUTION! Use only charging adapters that comply with USB-C standard. Do not charge the Device if the charging adapter or the charging cable are damaged.
⚠CAUTION! Do not use the Device if it has been damaged!
⚠CAUTION! Do not attempt to service or repair the Device yourself!
Device Status
To check the Device status press and hold for 5 seconds both the Up and Down buttons. Use the Up or Down buttons to scroll through all the parameters:
Mode:
 | Access point mode |
 | Station mode |
 | Connected to a Wi-Fi network |
Battery level:
 | <50% (<25% if the dash is flashing) |
 | 50-75% |
 | 75% |
Status:
 | No issues |
 | Calibration problem |
 | Temperature sensor problem |
Initial inclusion
If you choose to use the Device with the Shelly Cloud mobile application and Shelly Cloud service, instructions on how to connect the Device to the Cloud and control it through the Shelly App can be found in the Shelly Smart Control Guide.
The Shelly Mobile Application and Shelly Cloud service are not conditions for the Device to function properly. This Device can be used stand-alone or with various other home automation platforms and protocols.
Manually connecting to a Wi·Fi network
You can manage and control the Device through its embedded web interface too. Check the Shelly TVR web interface guide for more details.
Make sure Shelly TRV is in AP mode. Open the Device web user interface at http://192.168.33.1 in the Device created Wi-Fi network.
Click the Internet & Security button and then select WIFI MODE- CLIENT.
Check the Connect the Shelly device to an existing WIFI Network check box, enter the Wi-Fi network name and password, and press the SAVE button.
Find your Device IP address in the WI-FI network. You can use a simple tool to find shelly devices in the local network: https://shelly.cloud/documents/device_finders/ShellyFinderWindows.zip
(Windows) and https://shelly.cloud/documents/device_finders/ShellyFinderOSX.zip (MacOSX).
⚠IMPORTANT: Enabling the Client mode will disable the AP mode. In case you need the AP mode again, press and hold the Reset button for 5 seconds. Press and hold the Reset button for 10 seconds to factory reset the Device.
How to control room temperature
Setting room temperature using the buttons
Press shortly any of the buttons to see the measured temperature of the room. The display will show the measured room temperature for 3 seconds.
Press and hold one of the buttons for 3 seconds to display the current temperature with a dot at the last digit. Press the Up or the Down button to set a new target temperature in the range of 5°C to 30°C.
LOmessage on the display means that the valve is fully closed, andHImeans that the valve is fully open.
Setting room temperature using the Shelly Cloud APP
The room temperature can also be monitored and controlled through the Shelly Cloud Application. Check the Shelly Application Guide for more information.
Setting room temperature using the Device web user interface
Access the Device by Its IP address in your Wi-Fi network.
Use the red and the blue arrows to set new target temperature.
When the Device receives the new target temperature, a dot will flash briefly on the display.
⚠IMPORTANT: If a weekly schedule is activated, the manually set target temperature will be overridden by the next scheduled one.
Scheduling
Shelly TRV supports up to 5 pre-set profiles to control the temperature in the room on a weekly schedule. Up to 20 temperature changes can be added to each profile.
Setting Schedule using the Shelly Cloud APP
The scheduling can also be activated and set through the Shelly Cloud APP. Check the Shelly Application Guide for more information.
Setting Schedule using the Device web user interface
Access the Device by its IP address in your WI-Fi network.
Click on Weekly schedule button.
Select a profile from the dropdown. Select the Disable profile to disable the scheduling.
Click on EDIT CURRENT SCHEDULE to add, remove or edit temperature changes.
Change the profile name if desired by typing a new name and pressing the RENAME button.
Click on the SET A NEW TIME button to add a temperature change time.
Select a desired temperature, check the weekdays it applies to and click on the SAVE button.
Edit a scheduled temperature change by clicking the yellow pencil button, or delete it by clicking the red bin button.
Using external temperature sensor
Every radiator-mounted thermostat has a slight deviation from the actual room temperature, since the temperature measurement is performed too closely to the radiator. Shelly TRV solves the problem by supporting communication with an external temperature sensor (i.e Shelly H&T and Shelly Plus H&T) or a compatible one, located anywhere in the room.
Enabling external sensor using the Shelly Cloud APP
The use of an external temperature sensor can also be enabled through the Shelly Cloud APP. Check the Shelly Application Guide for more information.
Enabling external sensor using the Device web user interface
Access the Device by its IP address in your Wi-Fi network.
Click on the Sensor Settings button.
Click TEMPERATURE OFFSET
Check the Enable external temperature corrections endpoint checkbox.
Set a manual temperature offset, if desired, and press the OK button.
⚠CAUTION! Do not allow children to play with the buttons/switches connected to the Device. Keep the devices for remote control of Shelly (mobile phones, tablets, PCs) away from children!