Case description
Using the main case description let’s assume we have a case where it is necessary to improve the existing electrical installation by providing the ability to DIM UP/DOWN the Presenter's (Lecturer’s) spots and giving him the comfort to still have light while making presentations.
Below we describe how to achieve that by selecting Shelly’s PRO Dimmer 1PM, which requires minimum rewiring and space (1 position/18mm) inside the distribution board only.
In addition, the Shelly PRO Dimmer 1PM is capable of providing measurement data of the connected load onto the KNX network.
KNX Configuration
Electrical installations are not covered in this guide. Proper installation of the Device and all associated electrical connections is an absolute must. To protect the user and ensure optimal safety and functionality, all necessary procedures must be performed by an experienced technician in accordance with the provided documentation.
General configuration
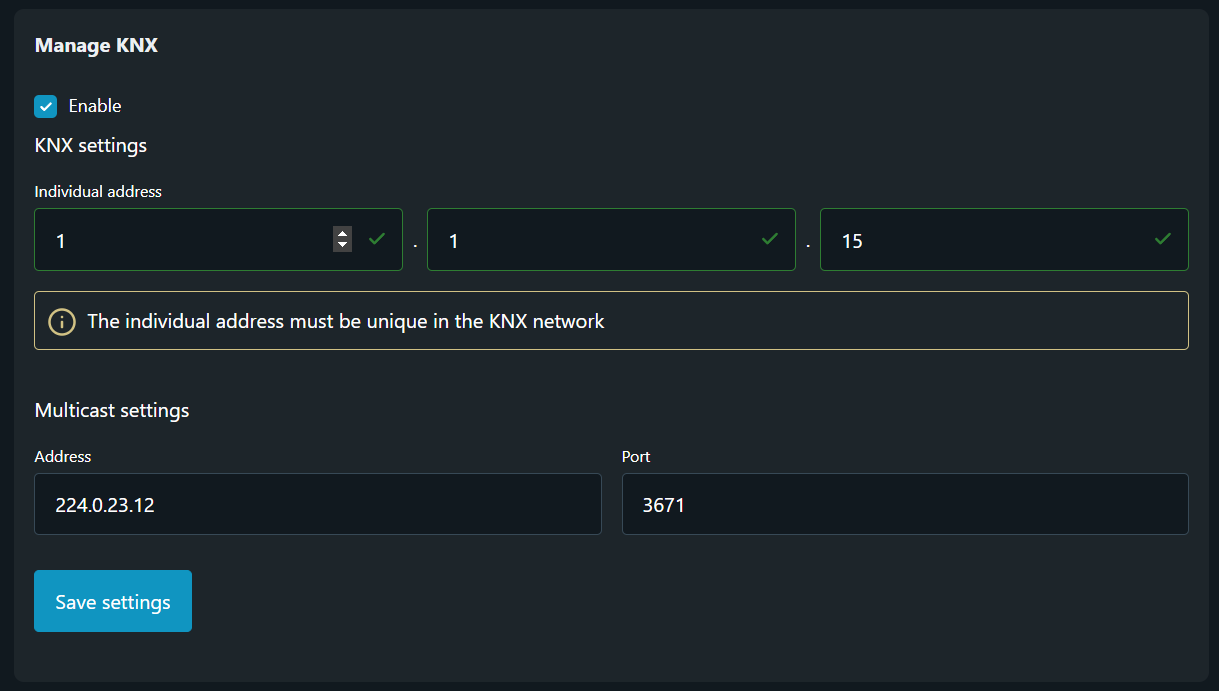
As with every KNX device, Shelly devices too need to be properly configured in order to be able to exchange data with other KNX devices. You’ll need to coordinate this information with your KNX integrator and network administrator.
In this example we are using 1.1.15 as Individual address and the default Multicast settings.
For more details about the General configuration, see provided documentation here.
Outputs configuration
According to the data listed in Table 2 the Presenter’s spots are organized as one lighting circuit - L1, which is operated by channel 1 of the KNX switch actuator. Below is described how to configure your newly installed Shelly PRO Dimmer 1PM.
Control commands
As opposing to simple ON\OFF controls, where we have only one control command, in cases where dimmers are used we still have the same Switching object and additionally we have commands for controlling the dimming level. These commands are relative and absolute dimming, which we explain in detail below.
Relative dimming stands for dimming up or down in predefined steps. Such dimming control is mainly used by KNX push buttons or simple displays. The control data exchanged between devices has length of 4 bits and according to the KNX organization its DPT is 3.008 (dimming).
Absolute dimming stands for precise dimming control defined in percentage (0-100%) with control step of one percent. Absolute dimming is required for direct brightness control provided by advanced KNX displays or KNX servers. It is also used for configuring KNX scenarios. The control data exchanged between devices has length of 1 byte (8 bits) and according to the KNX organization its DPT is 5.001 (percentage).
-
Switch object- provide theGroup addressused for switching control, i.e. ON/OFF. Make sure it has the same DPT length. In this example, according to the data in Table 2 that GA is 1/1/1. Enter it in the provided fields and pressSavebutton.

Switch object configuration
-
Relatie dimming object- provide theGroup addressused for relative dimming control, i.e. step dimming up or down. Make sure it has the same DPT length. In this example, we have to assign new GA since this type of control did not exist in the original KNX configuration. Coordinate this upgrade of the system with your KNX integrator and request new GA. In this case we’ve got Ga 1/3/1. Enter it in the provided fields and pressSavebutton.

Relatie dimming object configuration
-
Absolute dimming object- provide theGroup addressused for absolute dimming control, i.e. precise dimming in percentage. Make sure it has the same DPT length. In this example, we have to assign new GA since this type of control did not exist in the original KNX configuration. Coordinate this upgrade of the system with your KNX integrator and request new GA. In this case we’ve got Ga 1/4/1. Enter it in the provided fields and pressSavebutton.

Absolute dimming object configuration
Feedback reporting
In dimmers the feedback status report have one more object additionally, which provides information regarding the current brightness level of the dimming channel. Brightness level is provided via using Lighting level object, which we explain below. The information regarding the switching status of the channel is also provided by the Feedback object.
Lighting level - presents information for the current dimming level expressed in percentage of the dimming channel. The control data exchanged between devices has length of 1 byte (8 bits) and according to the KNX organization its DPT is 5.001 (percentage).
-
Feedback object- notifies all other devices sharing the sameGroup addressabout Shelly PRO Dimmer 1PM output’s switching status, i.e. ON/OFF. Make sure it has the same DPT length. In this example that is GA 1/2/1. Enter it in the provided fields and pressSavebutton.

Feedback object configuration
-
Lighting level object- notifies all other devices sharing the sameGroup addressabout Shelly PRO Dimmer 1PM output’s brightness level. Make sure it has the same DPT length. In this example, we have to assign new GA since this type of control did not exist in the original KNX configuration. Coordinate this upgrade of the system with your KNX integrator and request new GA. In this case we’ve got Ga 1/5/1. Enter it in the provided fields and pressSavebutton.

Lighting level object configuration
Measuring data
The following setup process is not needed for proper operation of the system, but it provides extended functionality within the existing KNX installation. Usually this data is visualized by a KNX display or visualization server (KNX server). The KNX server may also process this data and by implementing additional logic on it a variety of actions (e.g. notifications. alarms or even safety switching) may be integrated.
To add measuring data into the KNX server, additional setup of the server are required if not already provided.
A detailed description regarding all the measurements provided by Shelly PRO Dimmer 1PM may be found in Table 3 below. The last column of the table shows an example of Group addresses (GA) that we use to describe the setup process.
|
Table 3 - Measurements |
||||
|---|---|---|---|---|
|
Num |
Description |
Object name |
KNX Length & Encoding |
GA |
|
1 |
Supply voltage |
|
4 byte, DPT 14.027 (electric potential) |
1/6/1 |
|
2 |
Load current |
|
4-byte; DPT 14.019 (electric current) |
1/6/2 |
|
3 |
Active power |
|
4-byte; DPT 14.056 (active power) |
1/6/3 |
|
4 |
Active energy |
|
4-byte; DPT 13.010 (active energy) |
1/6/4 |
To complete configuration follow the steps below:
-
Voltage object- provides real-time data of the voltage supplied to the connected load(s) via the assignedGroup addressto all other devices that share it. In this example we use GA 1/6/1. Enter the address in the provided fields and pressSavebutton.

Voltage object configuration
-
Current object- provides real-time data of the current flowing through connected load(s) via the assignedGroup addressto all other devices that share it. In this example we use GA 1/6/2. Enter the address in the provided fields and pressSavebutton.

Current object configuration
-
Active power object- represents the rate at which electrical energy is consumed in a system. This rate is shared via the assignedGroup address. In this example we use GA 1/6/3. Enter the address in the provided fields and pressSavebutton.

Active power object configuration
-
Active energy object- tracks the active energy consumption over time, providing cumulative data on the total energy consumed by the load. Consumed energy is presented via the assignedGroup addressto all other devices that share it. In this example we use GA 1/6/4. Enter the address in the provided fields and pressSavebutton.

Active energy object configuration
Conclusion
Once all of the setup process is done and all necessary Group addresses are entered, Shelly’s PRO Dimmer 1PM is a great device which provide dimming capabilities required for expansion or renovation of existing KNX installations.
Shelly’s PRO Dimmer 1PM offers a comprehensive measurement data to the system in addition.