Use Shelly Plus 2PM and Add-on with a wind sensor to retract your motorized awning in high winds

Read before use
This document contains important technical and safety information about the device, its safety use and installation.
⚠ ATTENTION! Before beginning the installation, please read carefully and entirely this guide and any other documents accompanying the device. Failure to follow the installation procedures could lead to malfunction, danger to your health and life, violation of the law or refusal of legal and/or commercial guarantee (if any). Shelly Europe Ltd is not responsible for any loss or damage in case of incorrect installation or improper operation of this device due to failure of following the user and safety instructions in this guide.
Use case
This guide describes an example of how to use Shelly Plus 2PM and Plus Add-on with a wind sensor to automatically retract your motorized awning and protect it in harsh weather conditions. The installation guide includes the following Shelly products:
You can connect and use any anemometer with an analog output in the range of 0 to 10 V that is commercially available on the market.
Prerequisites
A retractable awning with a motor with power supply 110 - 240 VAC and end switches.
2.4 GHz Wi-Fi network.
Installation
⚠WARNING! Danger of electrocution. Mounting/installation of the Device to the power grid has to be performed with caution, by a qualified electrician!
⚠WARNING! Danger of electrocution. Every change in the connections has to be done after ensuring there is no voltage present at the Device terminals!
⚠CAUTION! Use the Device only with a power grid and appliances which comply with all applicable regulations. A short circuit in the power grid or any appliance connected to the Device may damage the Device!
⚠CAUTION! Тhe Device may be connected to and may control electric circuits and appliances only if they comply with the respective standards and safety norms!
⚠CAUTION! Do not connect the Device to appliances exceeding the given max load!
⚠CAUTION! Connect the Device only in the way shown in these instructions. Any other method could cause damage and/or injury!
⚠CAUTION! Do not install the device where it can get wet!
⚠CAUTION! Do not use the Device if it has been damaged!
⚠CAUTION! Do not attempt to service or repair the Device yourself!
Mounting
Shelly Plus Addon is intended to be attached to a Shelly Plus device (currently Shelly Plus 1, Shelly Plus 1PM, Shelly Plus 2PM, Shelly i4, and Shelly i4DC).
⚠CAUTION! If you are installing the Shelly Plus Add-on to a Shelly Plus 2PM that is already connected to the power grid, check that the breakers are turned off and there is no voltage on the terminals of the Shelly Plus 2PM device you are attaching the Shelly Plus Add-on to. This can be done with a phase tester or multimeter. When you are sure that there is no voltage, you can proceed to installing the Shelly Plus Add-on.
Attach the Shelly Plus Add-on to the Shelly Plus 2PM as shown below.
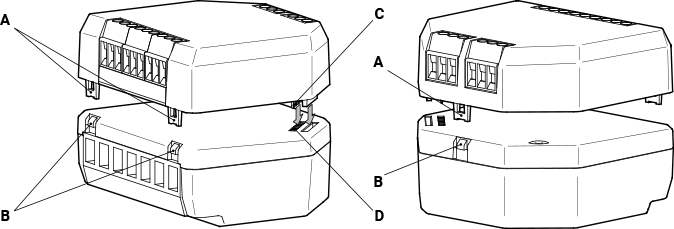
Attaching Shelly Plus Add-on to a Shelly Plus 2PM device
⚠CAUTION! Be very careful not to bend the Device header pins (C) when inserting them to the Shelly Plus device header connector (D).
Make sure the brackets (A) lock on the Shelly Plus device hooks (B) and then proceed to the Device wiring.
Wiring
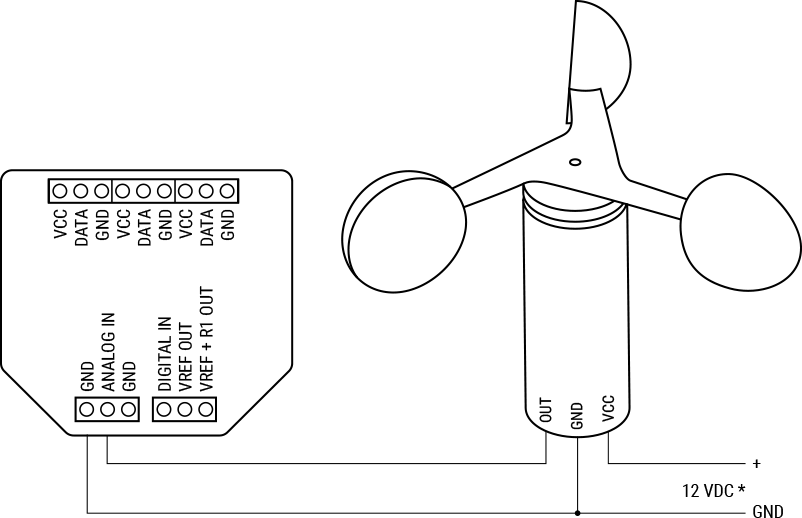
Connect the wind speed sensor to Shelly Plus Add-on according to the schematic below.
Connect the OUT wire to the Device ANALOG IN input.
Connect the sensor GND wire to the sensor power supply ground and the Device GND terminal.
Connect the + wire to the sensor power supply VCC wire.
Connect the awning motor to Shelly Plus 2PM and Shelly Wall Switch 2 according to the schematic below.
⚠ CAUTION: For inductive appliances that cause voltage spikes during switching on/off, such as electrical motors, fans, vacuum cleaners, and similar ones, an RC snubber (0.1µF / 100 Ω / 1/2 W / 600 VAC) should be connected in parallel with the appliance. The RC snubber can be purchased at https://www.shelly.com/en-bg/products/shop/bypass-1/rc-snubber.
O1 corresponds to Opening.
O2 corresponds to Closing.
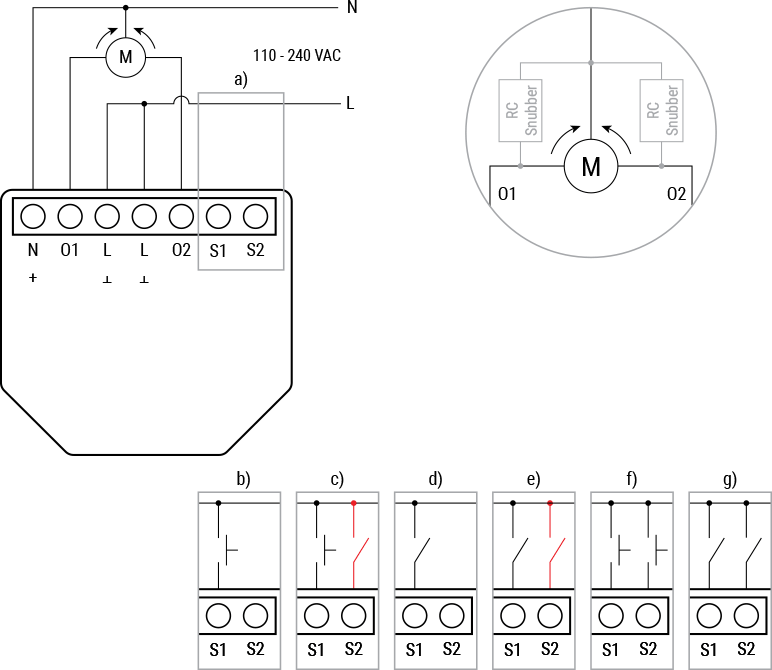
You can choose a configuration of button/switch options according to your preference. For the purpose of this installation guide we recommend using the switch configuration g).
Add the Shelly Plus Add-on peripheral to the Shelly Plus 2PM device
Connect to the Shelly Plus 2PM and type
http://192.168.33.1in your browser to access its embedded Web Interface.
Make sure that the Device is up-to-date with the latest firmware version. To check for updates, go to Settings > Firmware. To install the updates, connect the Device to your local Wi-Fi network. For more details, see Web interface guides.
In the main menu, select Add-on and then, Enable Add-on.
To complete the process, select Reboot now.
To add the Device inputs, select Add Peripheral.
Select Voltmeter, then Save settings.
To use the analog input, select Reboot now. The Voltmeter appears in the list of inputs.
In the Input menu, select Settings.
Type a name of the input, for example Wind. Than, Save settings.
Set Delta threshold for the input, which can be from 0.1 to 5 V.
The Delta Threshold acts as a sensitivity setting. It sets a limit for what change in wind speed is considered significant enough to report.
Select Save settings, then reboot the Device once again.
If the add-on peripheral is successfully installed, in the list of inputs you should be able to see the analog input signal from the wind sensor in voltage.
Set the Device profile to Cover mode
Go to Settings > Device profile.
Select Cover, then Save settings. A confirmation dialog appears to reboot the Device.
Select OK to proceed and complete the process.
Before you continue, make sure to properly calibrate the cover position control. To calibrate the cover position, follow the calibration procedure in the Shelly Plus 2PM - Cover Mode.
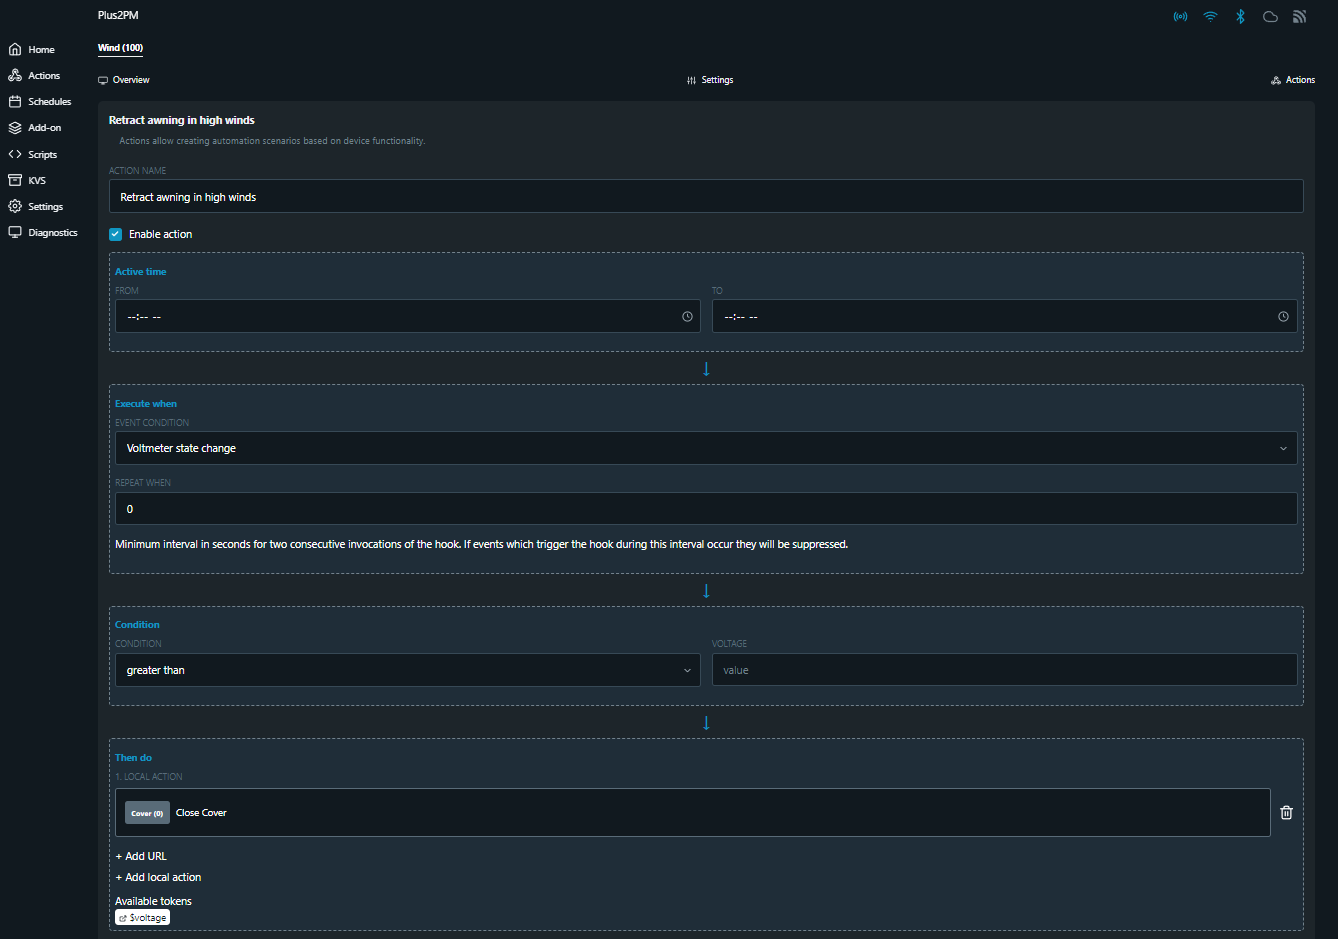
Create an Action to detract awning based on specific wind conditions detected by the sensor
To add a new action, select Add-on in the main menu and then the analog input field.
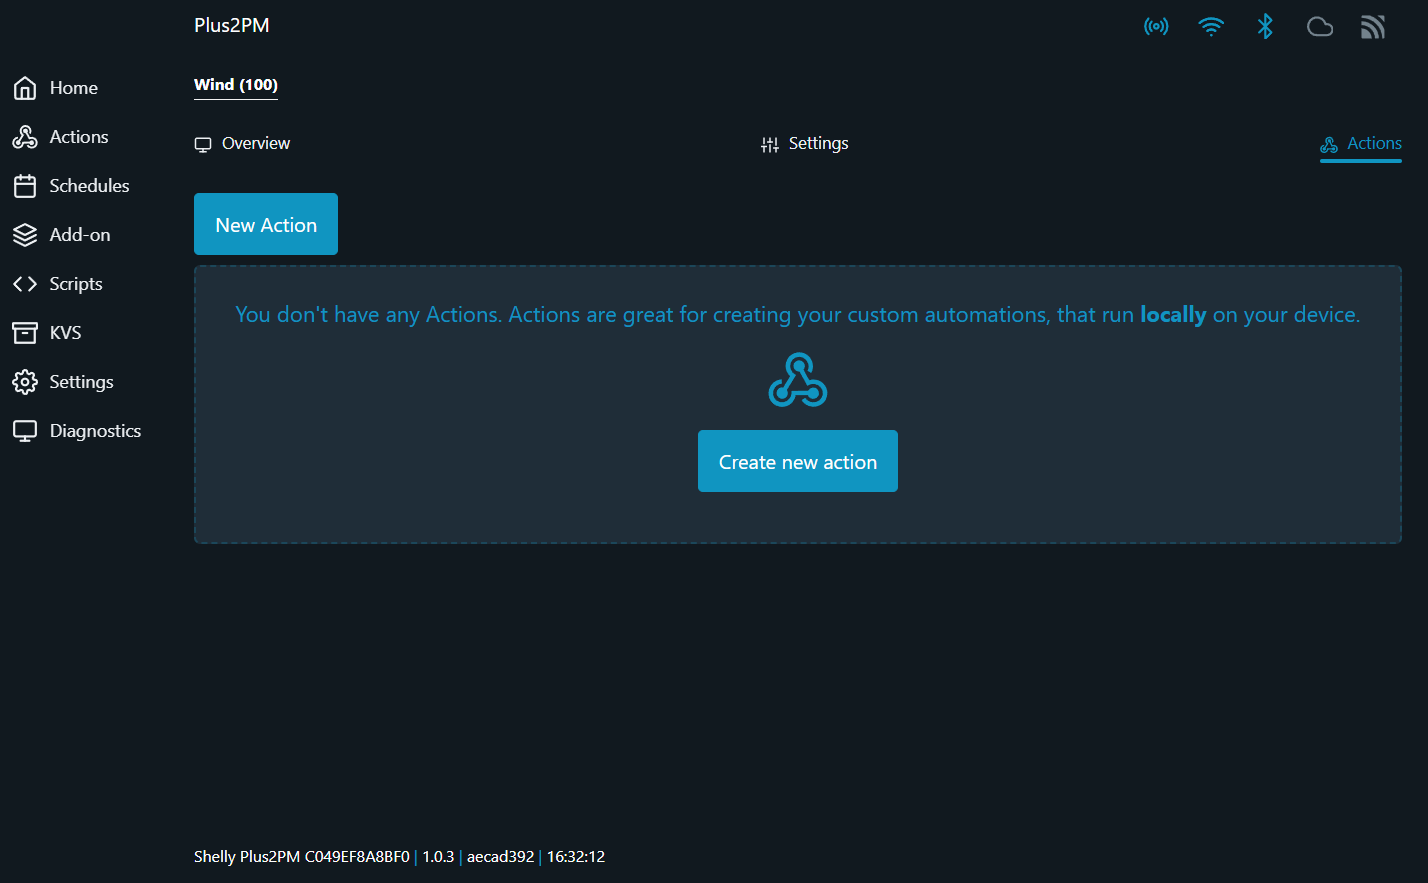
In the input menu, select Actions > Create new action.
Type an Action name, for example Retract awning in high winds.
Set an Active time for the action. If no time is specified, the action will always occur.
From the Execute when list, pick Voltmeter state change.
Keep the default 0 value under Repeat when.
From the Condition list, pick Greater then and specify a value threshold above which you wish the action to occur.
To set the right threshold, find a reference wind speed value for the voltage output in the documentation of your wind sensor. For example, 1 V equals wind speed of approximately 10 km/h. Note that wind speed values above 30 km/h can pose a risk of damage to most standard residential awnings.
From the Then do list, pick Add local action > Action > Close cover.
Make sure that Close cover action retracts the awning. If it opens the awning:
Reconnect the awning motor swapping O1 and O2.
Alternatively, go to Home > Settings > Reverse direction and Enable direction reverse.
Save the action.