-
Why there is no communication between Shelly and other KNX devices?
Check if the communication interface (e.g. KNXnet/IP to KNX TP gateway) operates properly, e.g. has power, its status LED and etc.
Check that both sides of your communication interface is properly connected, i.e. Ethernet or Wi-Fi is up and running. Check that Shelly device has an IP address on the IP interface used.
Check for proper connection at the KNX TP (twisted pair) side.
Check KNX setting Multicast address and communication port.
Check if all Shelly devices are using the same Multicast address and communication port as the ones configured at the communication interface used. -
What are the recommended settings for the KNX IP Router?
When a KNX telegram needs to be routed externally (to other KNXnet/IP devices) and/or between different KNX Areas and Lines the programming software (ETS or other) automatically creates a “Filter table” of the allowed to passthrough KNXGroup Addresseesat the KNX IP Router responsible for the communication. Depending on how the KNX program is designed and how Shelly devices would interfere with that program, there might be a case where used by Shelly KNXGroup Addressesare NOT listed in the automatically created “Filter table” by the programming software. In some cases the “Filter table” may even be completely empty.
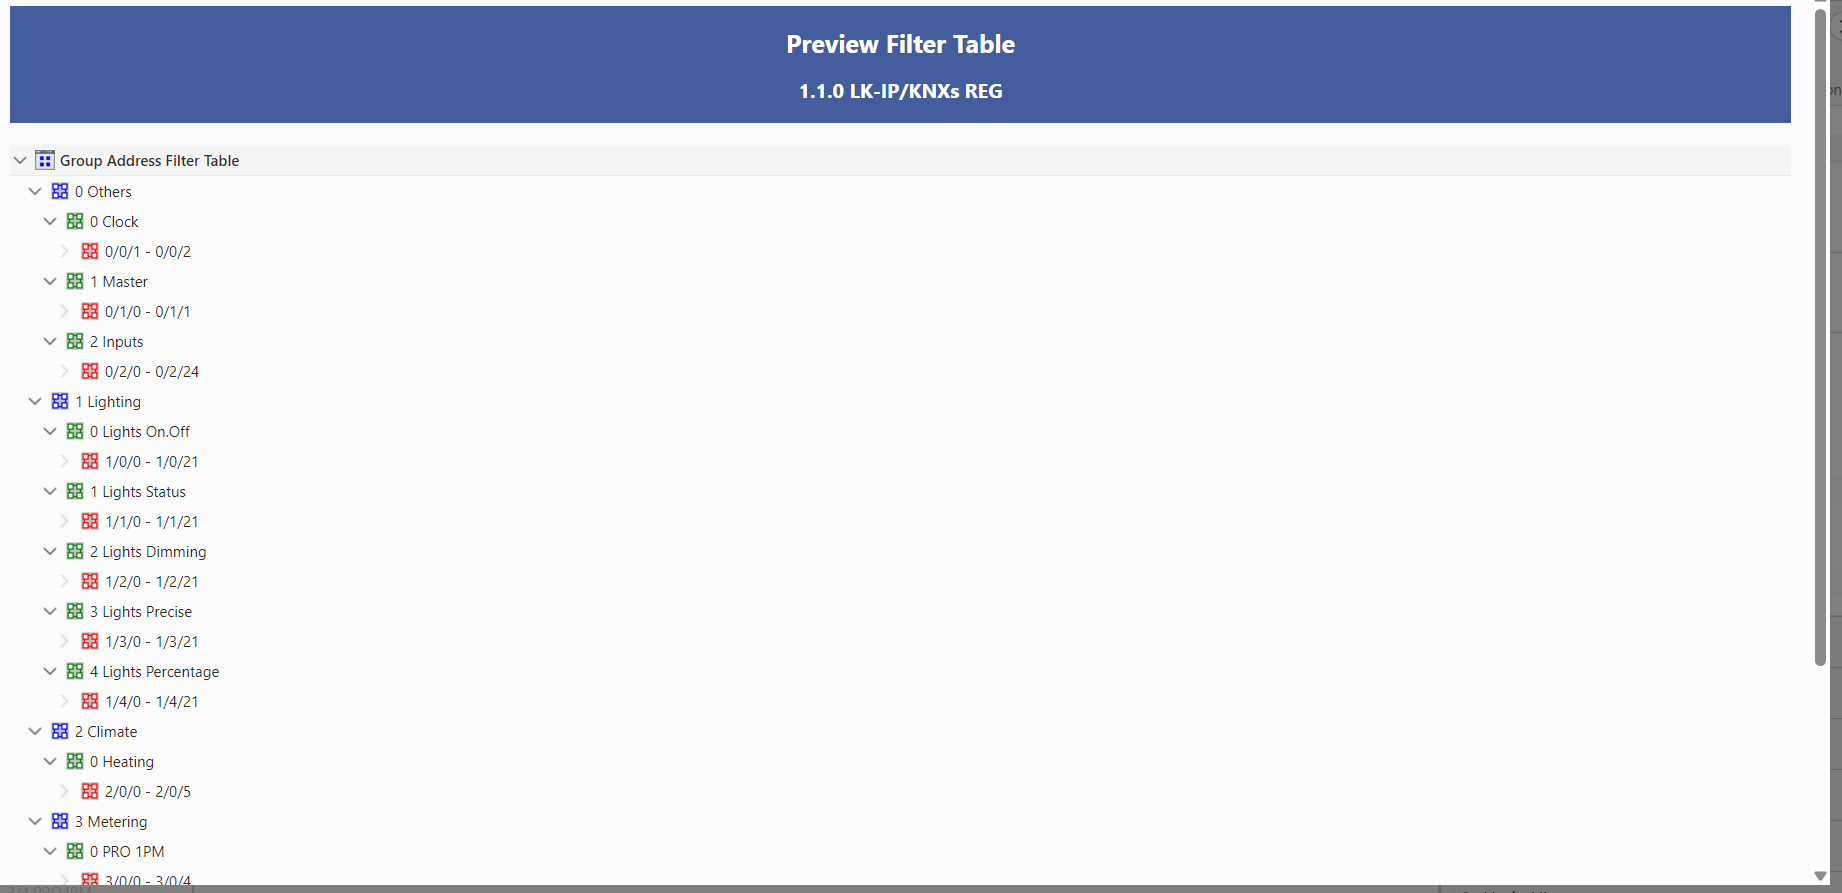
In order to check the contents of the “Filter Table” open your KNX programming software and navigate to the KNX IP Router used in your project, then right click on it and select “Preview Filter Table” (See picture below).
A preview of a “Filter Table” is shown below:
To overcome the issue with the allowed to passthrough
Group Addresses, we recommend to manually route in both directions the KNX telegrams, which are used by Shelly. See pic below:
|
|
-
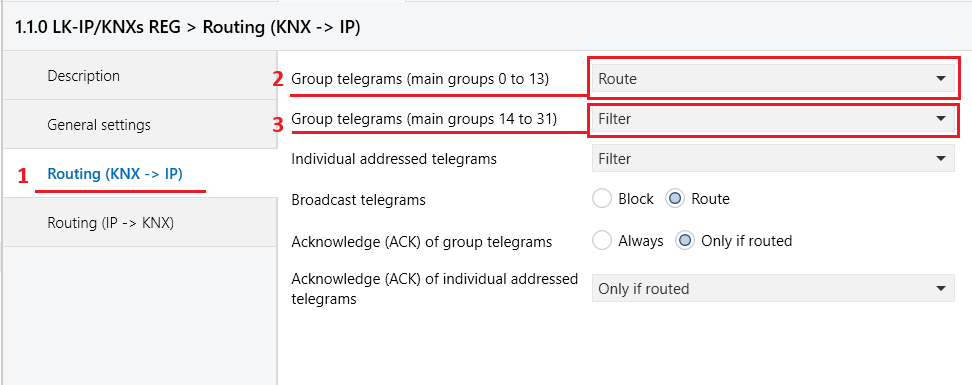
Routing KNX to IP - Points 1 and 2 shows how route
Group Addresses(Group telegrams) in the range from 0 to 13 (0 ≥ A ≤ 13). In case you are usingGroup Addressesin the range above 13 (14 ≥ A ≤ 31) you should route those telegrams too, see point 3 (optional). -
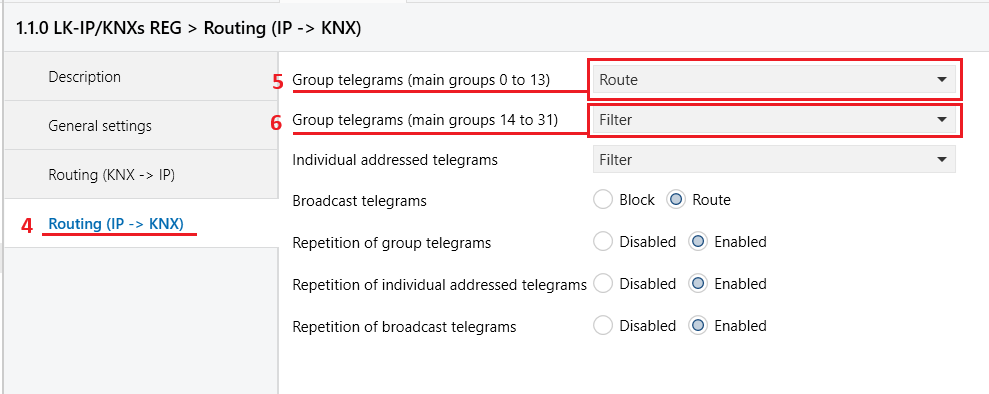
Routing IP to KNX - Using the logic as above, route the
Group Addressin the reverse direction too. See Points 4 and 5 to routeGroup Addresses(Group telegrams) in the range from 0 to 13 (0 ≥ A ≤ 13). In case you are usingGroup Addressesin the range above 13 (14 ≥ A ≤ 31) you should route those telegrams too, see point 6 (optional).
-
What does unique
Individual addressmean?
As described in the Knowledge base theIndividual addresshas the following format X.Y.Z
Unique means that within a single KNX installation there should not exist two or more devices with all three parameters identical one to another.
Example: If device “K” hasIndividual address1.1.3 then device "L" shouldn’t get anIndividual addresswith all three parameters identical to device “K” (1.1.3), but something else like 1.1.4.
Devices using the defaultIndividual address(15.15.255) are not considered as a conflict only.
NOTE: TheIndividual addresshas no significance during normal operation of the installation. -
Is it possible to detect individual address conflicts from within the UI of the Shelly device?
No. Shelly devices currently do not support this feature. It is sole responsibility of the KNX integrator to prevent such conflict. -
Does it matter if the device is connected over Ethernet or Wi-Fi for the KNXnet/IP functionality to work?
The network connectivity type does not matter from device’s point of view. Stable network connection is required for flawless operation and such shall be taken into account when building the network infrastructure. -
What data is sent over the KNX network? Is all the information described in the API docs available?
KNX protocol is closed automation system and is intended for operation by certified KNX partners only. The information described in the API docs covers supported by Shelly KNX options only. For understanding the terminology used a basic KNX knowledge (Basic KNX certificate) is required. -
Is it possible to have the Shelly device both in the KNX network and in a Shelly account?
Yes, it is absolutely possible. Moreover it is possible to also connect the device to local home automation controller like Home Assistant at the same time. -
Reboot and/or power failure behavior?
All of the KNX settings made are kept internally and reboot/power failure does not require any additional interactions by the user for further proper operation of Shelly devices. -
How does KNX handle failures or malfunctions in the system?
KNX is communication protocol which is designed with very high failure prevention in mind. Every KNX telegram sent contains a check byte, which is used by all of the recipients to generate their own acknowledgement of successful data transmission to notify the sender. When all of the recipients acknowledge successful data reception back to the sender, then a new telegram is sent again.
In case of error detection the whole telegram is repeated. Default repetition of a KNX telegram is three times, a parameter which may be changed. -
Diagnostics and problems solving in Shelly + KNX integrations
Proper diagnostic process can not be done without using KNX programming software (e.g. ETS).
For comprehensive diagnostics one is obligated to use both - Shelly provided Diagnostics page from the embedded web interface (Advanced->Diagnostics) and the Diagnostics function included in the KNX programming software (e.g. ETS → Diagnostics). -
Do Shelly devices support KNX Security?
No. Shelly devices are not capable to decrypt neither the KNX IP Security or KNX Data Security, both part of the KNX Security extension of the KNX Standard. A non encrypted communication is supported only. -
Manually modifying the Communication Flags of
KNX objects
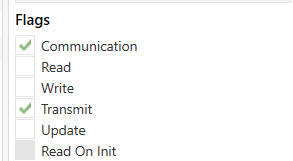
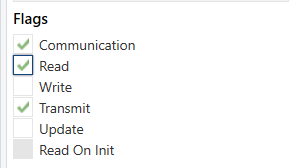
Some KNX manufacturers DO NOT set the Read Flag as Active (see Pic. 1) on their Switch actuators' Channel XFeedback objectof the corresponding channel. When the Read Flag is not enabled the TOGGLE function of Shelly devices won’t work!
Pic. 1 - Switch Actuator with disabled Read rights on its Channel X Feedback objects When such case occur, the Read Flag should be manually enabled via the ETS (or other) configuration software. Select the
KNX objectwhich you need to modify and then Navigate to its Flags Properties - may be found onto the right side of the ETS configuration software under Properties → Flags (See Pic. 2 and Pic. 3).
|
Should be modified to: |
|
Pic. 4 shows how the configuration should look like once all the Read Flags are set on all (or user needed) of the switch actuator channels.
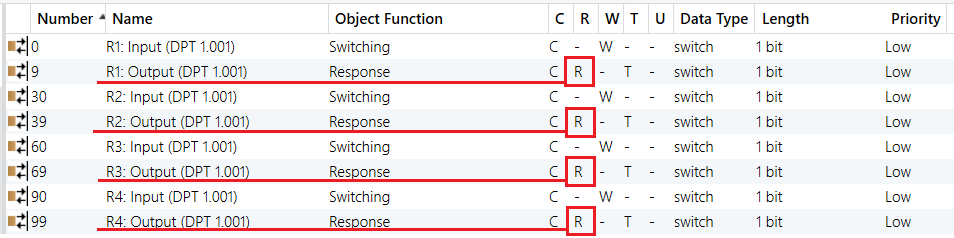
Note that the KNX manufacturers may give different names on their equipment for the Switch object and for the Feedback object. For example in the case above, for Channel [X] (1-4) the manufacturer is using R[X] Input for Switch object and R[X] Output for Feedback pobject.
You have to transfer all of the changes made back onto the affected KNX devices.
-
Can I use KNX interface to establish a KNX communication between Shelly and other KNX devices?
The KNX IP interface (without IP router) serves for programming purposes only and it can't be used as a KNX routing device. This limitation comes from the KNX device itself, not from Shelly.
To establish communication between KNX devices and Shelly you need KNX IP Router. -
Can I connect a KNX capable Shelly device to another Shelly device by using its range extender option?
No. -
ETS v6.3.0 No longer supports Manual Editing of the Filter Table — What Should I Do?
In previous versions of ETS (prior to v6.3.0), users had the ability to manually edit the Filter Table. This allowed fine-tuning of whichGroup Addressesa device would filter or pass. However, this functionality has been removed as of ETS v6.3.0. More details on this decision by the KNX Association can be found here.As a result, using only a "Dummy" ETS file for devices located on a KNX TP Line is no longer sufficient. An additional Dummy file, representing the device on the Main IP Line, is now required. These Dummy files are typically provided by manufacturers of central control devices (e.g., KNX servers) and visualization tools (e.g., KNX displays).
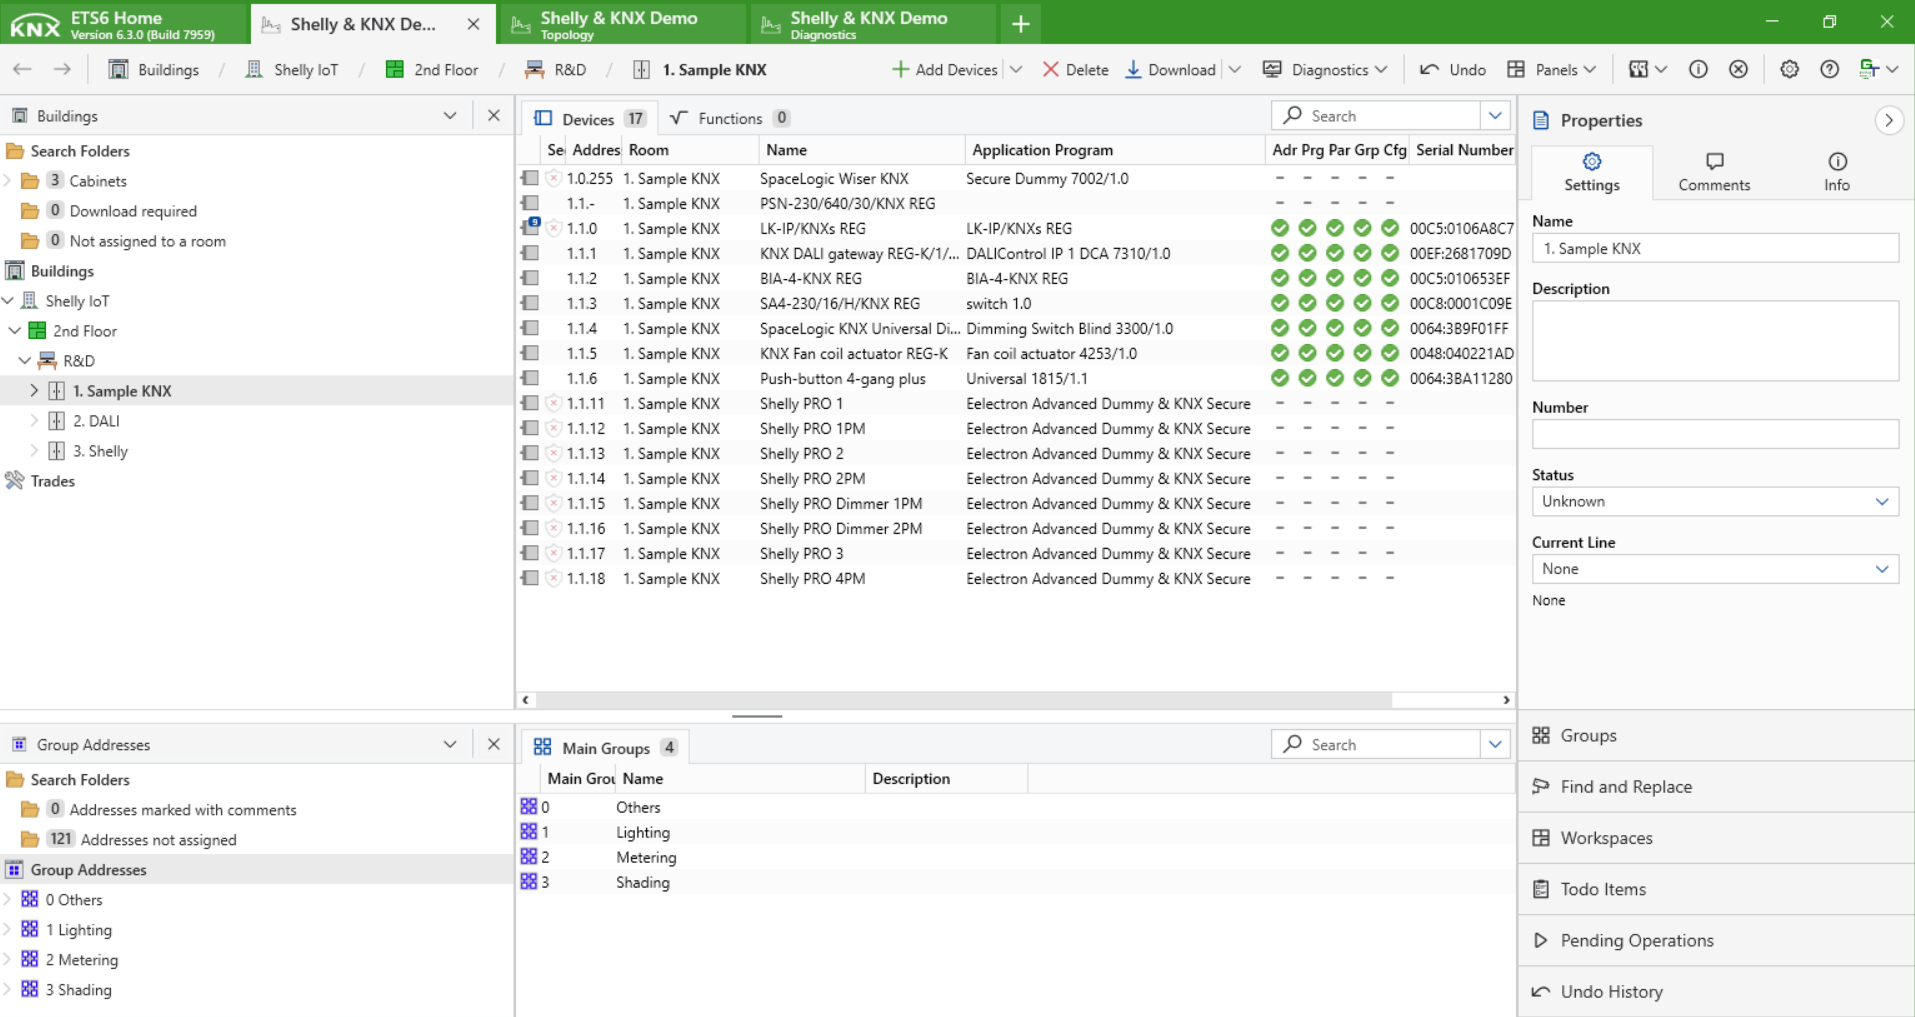
For this purpose, we at Shelly have chosen to use the Eelectron Advanced Dummy application to represent Shelly devices within the ETS programming software. The selected Dummy file is specifically designed to be used in the TP Line only. Figure 1 shows the selected Dummy file in use.

Fig. 1 - Example of Eelectron’s Advanced Dummy application file The selected Dummy application allows full customization of the KNX objects it contains. Figure 2 illustrates a Shelly Pro Dimmer 1PM already configured using the mentioned Dummy file.

Fig. 2 - Shelly PRO Dimmer 1PM configuration Once all devices have been added to the project, assigned their
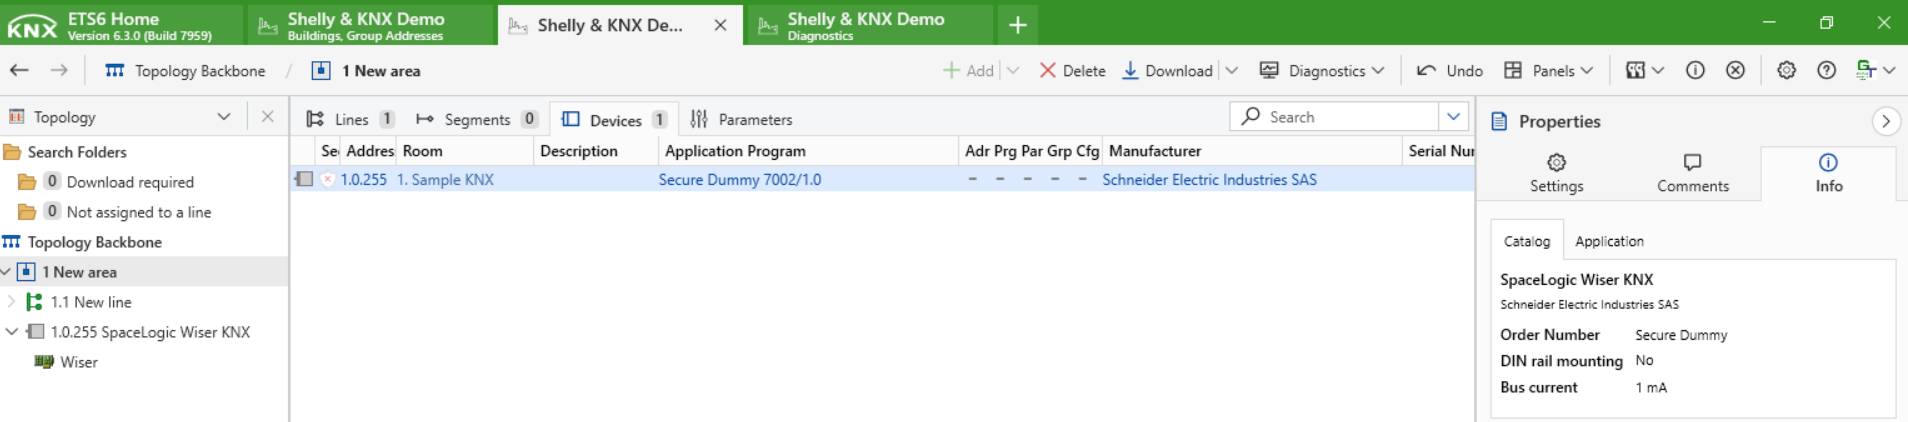
Individual Addresses, and the necessaryGroup objectsare linked with the appropriateGroup Addresses, the next step is to ensure that theseGroup Addressesare included in the filtering table of the KNX IP Router used. As previously mentioned, manual editing of the Filter Table is no longer supported in ETS v6.3.0 and later. Therefore, it is necessary to add a virtual device on the Main IP Line to automatically populate the filter table. Figure 3 shows the KNX IP Dummy device we have selected for this purpose — Schneider Electric’s SpaceLogic KNX Secure Dummy.
Fig. 3 - Schneider Electric’s Wiser for KNX Dummy file. As shown in the figure, the Medium Type column indicates that the device can be added to either the TP segment or the IP segment of the project. In this case, add Schneider Electric’s SpaceLogic KNX Secure Dummy device to the Main IP Line of the project, as illustrated in Figure 4.
Please note: There is absolutely no need to own or install the actual hardware — this Dummy device is added purely as a virtual placeholder to ensure the KNX IP Router’s Filter Table is correctly populated.
The next step is to link the Group Addresses used by the Shelly devices to the Dummy interface of the Schneider Electric SpaceLogic KNX Secure Dummy device. Simply drag and drop the relevant Group Addresses onto the Dummy device’s interface, as shown in Figure 5.
Note: If the selected Dummy device supports the KNX Secure option, make sure this feature is disabled, as Shelly devices do not currently support KNX Secure.
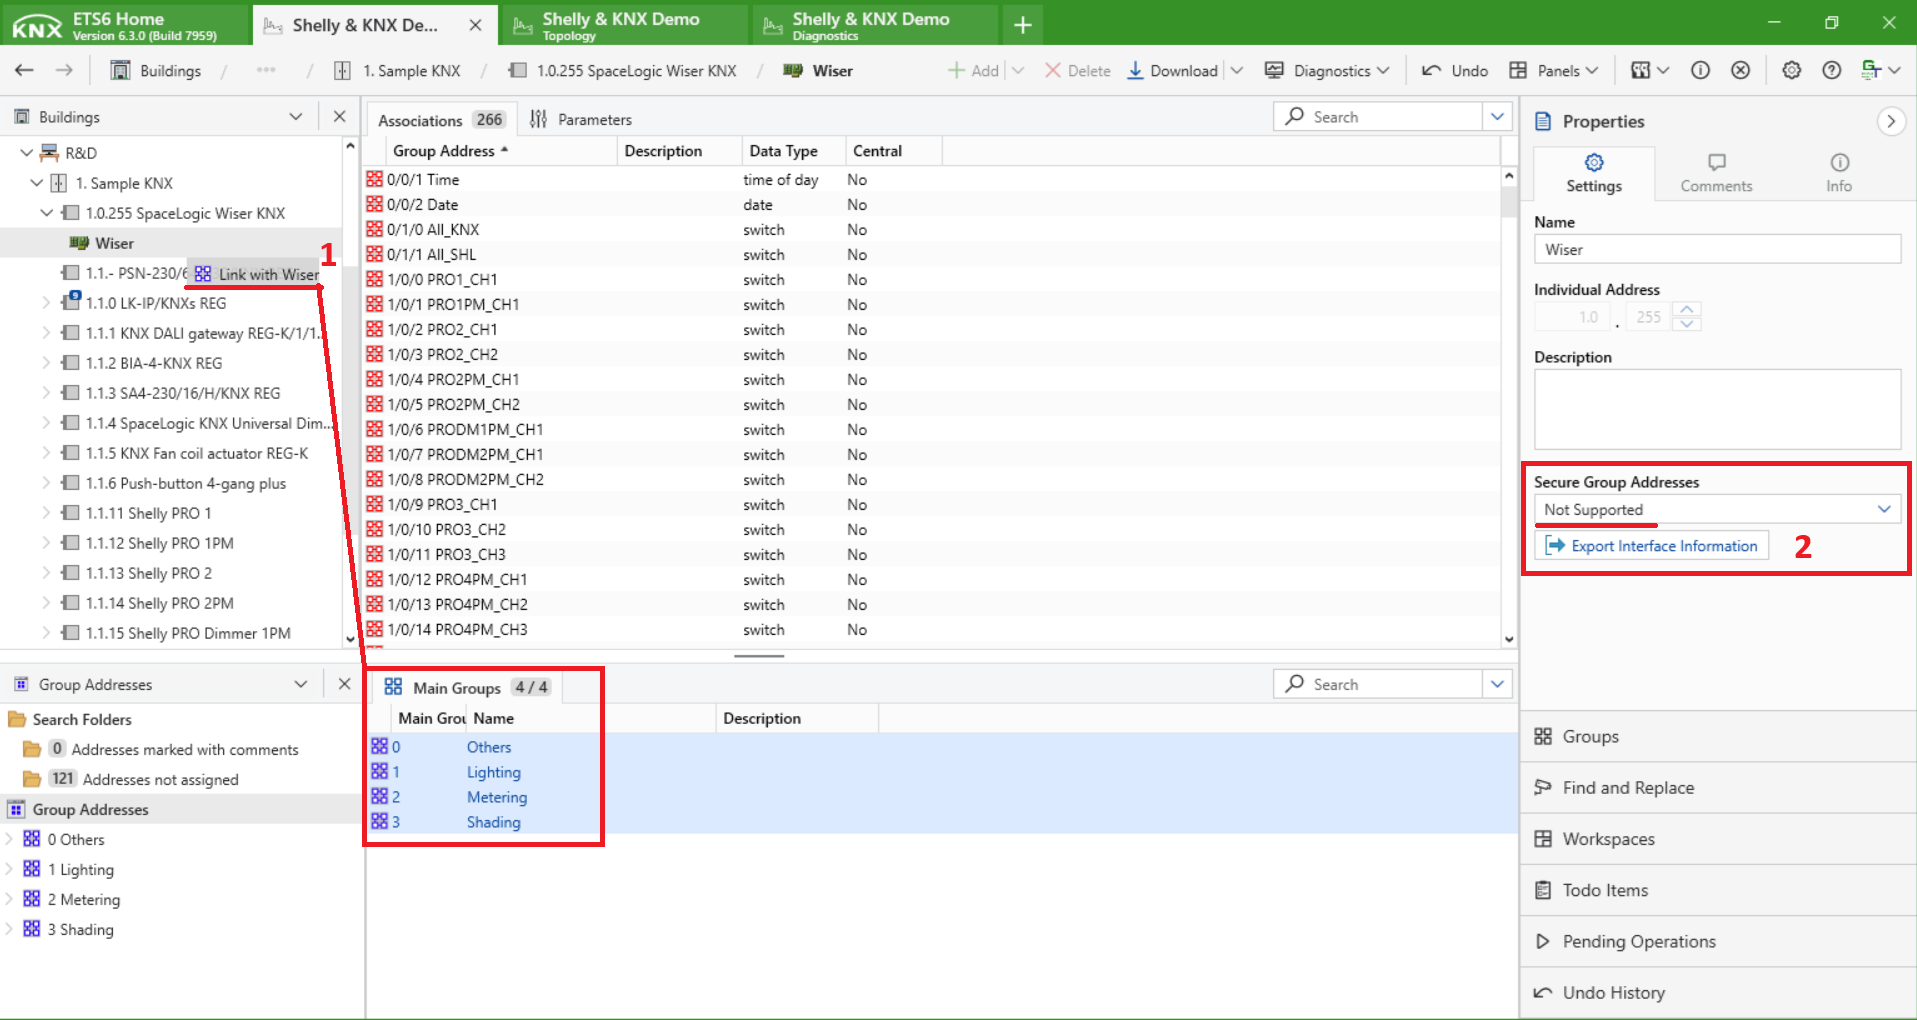
In our example, we have added all Group Addresses from the project to the Dummy device — this was done purely for demonstration purposes. However, this approach is not recommended by the KNX Association. While including all Group Addresses may not cause issues in small-scale projects (such as ours), doing so in larger KNX installations can negatively affect system performance and should be avoided. In such cases, it is recommended to allow only the essential Group Addresses to pass through the KNX IP Router to maintain optimal performance. Essential addresses typically include those required for central control, visualization, or communication between different lines or devices that span multiple segments.
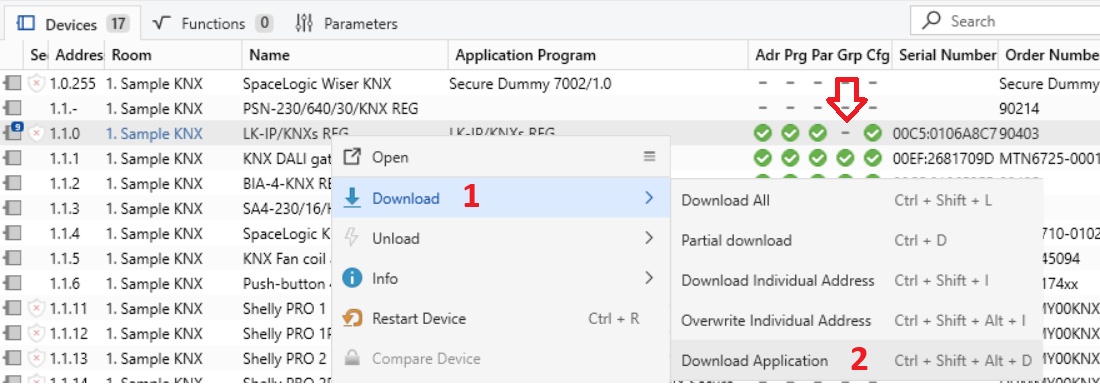
Once the necessary Group Addresses have been assigned to the Dummy device, don’t forget to transfer the configuration changes to the KNX IP Router you are using — this is a crucial step to ensure proper communication across the KNX lines. Figure 6 illustrates where and how to perform this transfer within the ETS environment.
Once the configuration has been successfully transferred to the KNX IP Router, the final result can be seen in Figure 7.
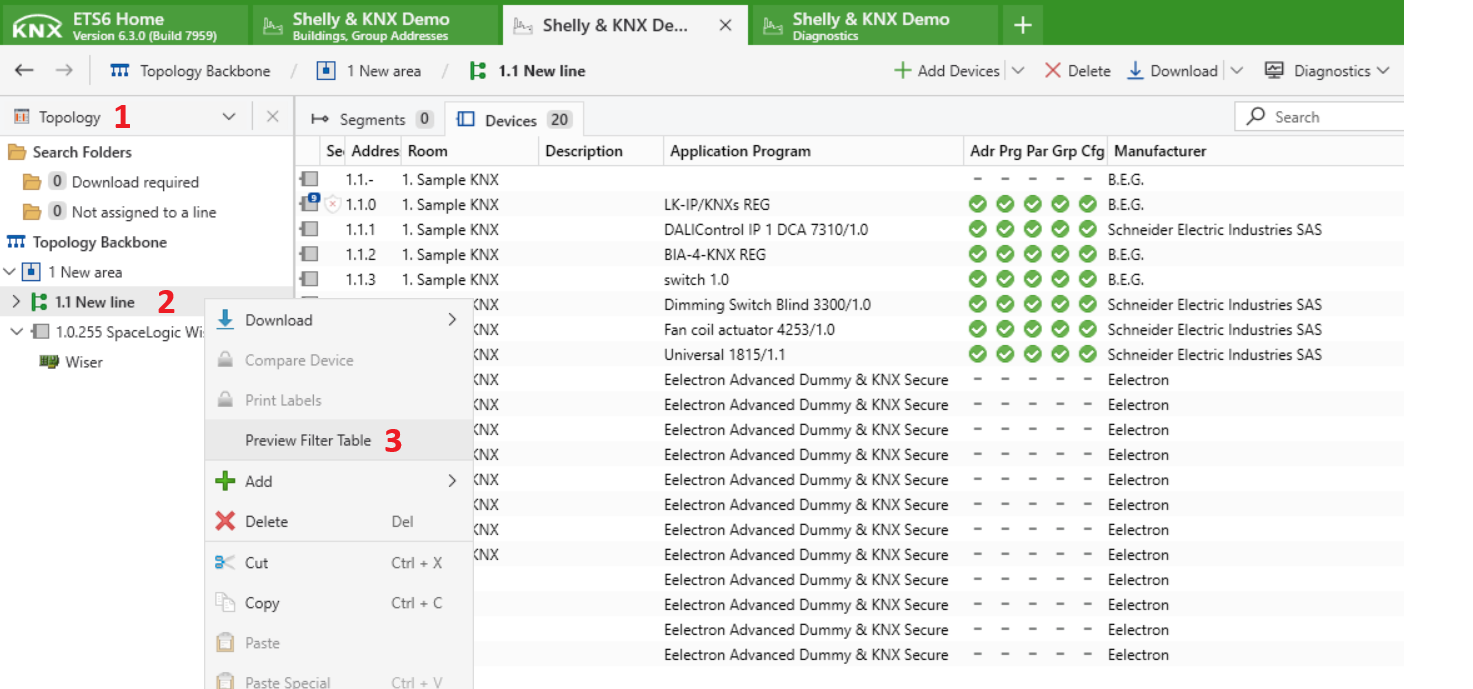
As a best practice, it is recommended to check the Filter Table not by right-clicking directly on the KNX IP Router, but instead by navigating to the Topology → Backbone view and right-clicking on the Main TP Line. This method provides a more comprehensive and accurate overview of the filter configuration. If everything has been set up correctly, the Filter Table preview obtained from the KNX IP Router and the one accessed via the Main TP Line should be identical. An example of this process is shown in Figure 8.
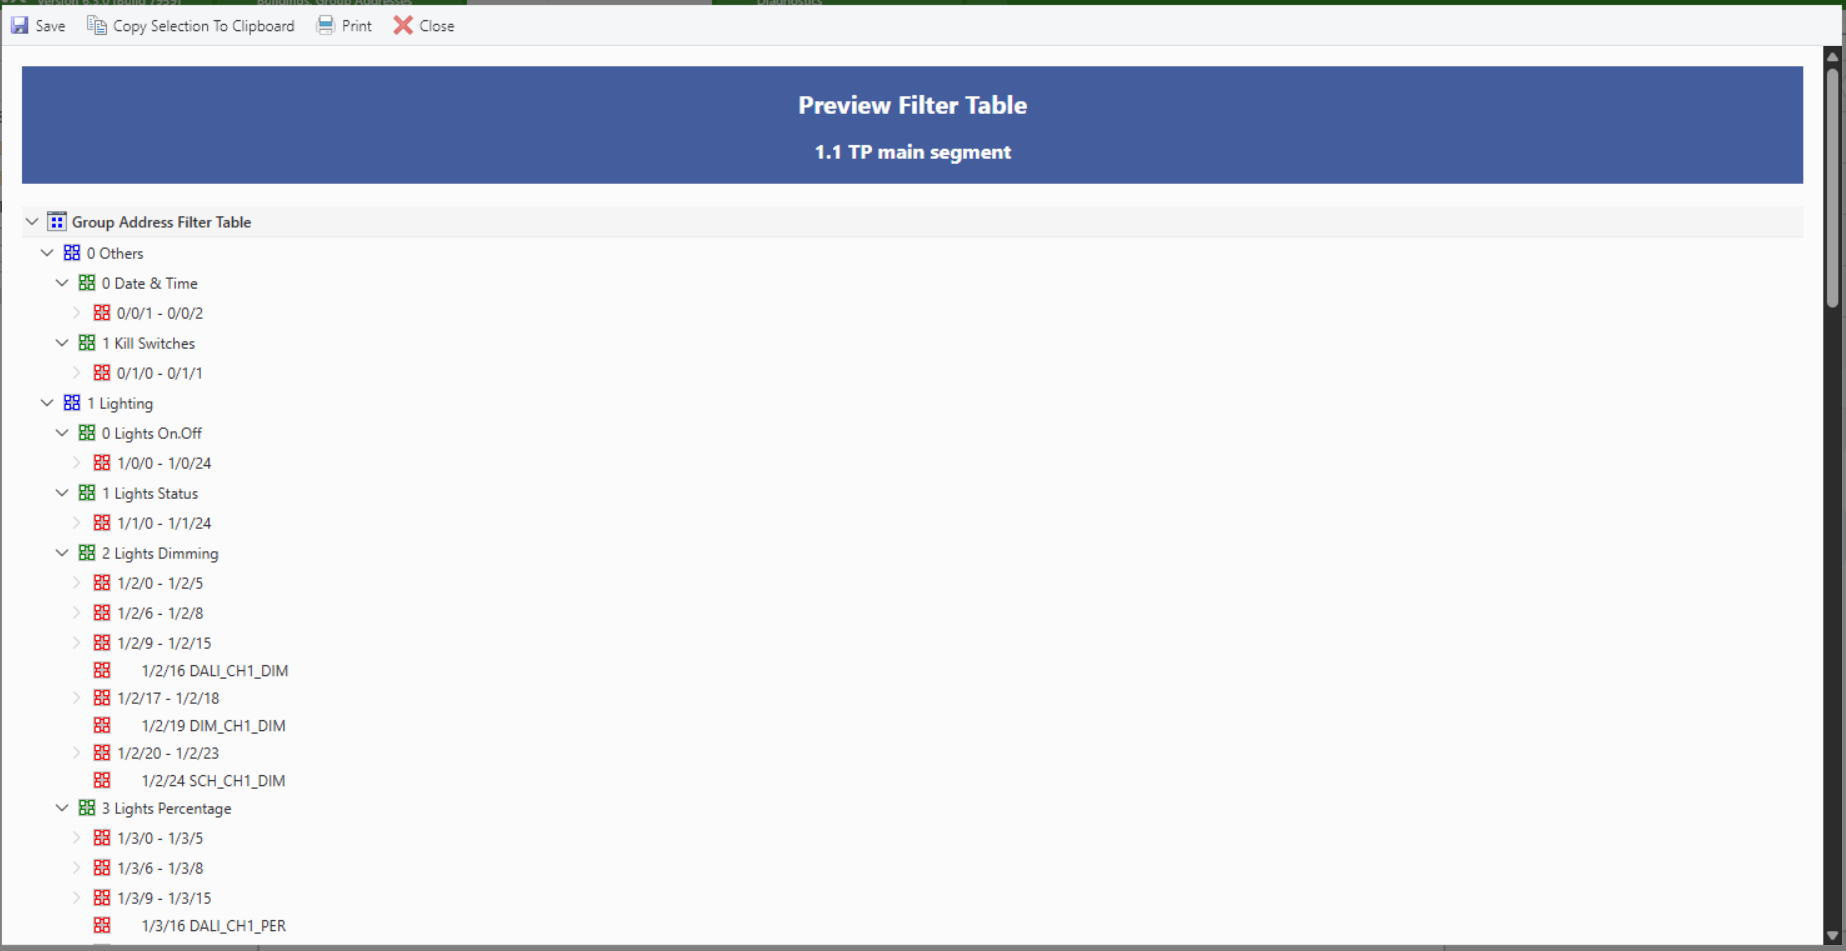
The final Filter Table preview confirms that everything has been set up correctly — the KNX IP Router is now properly configured, and all required Group Addresses are included. With that, the integration is complete and ready for operation.
See Figure 9 below for the resulting Filter Table preview.
If you’ve followed all the steps above, your setup should now be fully functional and KNX-compliant — ready for reliable and efficient operation. If you run into any issues or have further questions, feel free to contact our support team — we’re here to help!