Connecting a Shelly 1 G3 Device to AWS IoT Core Using MQTT

This guide will help you set up a Shelly device with AWS IoT Core, enabling communication via MQTT.
Overview
This guide will help you set up a Shelly device with AWS IoT Core, enabling communication via MQTT. Follow these instructions carefully to ensure your device is connected securely and properly.
Prerequisites
A free AWS account with IoT Core service enabled, also free at the moment.
A Shelly Gen2+ device (e.g., Shelly 1 G3) connected to a network with internet access.
Basic knowledge of AWS IoT Core and MQTT.
Ensure your Shelly device has the latest firmware installed.
Step-by-Step Instructions
Part 1 - AWS Setup
Follow these steps to configure AWS IoT Core, create a Thing, and generate the necessary security credentials.
Login to AWS Console & Create a New AWS IoT Thing
Open the AWS Management Console and navigate to the IoT Core service using the search bar.
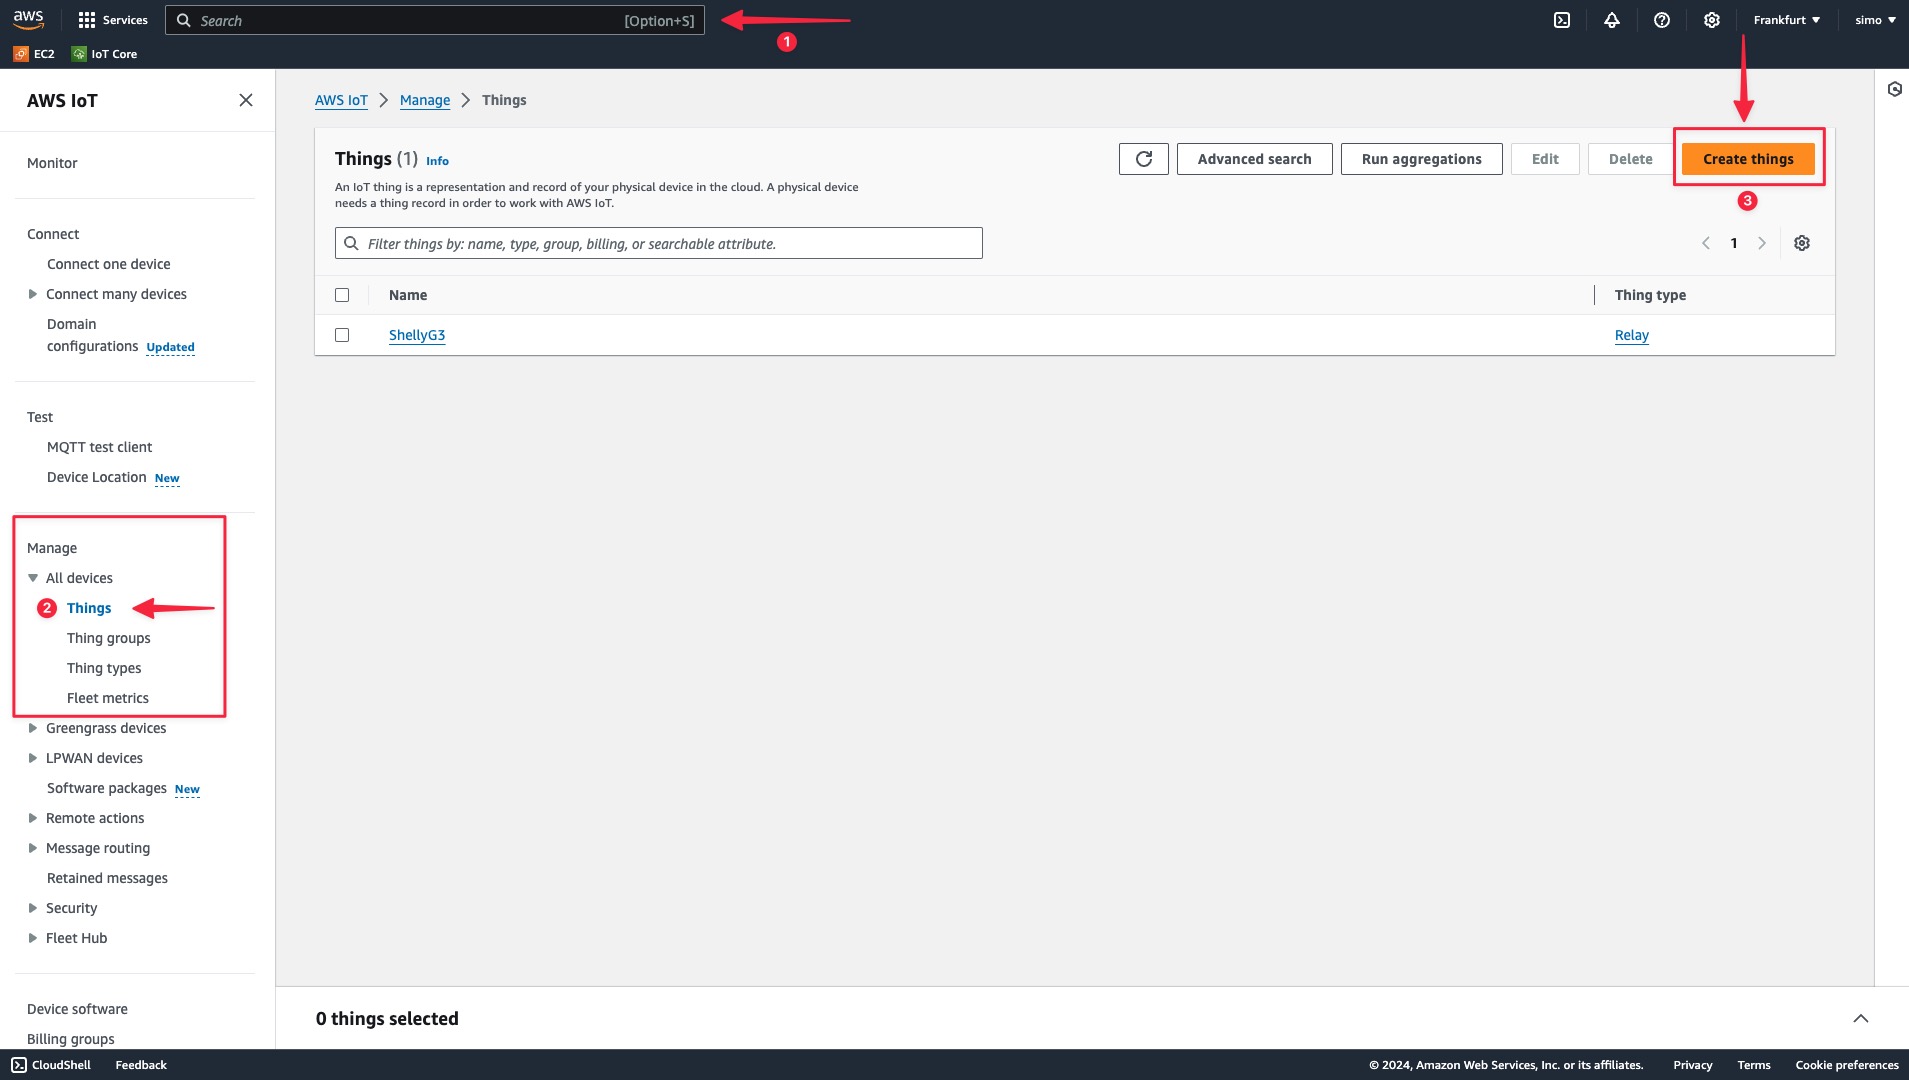
From the IoT Core Dashboard, located on the left, click on the Manage > All Devices > Things.
Once there, on the right side you will see an orange button Create Thing, click on it.
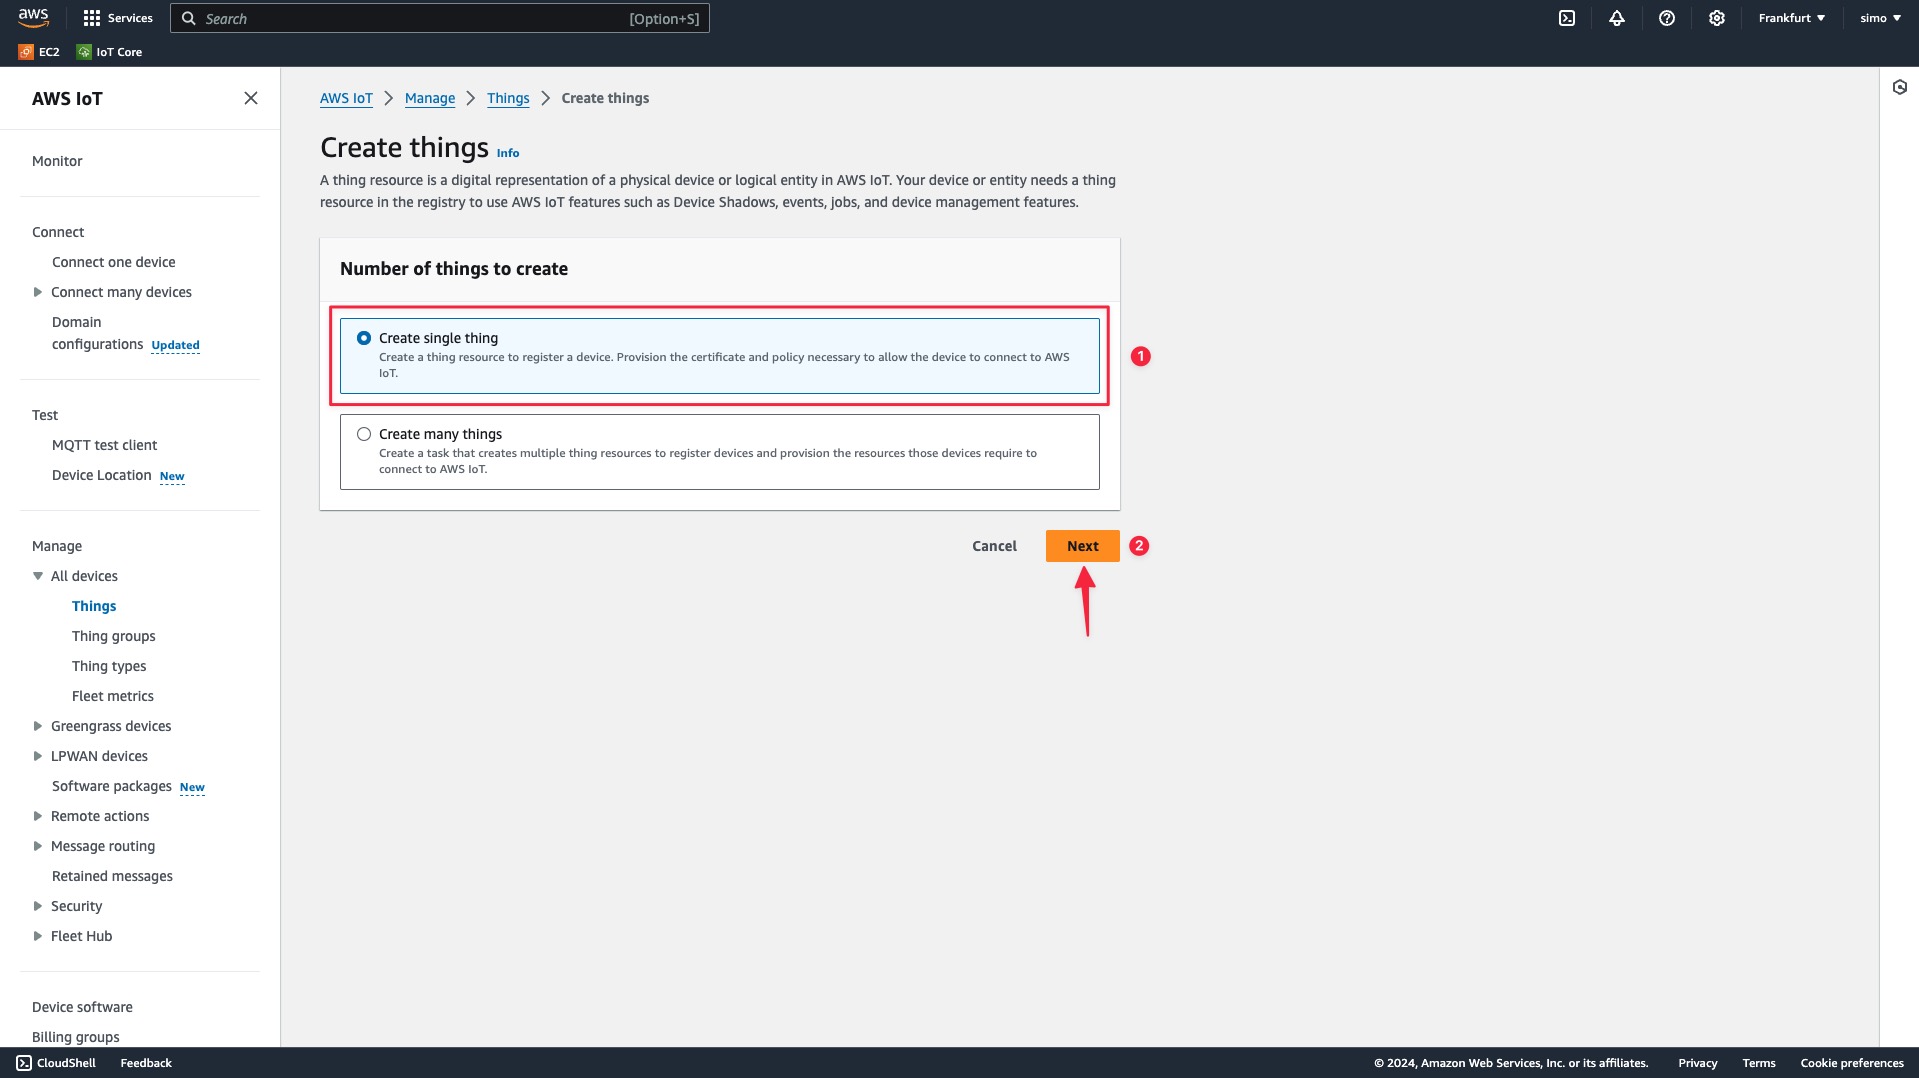
Select Create single thing and click Next.
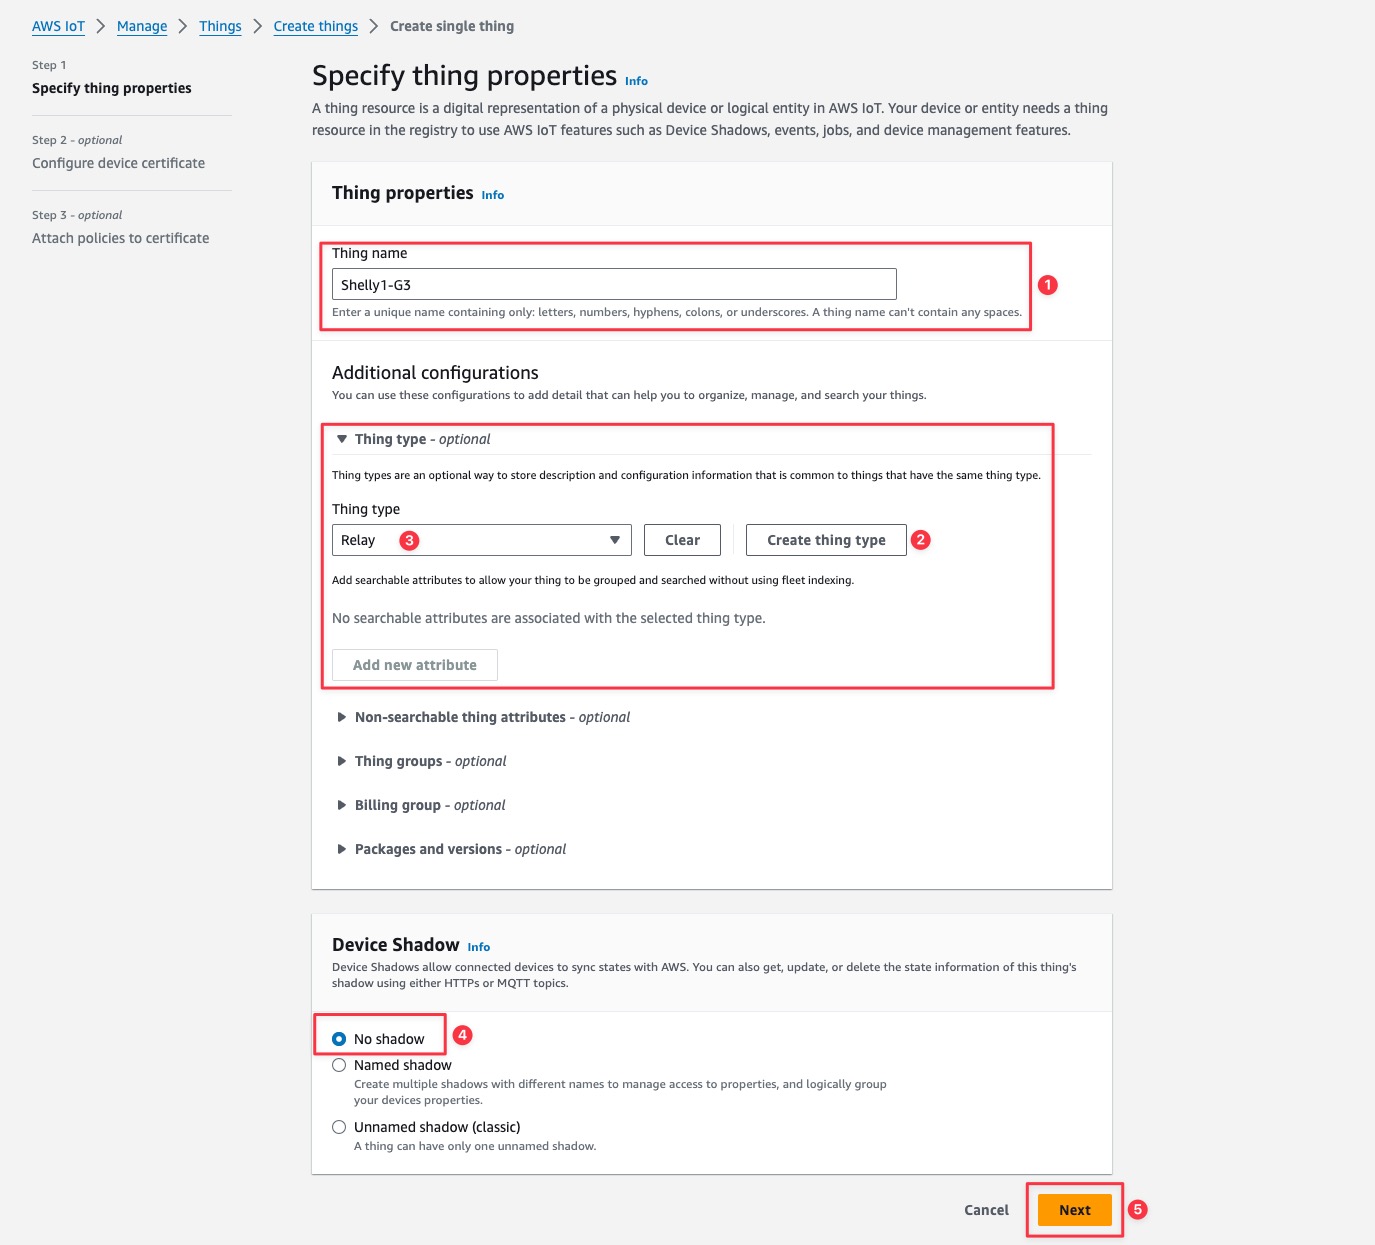
On this step you need to fill the following fields:
Name your device (e.g., Shelly1-G3).
Optionally, assign a Thing Type (e.g., Relay, Plug, Bulb) for easier management.
If you decide on assigning one, see the second photo.
Select No Shadow
Click Next
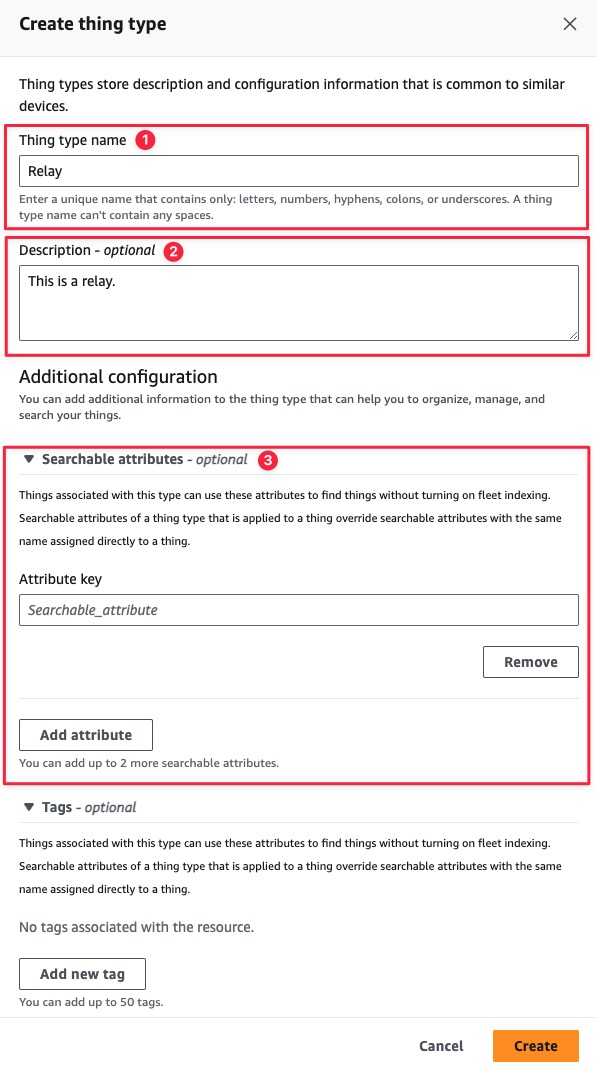
Optional(Add a Type)
Generate Certificates.
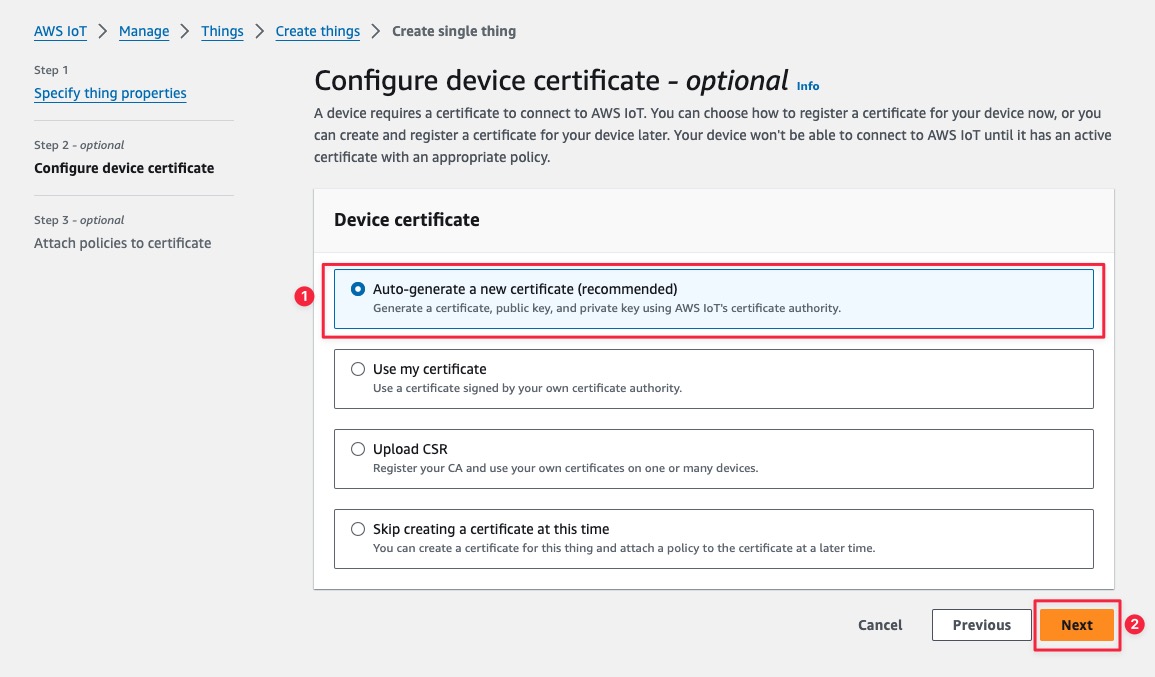
On this screen, choose the Auto-generate a new certificate (this is the recommended option) and click Next.
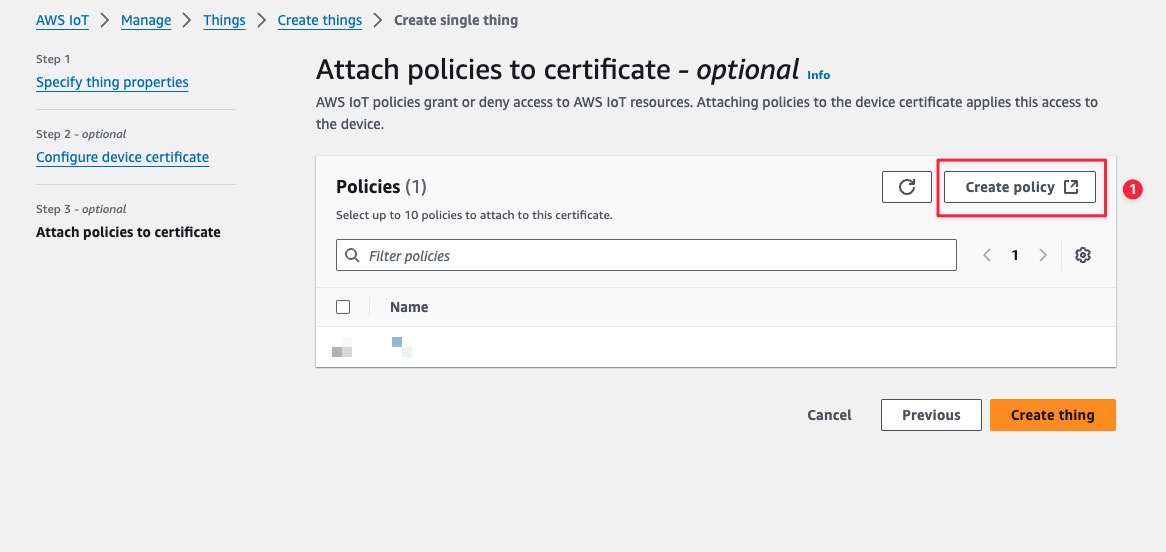
Here you will be asked to assign a policy, although it says “Optional”, we strongly advice to create one by clicking the Create Policy.
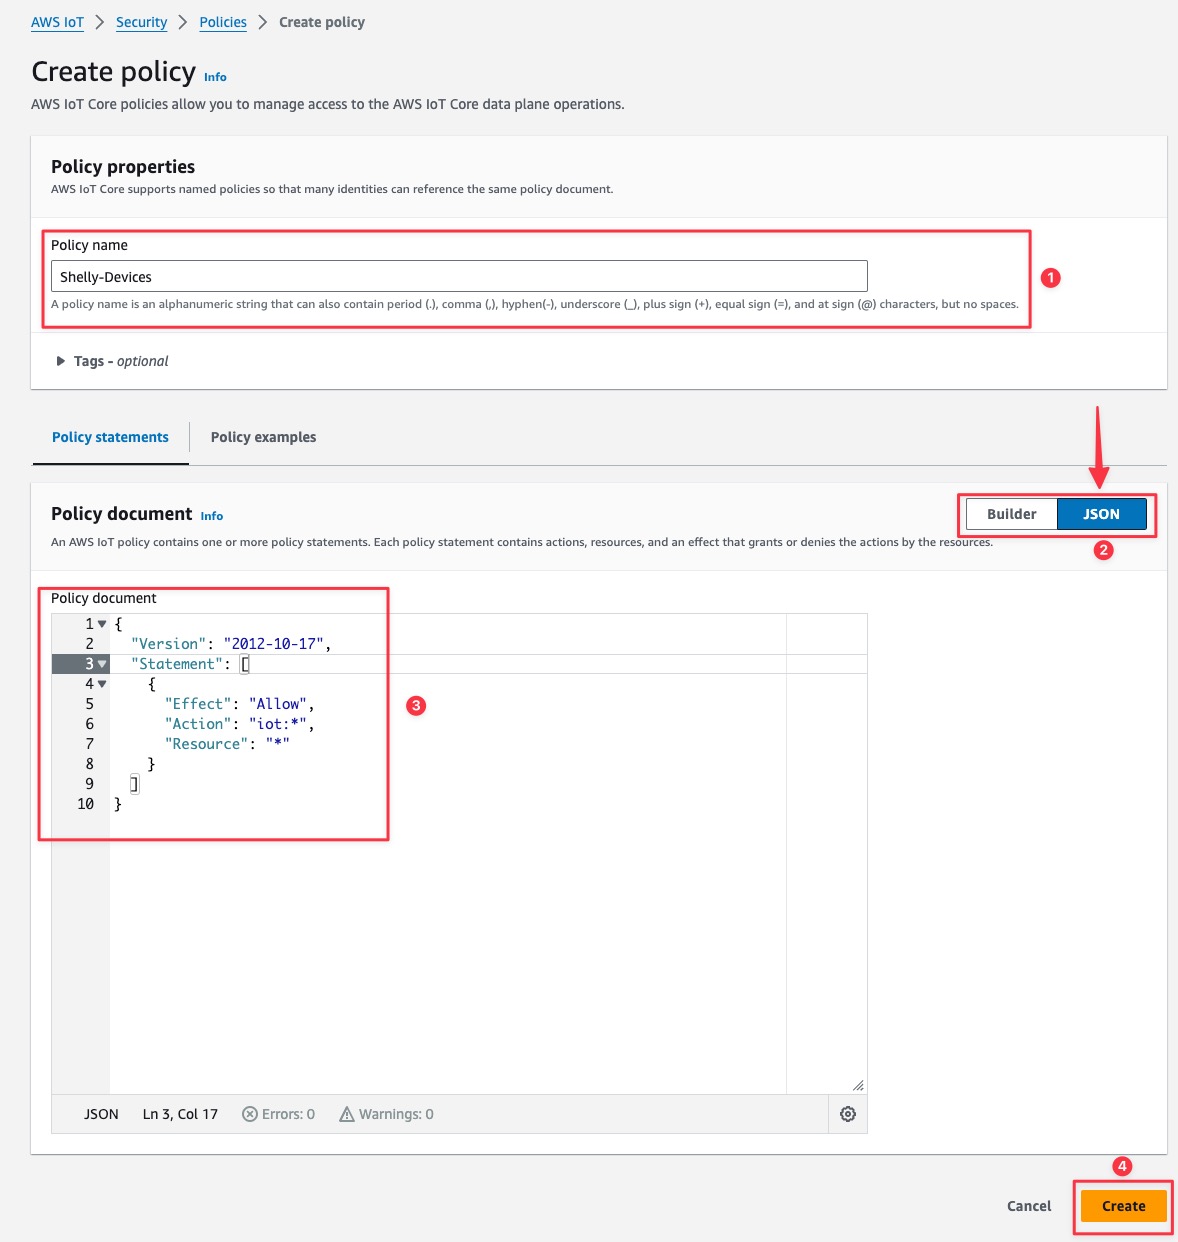
You will see a pop-up window enter the following values:
Name of the Policy
Click on JSON
Enter the values from below:
{
  "Version": "2012-10-17",
  "Statement": [
    {
      "Effect": "Allow",
      "Action": "iot:*",
      "Resource": "*"
    }
  ]
}
This will allow all IoT actions only(Connect, Publish, Receive, Subscribe, Retain Publish, ListRetainedMessages, GetRetainedMessages), for all resources.
Once all values are added click Create.
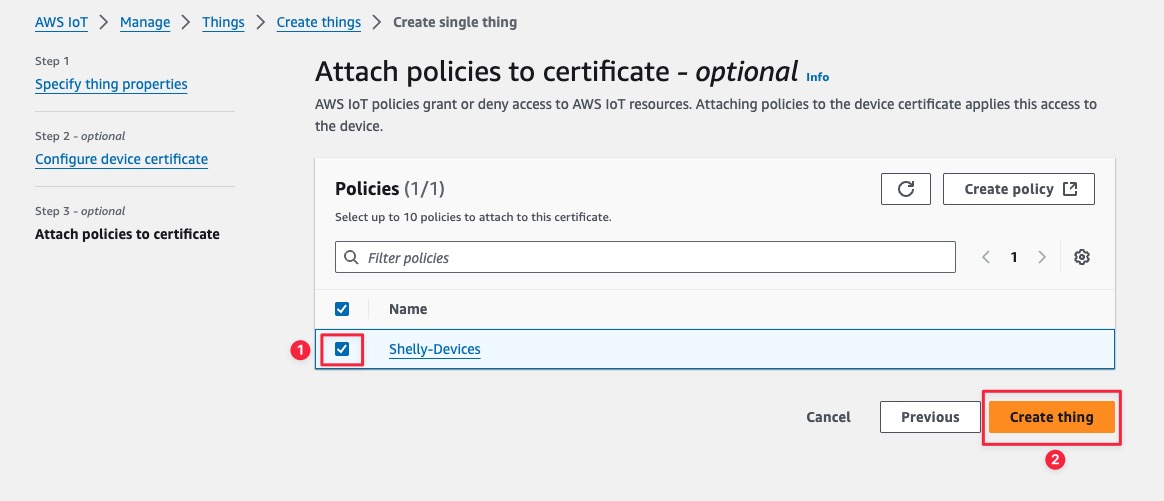
We will now see our newly created Policy:
Select the new Policy
Click Create Thing
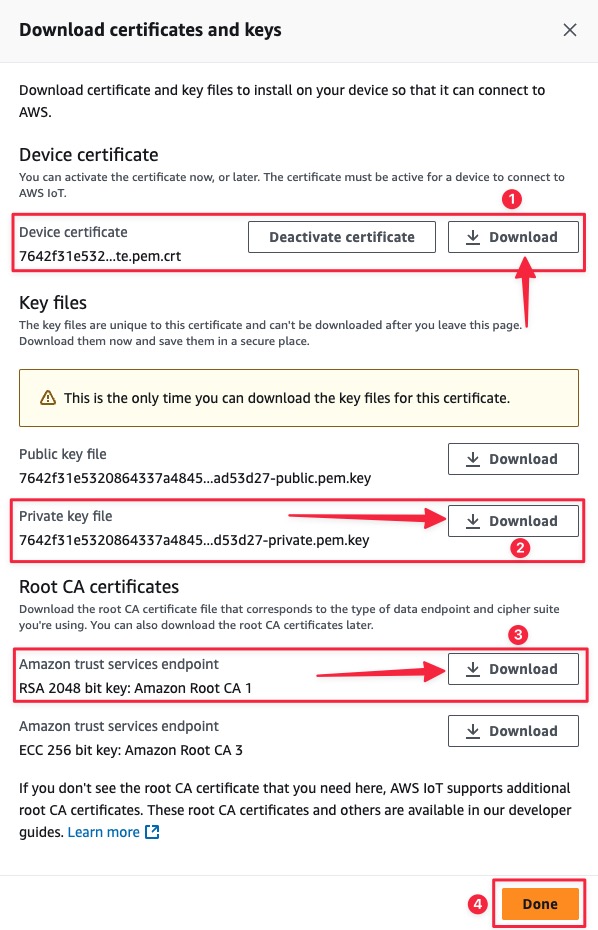
Now you will see a screen with different files to download, the ones we need are:
Device Certificate
Private Key
Root CA
Please keep in mind that the wizard may require you to download the public key as well. You can rename them for ease of use. Once finished click Done.
Now we have our Thing created and we can see it with the Type we have created for it as well

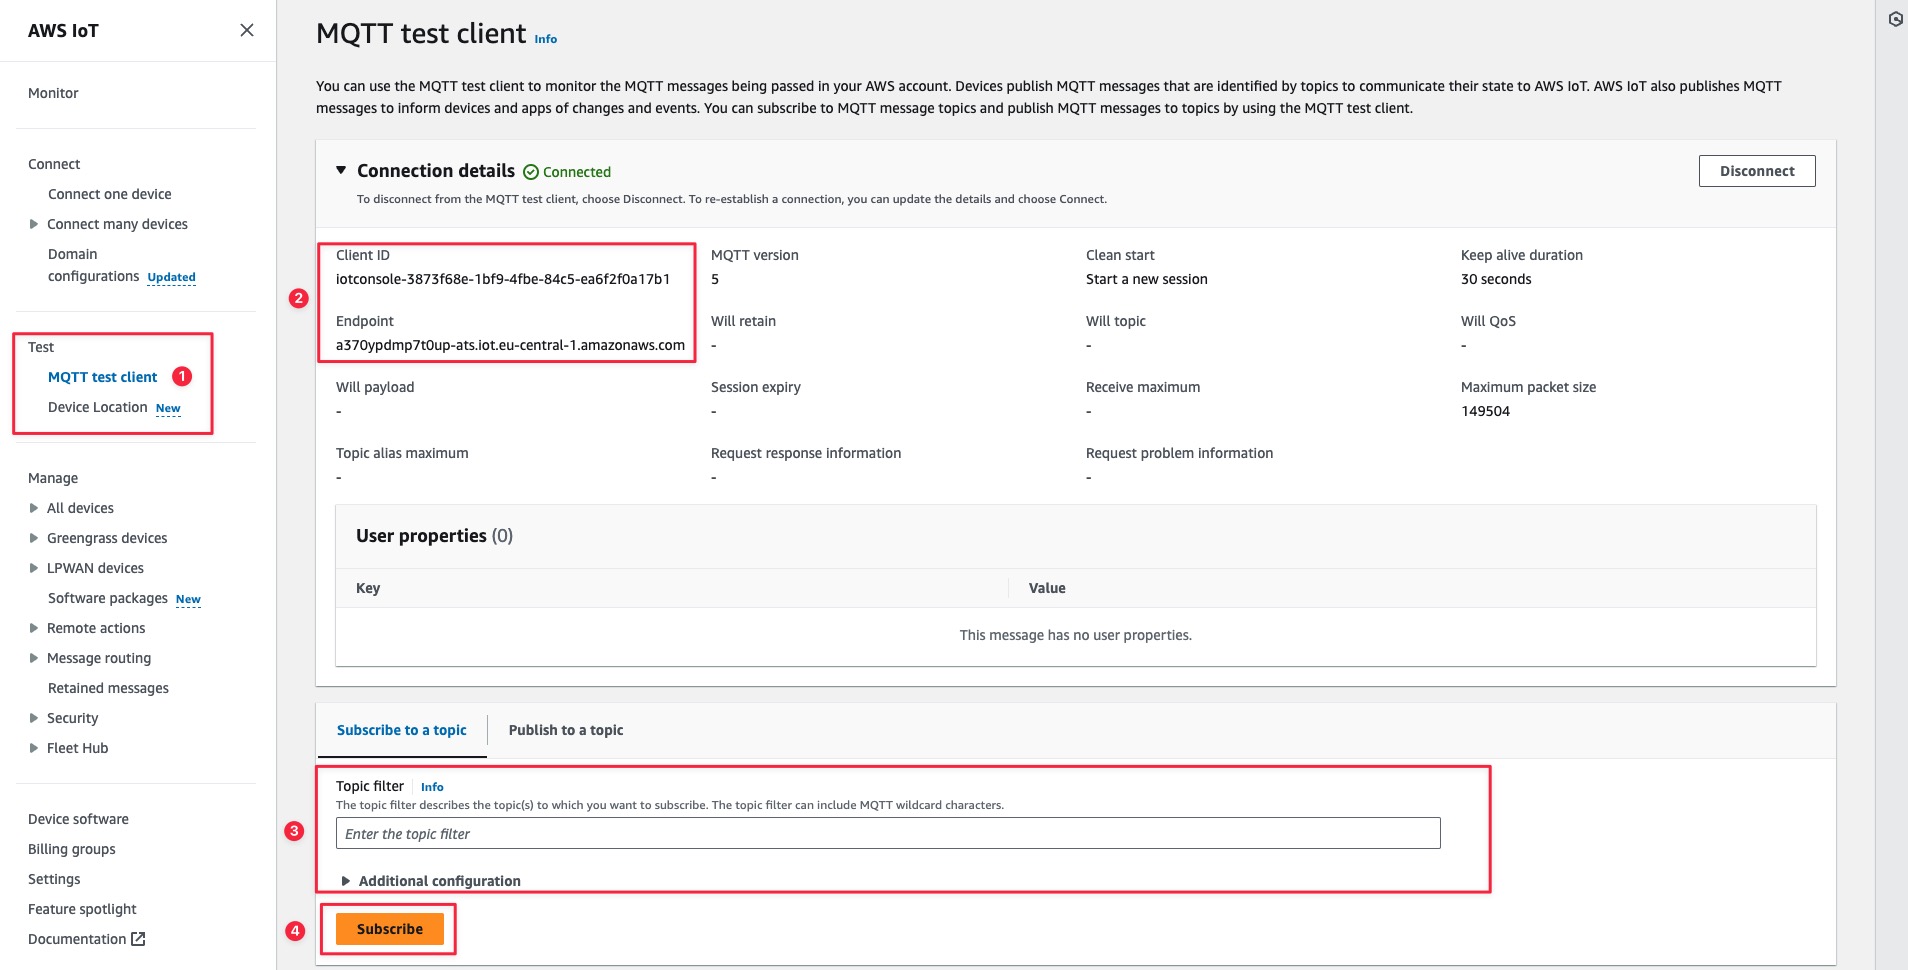
Now navigate to Test > MQTT test client and expand the Connection Details
Write-down the Client ID
Write-down the Endpoint
We will need these two later for the Shelly portion of the guide! Also under Topic Filter enter # and click Subscribe. This will allow us to see all messages coming from the our Shelly Device.
Part 2 - Shelly Setup
Power and Network Configuration for Shelly Device
Connect your Shelly device (e.g., Shelly 1 G3) to power and ensure it is added to your local network.
Ensure that your Shelly device is connected to a network that has access to the internet (WAN). The network must allow outbound connections.
Firmware Update for Shelly Device
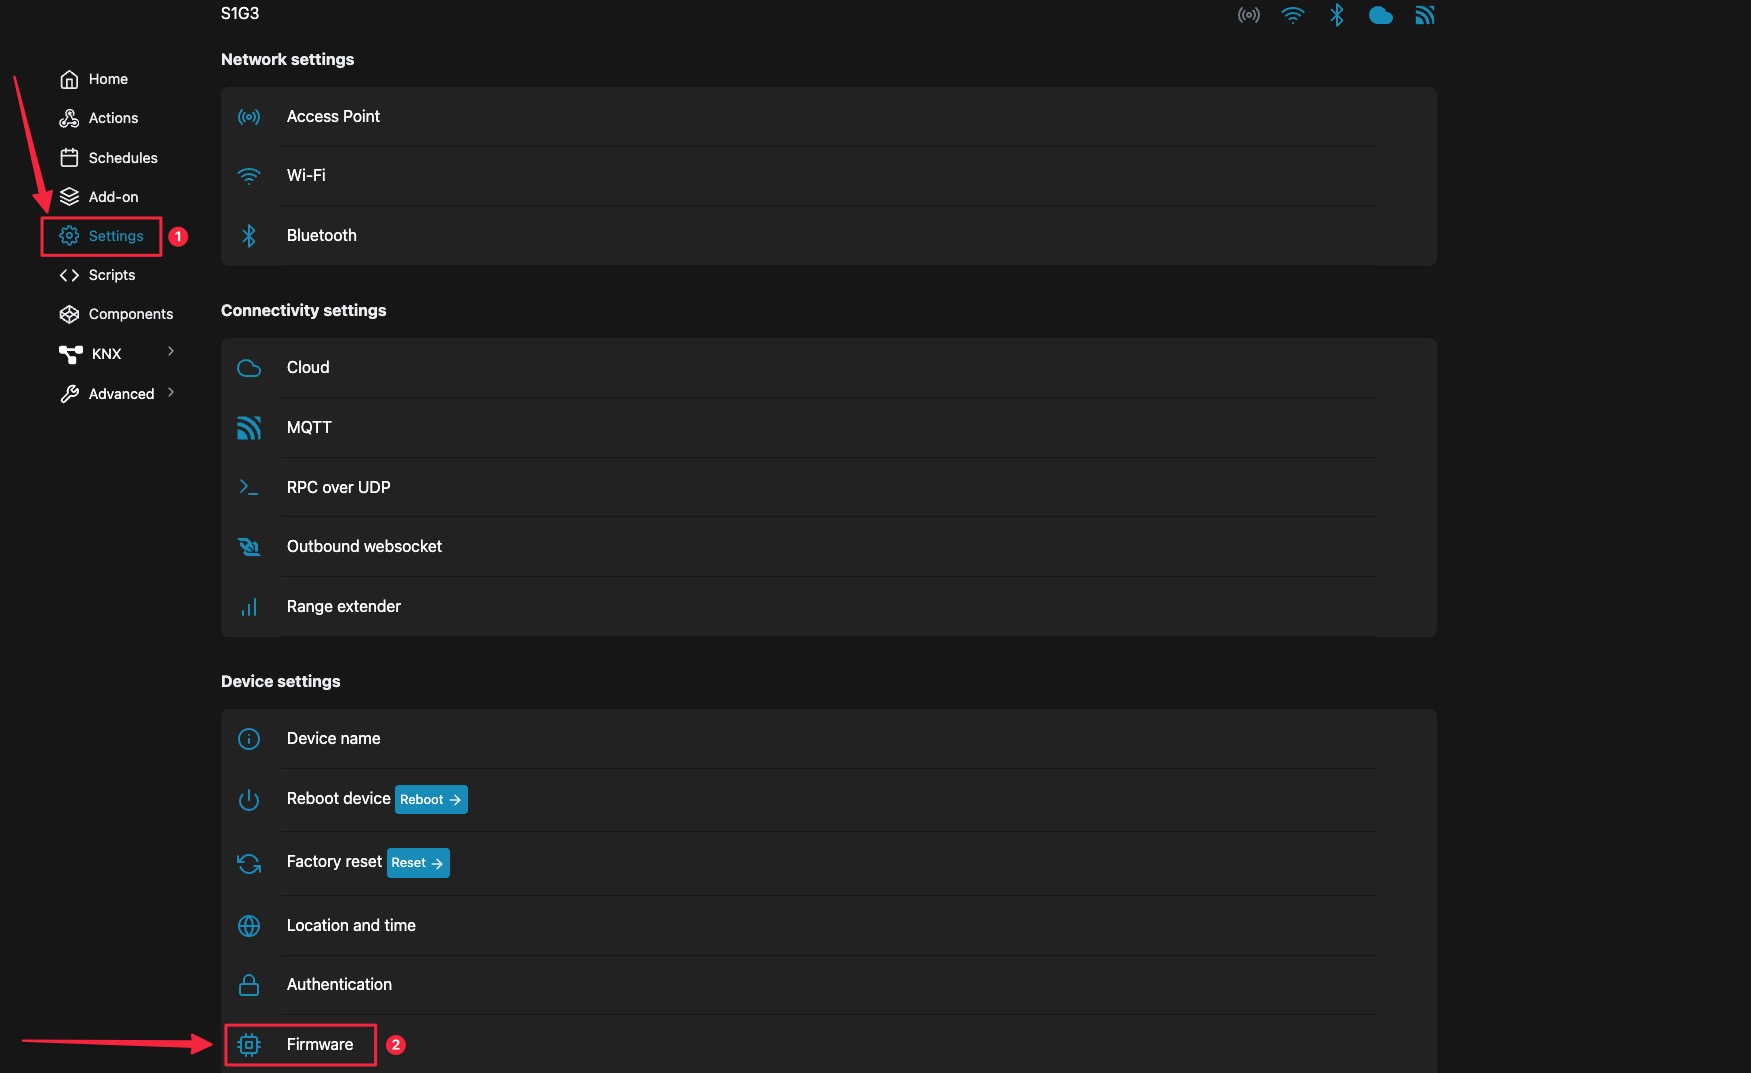
Go to the Shelly device’s web interface.
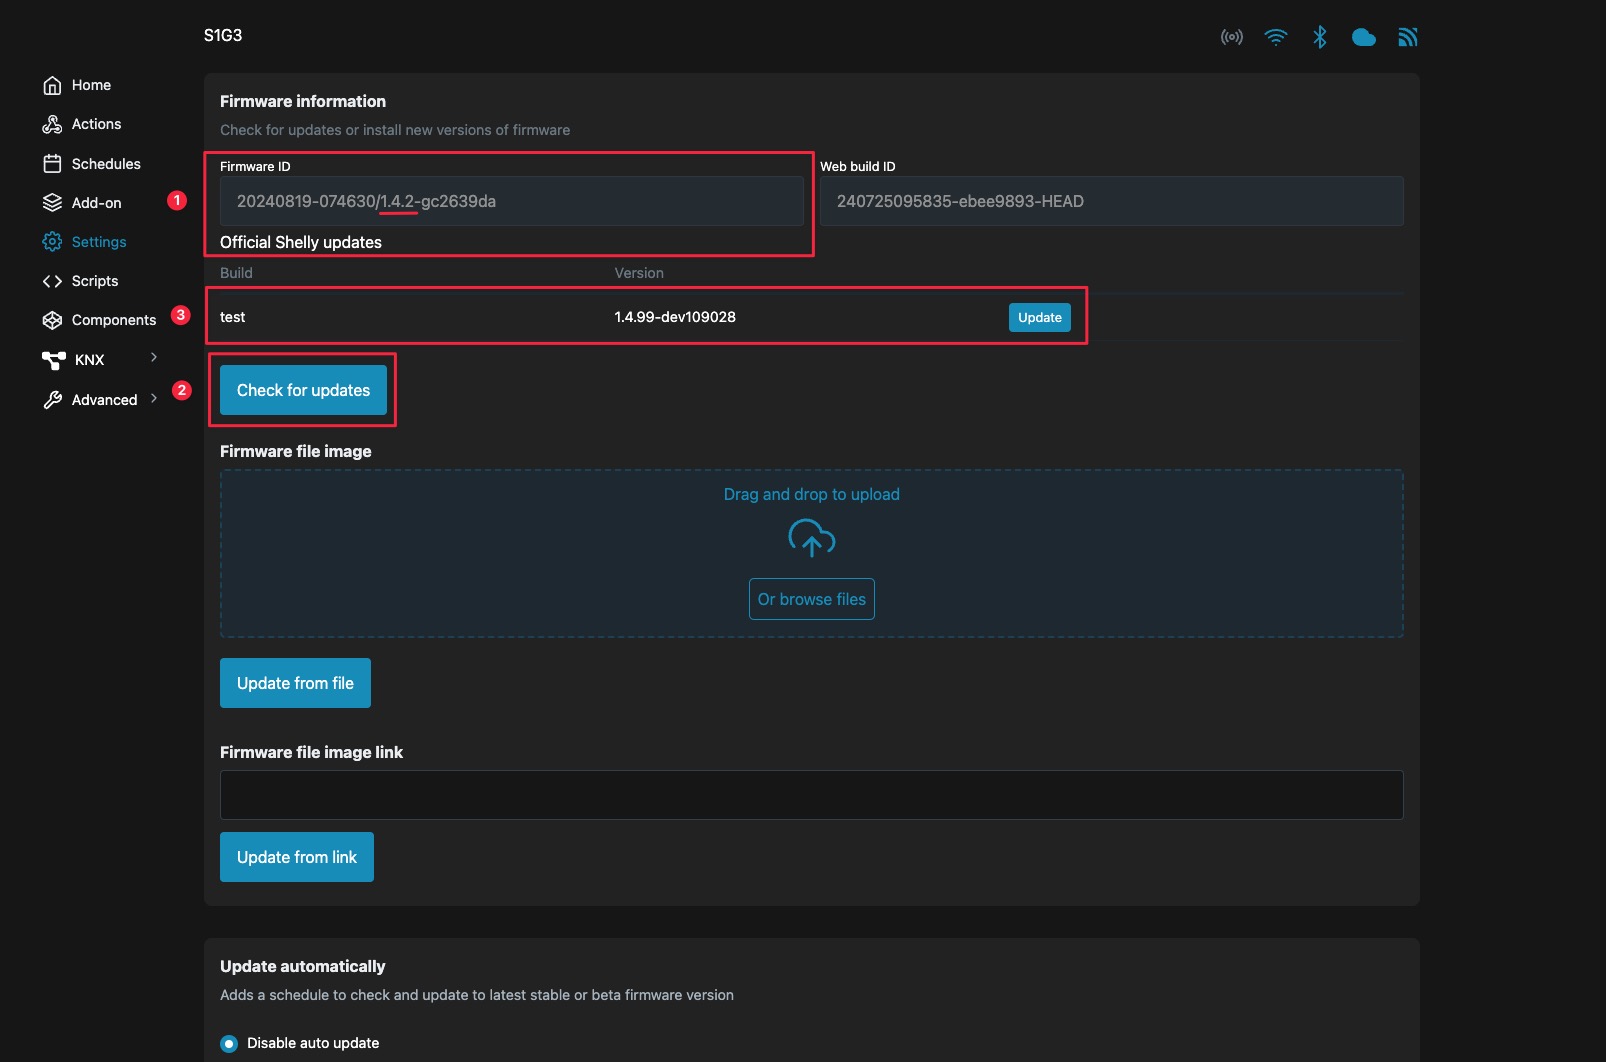
Navigate to Settings > Firmware and ensure your device is running the latest firmware version.
A few things to keep in mind!
The current Stable version is 1.4.2 and we have already installed it. This is visible in the second screenshot on Step 1.
If we want to check for updates, we click
Check for Updatesbutton.If there are any viable results they will be listed as seen on Step 3. KEEP IN MIND THAT TEST AND BETA VERSIONS WILL SHOW UP AS WELL, WE ONLY NEED STABLE!
Test Network Connectivity to AWS IoT Core
Open a terminal or command prompt on a device that uses the same network as your Shelly.
Run a ping test to check network connectivity to your AWS IoT endpoint(you can get the endpoint from the AWS Setup portion of the guide on the last step, remember those values we wrote down? In our case it's):
ping a370ypdmp7t0up-ats.iot.eu-central-1.amazonaws.comIf you receive responses, your network is correctly configured for AWS IoT Core communication.

Configure TLS Settings on Shelly Device
Access the Shelly’s Web interface by entering its IP address in your browser.
Navigate to Settings > scroll down and at the bottom go to TLS Configuration.
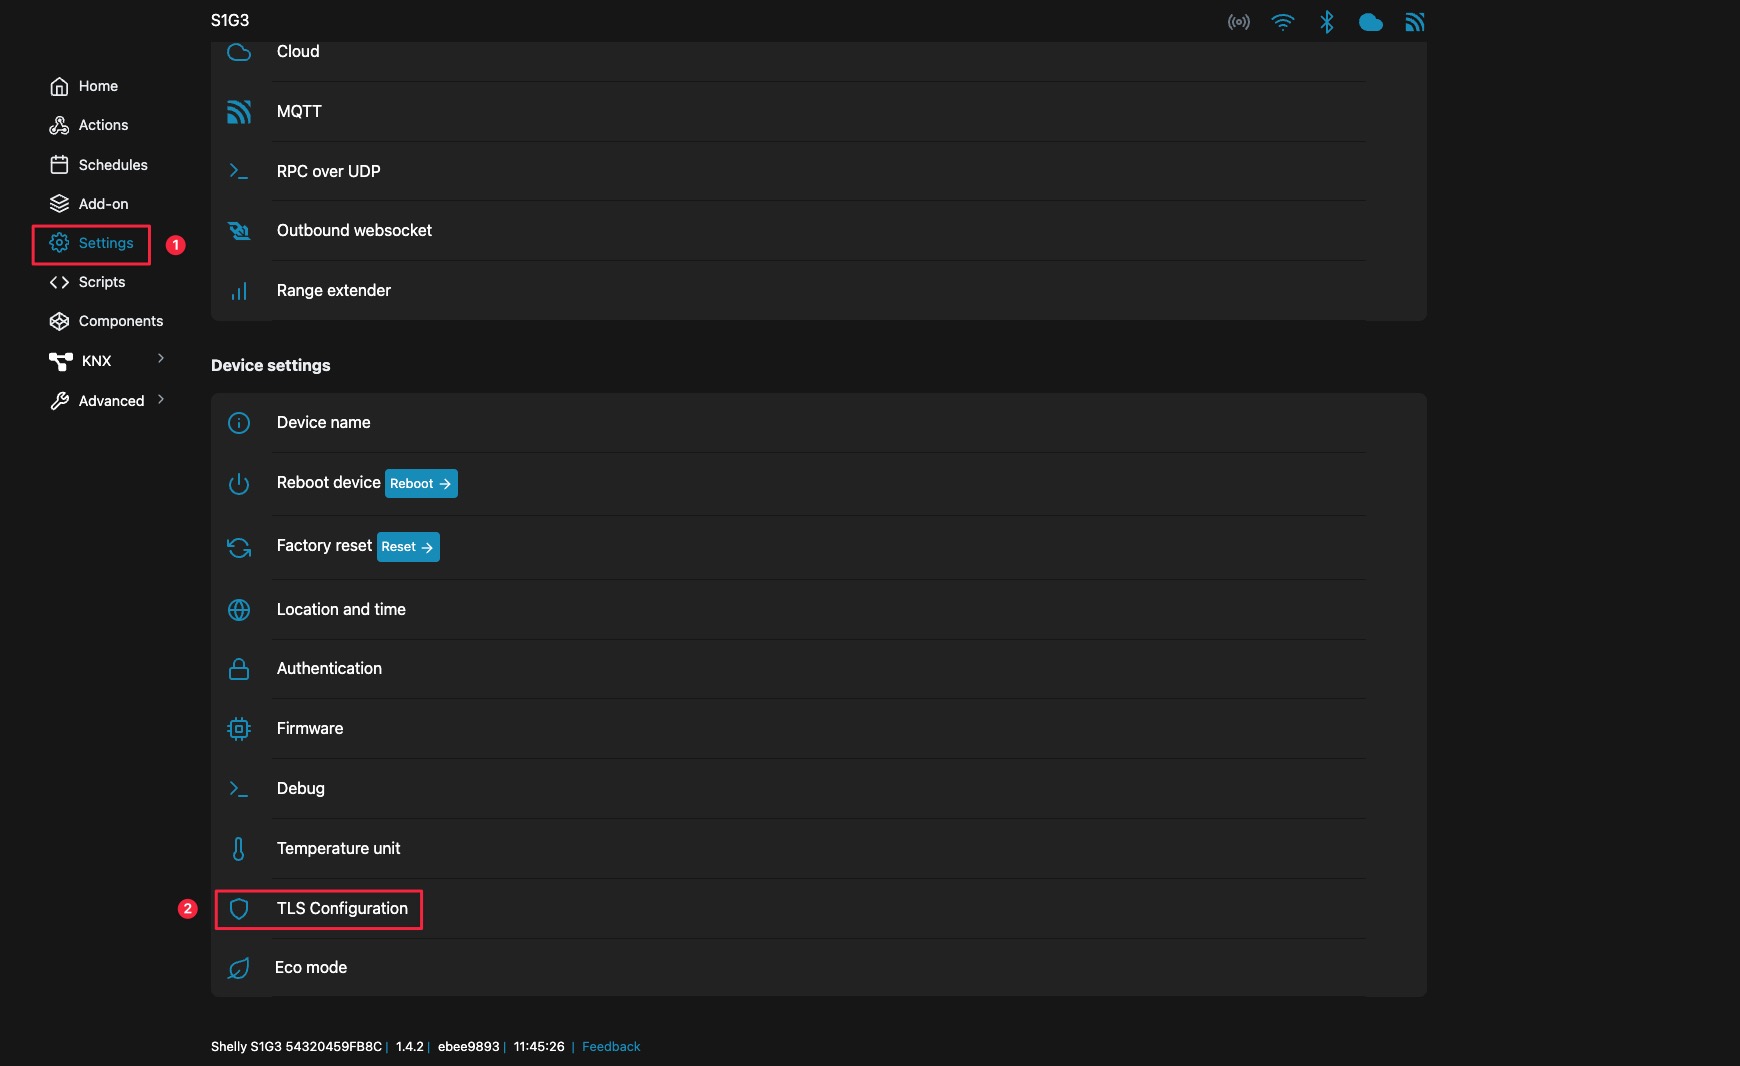
Under TLS Configuration, upload the following certificates which we already downloaded in the AWS Setup portion of the guide.
Please keep in mind that you should upload the certificates in the same order as we show them here from top to bottom:
First is the CA Certificate: Amazon Root CA 1 or however you have renamed it.
Second is the Device Certificate: or however you have renamed it.
Lastly is the Private Key: The private key associated with the device certificate.
Save the configuration by clicking Upload on each certificate individually, you should see Save successful! for each one.
Upload Certificates
Configure MQTT Settings on Shelly Device
In the Shelly interface, go to Settings > MQTT and enter the following values:
Connection Type: Default TLS.
Check all available boxes to enable required MQTT options.
Server: a370ypdmp7t0up-ats.iot.eu-central-1.amazonaws.com (replace with your AWS IoT endpoint, which can be found in the AWS IoT console).
Client ID: The Client ID should be something unique, for example the Device/Thing name. The Client ID is a unique identifier that the MQTT client (in this case, your Shelly device) uses when connecting to the broker (in this case, AWS IoT Core)
Save the configuration and click on the Reboot Now button that will show up in the top right side.
Test the MQTT Connection
After rebooting the Shelly device, return to the AWS IoT Core console.
Navigate to Test > MQTT Test Client.
In the Topic filter field, you have entered # which allows you to subscribe to all topics. The example below show a different topic shelly1g3-54320459fb8c/status/switch:0 which will show only the toggling of the replay.
From the Shelly’s Web interface turn on the relay to publish a message and confirming that the device is successfully connected.
Test Connection
We Value Your Feedback!
Thank you for taking the time to read our article! Was it helpful or interesting?
Your insights can help us improve. We’d be grateful for any feedback. If you have a moment,
please share it with us at the following email:
